
Release Notes for Ipswitch WhatsUp Gold v11
Ipswitch, Inc.
In this File
WhatsUp Gold v11.0.1 Release Notes
Description
Ipswitch WhatsUp Gold v11 is a powerful, yet easy to use network monitoring application. Within several minutes of installing the software, you can:
- Discover devices on your network and add them to the WhatsUp Gold database for monitoring.
- Set up notifications to alert you when a problem is found.
- Generate out-of-box reports to help you analyze your network up time, and response time.
Ipswitch WhatsUp Gold v11 includes a web interface that parallels its console. This allows you to monitor your network from anywhere with Internet connectivity in much the same way that you can from the console. Beginning in this release, the web interface houses all of the WhatsUp Gold full and workspace reports. You can only view reports on the web interface, they are no longer included on the console. While reports are no longer included in the console, they can still be accessed from the console Reports menu.
Ipswitch WhatsUp Gold v11 Premium Edition
The Premium Edition is available for separate purchase. It provides all of the network monitoring capabilities of Ipswitch WhatsUp Gold v11 and extends the product to allow monitoring of applications, including:
- Microsoft Exchange and Microsoft SQL Server. You have the ability to manage the availability of key application services, rather than just the network visibility of the host server.
- General application monitoring using Microsoft's WMI. You can monitor any performance counter and trigger an alarm if the value changes, goes out of range, or undergoes an unexpected rate of change.
New features
Ipswitch's release of Ipswitch WhatsUp Gold v11 includes the following new features and enhancements:
- A new web interface design that includes customizable workspaces and workspace reports.
- Added over 100 new workspace reports, which provide summaries of the data in status, performance and historical reports.
- Improved performance in rendering web interface pages.
- The ability to support IPv6 enabled devices.
- Improvements to the Bulk Field Change function.
- Enhanced Dependency capabilities that allow you to place Dependencies on devices' Active Monitors.
- Development measures to handle non-persistent SNMP instances for Performance Monitors.
- An Active Script Performance Monitor.
- Performance Counters in the engine.
- A database size information has been added to the console under Tools > Database Utilities > Tools > Performance. You can also view the database size indicator icon in the bottom right corner of WhatsUp Gold console application.
- You can now create multiple devices with the same address.
- SQL Server Active Monitor has been updated to support SQL 2005 Windows services.
- Map improvements:
- Map icons no longer shift when a shared icon is deleted.
- You can now click-and-drag multiple map icons.
- Devices are added to maps in more obvious locations.
- Customer feature requests and defect fixes:
- An issue has been corrected that could cause Interface Utilization to fill up the database rapidly.
- Group Access Rights have been improved.
- The capability to back-up the database on an upgrade has been added to the WhatsUp Gold install.
- The capability to turn on the web interface has been added to the WhatsUp Gold install.
- The capability to manually set an interface speed in data collection has been added.
- You now can create device states that last as long as 7 days.
- The removal of an extra zero (0) from the Interface Speed graph.
- The removal of the requirement for users to acknowledge Passive Monitor State Changes.
- Issue was corrected that prevented users from exporting reports or playing web alarms through SSL.
System requirements
Minimum software requirements
- Windows XP Professional SP2 or later; Windows 2000 SP4 Professional or Server; Windows 2003 Server (SP1)
- Microsoft Internet Explorer 6.0 (SP1) and later or Firefox 1.5x and later
- Microsoft Windows Scripting Host v5.6 or later. (Required for the WhatsUp web interface, and to run scripts for the active scripting capabilities within active monitors and actions.)
Windows Scripting Host is installed with the Windows operating system. To verify your version, run
cscript.exeIf you need to update Windows Scripting Host, go to the Microsoft Scripting Site.
Important: To install and activate the e-commerce version of the application on the Internet, you will need an active internet connection.
- Internet connectivity for activation and for running the web interface
Minimum hardware requirements
- Intel Pentium-compatible computers, 550 Mhz or higher (2 GHz or faster recommended)
- 512 MB memory (RAM) (1-2 GB RAM recommended)
- 256 MB of drive space (up to 3 GB additional for MSDE Database and 7200 RPM drive recommended)
Note: This is the requirement for installation. You will need more space for the database. An MSDE database can grow up to the 2 GB limit.
- CD-ROM drive
- Network Interface Card (NIC)
- To use pager, SMS, or beeper actions, a local modem and phone line is required (Ipswitch WhatsUp Gold v11 does not support modem pooling).
- Text to Speech Actions require a sound card configured to use SAPI v5.1, which comes with Windows 2003 and Windows XP operating systems. SAPI v5.1 can be downloaded from the Microsoft Speech site.
MSDE 2000 requirements
- MSDE has a 2 GB data limit, however up to an additional 1 GB may be used for temporary storage. Make sure you select a large capacity drive for data storage.
- File and Print Sharing must be enabled to run MSDE 2000.
To verify that file and print sharing are enabled:
- Select Start > Control Panel.
- On the Control Panel, select Network Connections.
- From the menu bar, select Advanced > Advanced Settings.
- On the Adaptors and Bindings tab, make sure the File and Print Sharing for Microsoft Networks option is selected.
Installing or upgrading
The installation program is similar whether you are installing WhatsUp Gold Standard Edition (or WhatsUp Gold Premium Edition) for the first time or upgrading a previous installation. Steps that apply only to a first-time installation, or only to an upgrade, will be identified as such.
To install or upgrade WhatsUp Gold:
- Log in to an Administrator account.
- Start the installation program:
- If you purchased a WhatsUp CD-ROM, insert the CD-ROM into the appropriate drive. If it does not run automatically, click Start, select Run, then enter the CD path followed by
AutoRun.exeD:\AutoRun.exe - If you downloaded WhatsUp Gold Standard Edition or WhatsUp Gold Premium Edition from our Web site, run the downloaded installation application.
- If you purchased a WhatsUp CD-ROM, insert the CD-ROM into the appropriate drive. If it does not run automatically, click Start, select Run, then enter the CD path followed by
- Read the Welcome screen.
The Welcome screen recommends that you disable any running antivirus software, estimates how long it takes to install the application, and displays a button that, when clicked, displays the release notes.
If you have an activation key, click Activate and follow the on-screen instructions to activate the product.
If you do not have an activation key, the setup program installs a trial version of the software that expires in 30 days, if not activated. After completing the installation, each time you start the application, you will have an opportunity to purchase a key, as described in Activating the WhatsUp Application in the application Help.
Click Next to continue.
- Read the license agreement. Select the appropriate option, then click Next.
- Select the default install directories for MSDE 2000, then click Next (For first-time installation only.)
Note: If you want to customize your database setup, you need to first complete the installation, then manually configure your database as described in Alternative Database Setups in the application Help.
The application and data files will be installed in default directories. If you want to change the locations, click the browse buttons to find and select a different directory.
Important: Make sure that you have a large capacity drive selected for data storage. Data files can grow up to the 2 GB MSDE limit.
- Select the installation directory for the WhatsUp application files. (For new install only.)
The default path is
C:\Program Files\Ipswitch\WhatsUp - Choose whether to backup your current WhatsUp Professional database. (For upgrade installation only.) We strongly suggest that you do this!
- Choose how to handle existing Web and Report files. (For upgrade installation only.)
If you have previously installed WhatsUp Gold, you may already have Web and Report files stored in your installation directory. You can choose to either delete them or back them up during the install. Backup is recommended.
- If a sound card is installed and it has SAPI-compatible drivers, the install program asks whether you want to install Text to Speech capabilities. If you select No, you can always return and install Text to Speech at a later date.
- Choose whether to enable the web server during install and enter a port for this installation.
Note: This dialog will not be displayed during an upgrade if you have already enabled the WhatsUp web server in an older version of WhatsUp.
- Click Install to install the WhatsUp Gold application files. WhatsUp Gold gives you the option to go back and change options or cancel prior to completing the installation.
Important: When you use an alternative database setup, you will need to run the database upgrade scripts when installing a new release of WhatsUp Gold. The installation program will warn you if it detects a non-default database. For information on running the upgrade scripts, see Upgrading the Database Schema in the application Help.
- Make your selections, then click Finish.
If you choose to launch now, the next screen asks you to activate the application. For more information, see Activating the WhatsUp Application in the application Help.
After the activation screen, you are introduced to the Discover Devices wizard, which lets you set options on how to discover your network. If you choose to postpone these steps, click the Cancel.
MSDE information
An MSDE 2000 Release A installation will fail if the following security policy is set to Do not allow installation:
The Unsigned non-driver installation behavior local security policy for Windows 2000
If you use the Do not allow installation setting, you must change it to Silently succeed before installing MSDE 2000 Release A. If necessary, you can return the policy to its previous setting after the installation is complete.
Note: Do not allow installation is not the default setting for these security policies.
To set these policies:
- Select Start > Control Panel.
- Select Administrative Tools.
- Select Local Security Policy.
- Expand the Local Policies folder and select Security Options.
- Ensure that the following option is set to Silently Succeed:
- For Windows XP and Windows 2003: Devices: Unsigned driver installation behavior
- For Windows 2000: Unsigned driver installation behavior
Microsoft Data Access Components
MSDE 2000 Release A includes updates to Microsoft Data Access Components (MDAC). When you install MSDE Release A, MDAC 2.7 SP1a is also installed, unless the installation wizard Setup detects the same version or a newer version of MDAC.
For more configuration information
Refer to the KB
article or the readme.txt file in the DB
Scripts folder in WhatsUp Gold for more information on how to configure Ipswitch
WhatsUp Gold v11 to work with Microsoft SQL Server or other instances of MSDE
2000.
To access the DB Scripts folder:
- From the drive where Ipswitch WhatsUp Gold v11 is installed on your computer, navigate to your Program Files folder.
- From the Program Files folder, select
\Ipswitch\WhatsUp.
For more information on manually upgrading the database from WhatsUp Professional 2006 to Ipswitch WhatsUp Gold v11, see the DB_Upgrade.txt file in the \DB Scripts\Upgrade Scripts folder.
Visit the Ipswitch Knowledge Base for the most up-to-date version of these files.
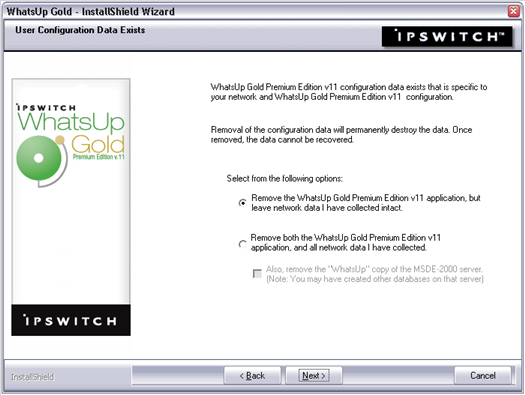
Uninstalling Ipswitch WhatsUp Gold v11
To uninstall Ipswitch WhatsUp Gold v11:
- Select Start > Settings > Control Panel, then select Add or Remove Programs.
- Select Ipswitch Ipswitch WhatsUp Gold v11.
- Select Remove.
You can also run the Ipswitch WhatsUp Gold v11 executable, then select Remove.
The following dialog shows the uninstall options:
Migrating configuration information
The WhatsUp Gold Data Migration utility migrates data from WhatsUp Gold 7 or 8 into Ipswitch WhatsUp Gold v11. The following list of items is migrated with this utility:
- Maps
- Service definitions
- Events library definitions
- Notification library definitions
- Custom device type definitions
- Trap definitions
Before you use the migration utility, we recommend that you back up your WhatsUp Gold database, using Back Up SQL Database (in Tools > Database Utilities).
To start migration, select Tools > WhatsUp Gold Migration Utility and follow the directions provided by the migration utility wizard.
You can run this utility at any time during the operation of WhatsUp Gold, and can be run multiple times. When you run the utility, imported maps and devices will be duplicated each time, but duplicate definitions are not imported or updated. If XYZ exists in the database, XYZ is ignored, even if the definition was updated in WhatsUp Gold.
Note: The migration results may not map directly to the terminology and dialogs you've seen in WhatsUp Gold 7 or 8, as Ipswitch WhatsUp Gold v11 uses different terminology and work flow.
Note: When the migration utility is run, items added to the database begin polling, even if the migration wizard has not been completed.
Application notes
WhatsUp Gold uses Windows Management Instrumentation (WMI) to monitor and restart NT Services. For each device that is assigned an NT Service Active Monitor, you must supply the Windows credentials. Also, when creating a Service Restart Action, you must supply Windows credentials for each Action. Credentials must have administrative permissions on the remote server. Local accounts with credentials that match remote accounts are no longer required to monitor remote servers.
Credentials are configured in the WhatsUp Gold Credentials Library and used in several places throughout WhatsUp Gold. They can also be associated to devices in Device Properties > Credentials, or through Bulk Field Change for Credentials.
The use of WMI could have some implications if target devices are behind a firewall. To successfully monitor and/or restart NT Services, you need to modify firewall settings so that:
- The RPC port (135) is open for connections.
- The DCOM port range is defined and open for connections.
In some cases, WMI monitors are known to report false negatives, in that a service is shown as down when it is in fact up. It may help if you increase the length of your RPCPingTimeout registry value.
To edit the RPCPingTimout registry value:
- Go to Start > Run > Regedit.exe
- From the Registry Editor go to:
HKEY_LOCAL_MACHINE\SOFTWARE\Ipswitch\Network Monitor\WhatsUp Engine\2007\Settings - Within the Settings folder, select RPCPingTimeout and right-click. From the right-click (context) menu, select Modify.
- In the Edit DWORD Value dialog, enter in a new value for the timeout (in milliseconds) and click OK.
Important: The default timeout is 5 seconds. We strongly recommend that you do not exceed a timeout of 30 seconds.
After making any changes to the registry, you need to restart the WhatsUp Engine.
To restart the WhatsUp Engine:
- Go to Control Panel > Administrative Tools > Services.
Select Ipswitch WhatsUp Engine from the list of services and select Restart from the left side of the dialog.
Known issues
- The Telnet protocol handler is disabled by default in Microsoft Internet Explorer 7. In order to use the Telnet tool in WhatsUp Gold, you need to re-enable the Telnet protocol.
To re-enable the Telnet protocol:
- Click Start > Run. The Run dialog box opens.
- In the Open box, enter:
Regedit - Go to the following key:
HKEY_LOCAL_MACHINE\SOFTWARE\Microsoft\Internet Explorer\Main\FeatureControl - Under the
HKEY_LOCAL_MACHINE\SOFTWARE\Microsoft\Internet Explorer\Main\FeatureControl,FEATURE_DISABLE_TELNET_PROTOCOL - Add a
DWORDiexplore.exe0 - Close the Registry Editor and restart Microsoft Internet Explorer 7. The Telnet protocol is enabled.
- There is a payload limitation for SNMP, Syslog Passive Monitors, and Windows Event Log Passive Monitors.
Passive Monitor payload limitation
It is important to note that Passive Monitors have a payload limitation of 3 KB for both WMI, SNMP, and Syslog Passive Monitors.
This could cause a couple of things to take place:
- A payload to not show up in a trap or event log when expected.
- An assigned action to fire with no payload that sends a blank email if you are trying to grab data from the payload.
- Shortcuts created for the 2006 web interface may not work with the Ipswitch WhatsUp Gold v11 web interface. You may need to update the WhatsUp Gold shortcut URL. To do this, connect to
http://whatsup-computer-ip-address-or-hostname:port/and create a new shortcut. - Any recurring reports created prior to Ipswitch WhatsUp Gold v11 needs to be recreated to use the updated URL format.
- If you use IIS for your web server for the WhatsUp Gold v11 web interface, you need to change the path of the NmConsole virtual directory. The new path is
<installation directory>\HTML\NmConsole\. For more information, see Configuring the web interface to use IIS in the application Help.
Stopping services before installing MSDE 2000 Release A
You can install MSDE 2000 Release A without shutting down services. If you do not shut down services, the WhatsUp Gold setup will attempt to shut down the following services prior to MSDE installation. The setup will attempt to restart the services following installation. You should confirm that all services restarted following MSDE 2000 installation. You may be prompted to reboot the computer when Setup is complete. Without rebooting, the following services will fail to start:
- Microsoft Component Services
- Microsoft Message Queuing
- Microsoft COM Transaction Integrator
You can reduce the possibility of having to restart your computer after installing MSDE 2000 Release A by stopping these services and applications before running Setup.
You can also try manually installing MSDE and then install Ipswitch WhatsUp Gold v11. For more information see the Knowledge Base article, How to manually install MSDE.
Note: Only default instances will be upgraded by the install.
Potential installation errors
- MSDE 2000 installation failure with
1639error code.
There are several potential causes for this error:- Ensure that all prerequisites listed above has been met:
- File and printer sharing enabled
- Server service is started
- Local Securities Policies set, etc.
- A previous install of MSDE 2000 failed or was removed. The MSDE install does not completely clean up behind itself, and Microsoft recommends manual clean-up prior to re-installation. For more information, refer to the Microsoft article How to manually remove a Microsoft SQL Server 2000 Desktop Engine (MSDE 2000) instance.
- DO NOT Use Terminal Services or Remote Desktop for the installation.
- Check other Services that may be running and Stop the Service during the install operation. These services include:
- Microsoft SQLServerAgent (for the "WhatsUp" instance)
- Microsoft COM Transaction Integrator
- Microsoft Distributed Transaction Coordinator (MS DTC)
- Microsoft Message Queuing
- Microsoft Search
- MSSQLServerOLAPService
- Ensure that all prerequisites listed above has been met:
- If there was a previous, non-default installation of WhatsUp Gold or WhatsUp Professional that has been removed, a "WhatsUp" Data Source (DSN) may still exist.
- Remove the WhatsUp DSN and allow the install to configure a default database, or upgrade an existing "WhatsUp" database residing on the WhatsUp MSDE 2000 instance.
New to this release
The following issues have been resolved within v11.0.1:
- Fixed an upgrade issue from WhatsUp Professional 2005 that caused device type icons not to display.
- Fixed an issue that caused Recurring Reports to display an "Unsupported Browser" message when using a URL other than "localhost" or 127.0.0.1.
- Fixed an issue which prevented devices from entering scheduled maintenance windows at the correct time.
- Fixed an issue which prevented devices from exiting a schedule maintenance window if the Ipswitch WhatsUp Engine service was restarted during the maintenance window.
- Fixed a memory leak in the web interface's full reports. This affected IIS as well as NMWebService.exe.
- Fixed an issue which prevented utilization graphs from displaying when installed on a non-English version of Windows.
- Fixed an issue which prevented NT Service Active Monitors from working correctly if they were created in the web application.
- Redesigned upgrade scripts to improve database upgrade speed and resource usage from WhatsUp Professional 2006 to a WhatsUp Gold v11 upgrade.
For more information
Following are information resources for Ipswitch WhatsUp Gold v11. This information may be periodically updated and available on the WhatsUp Gold support page.
- Release Notes. The release notes, located in the Start > Programs > Ipswitch WhatsUp Gold v11 > Release Notes, provide an overview of changes, known issues, and bug fixes for the current release. The notes also contain instructions for installing, upgrading, and configuring WhatsUp Gold.
- Application Help for the console. Contains dialog assistance, general configuration information, and how-to's that explain how to use the features. The Table of Contents is organized by functional area, and can be accessed from the main menu or by clicking Help.
- Application Help for the web interface. Contains dialog assistance, how-to's that explain how to use features, table of contents, index, and search. Click ? to access the Help.
- Getting Started Guide. Provides an overview of Ipswitch WhatsUp Gold v11, information to help you get started using the application, the system requirements, and information about installing and upgrading. To view or download the Getting Started Guide, go to the Ipswitch Web site.
- User Guide. This guide describes how to use the application out-of-the-box. It is also useful if you want to read about the application before installing. To view or download the User Guide, select Help > WhatsUp Gold User Guide or go directly to the guide on the Ipswitch Web site.
- Translation Guide. This guide describes how to use the translation features to create a localized version of the WhatsUp Gold web interface. To view or download the Translation Guide, go to the Ipswitch Web site.
- WhatsUp Gold Forum. Provides a resource for you to interact with other WhatsUp Gold users to share helpful information about the application.
- The Ipswitch Knowledge Base. Search the Ipswitch Knowledge Base of technical support and customer service information.
**We respectfully dedicate this release to the memory of our dear friend Veronique Gowdy.**
