![]()
![]()
![]()
![]()
|
|
|
|
|
Step 1
Ensure that you have the SMTP component installed in your local IIS server. When installed correctly, you should see a Default SMTP Virtual Server node in your IIS administration window under the local machine. If you do not have the SMTP component installed, or do not have IIS installed, you will need to install them through the Add/Remove Windows Components option of the Add/Remove Programs window, which can be found in the Control Panel.
Step 2
Open up the properties window of the SMTP service by right-clicking on the SMTP service node and selecting Properties. In the properties window, select the Access tab. In the Access tab, open the Connection Control window by clicking on the Connection button in the Connection Control section. Restrict access to the SMTP server by selecting the Only The List Below option and adding the localhost IP address 127.0.0.1 to the access list. Click OK to exit the window.
Step 3
In the Access tab, open the Relay Restrictions window by clicking the Relay button in the Relay Restrictions section. Restrict relay access to the SMTP server by selecting the Only The List Below option and adding the localhost IP address 127.0.0.1 to the access list. Make sure the Successful Authentication Relay option is turned off. Click OK to exit the window.
Step 4
In the Properties window, switch to the Messages tab. In the Messages tab, turn off all the message limits.
Step 5
In the Properties window, switch to the Delivery tab. In the Delivery tab, change the default delivery intervals and timeouts to smaller values. Recommended values are shown in the image below.
Step 6
In the Delivery tab, open the Advanced Delivery Options window by clicking the Advanced button. Set the Fully Qualified Domain Name setting to the name of your MOVEit Automation server. Set the Smart Host setting to the name of your main SMTP server. Click OK to exit the window. Configuration of the SMTP server is now complete. Click OK in the Properties window and make sure the SMTP service is started.
Step 7
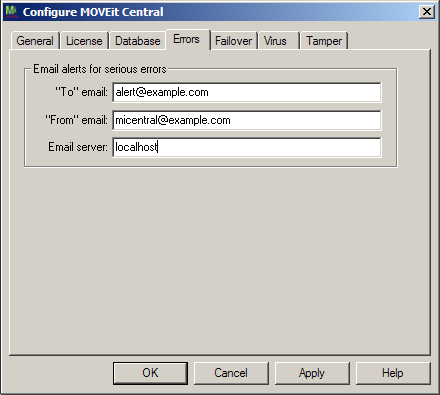
The final step is configuring your Central server to use the new local SMTP service. First, open the MOVEit Automation Config program (Start -> Programs -> MOVEit Automation) and switch to the Errors tab. Enter localhost as the "Email server" value. Click OK to exit the Config program. The change should happen immediately; no restart is required.
Next, sign on to the Central server using MOVEit Automation Admin and switch to the Hosts tab. If you have an SMTP host configured for your outgoing email server, open it by double-clicking the host entry and change the Host value to localhost. Remove any authentication values as they will not be needed.
Tuning
You will probably want to tinker with the "outgoing connection limit" (default is 1000) if one of your goals is to keep MOVEit Automation from overloading your "real" mail server. (Typical "throttled" values are from 1-5.) To alter this setting, open the SMTP properties, go to the "General" tab and open the "connection" dialog.
Finished
Your local SMTP relay server should now be set up, and your MOVEit Automation server configured to use it. If you have any questions about or problems with this process, please contact the MOVEit technical support department for additional assistance.
Repeat on Each Node if Running MOVEit Automation Failover
If you are running MOVEit Automation Failover, you must repeat this procedure on each node in the cluster.