IN THIS PAGE
v2021.1 (13.1) on Azure Marketplace
Why MOVEit?
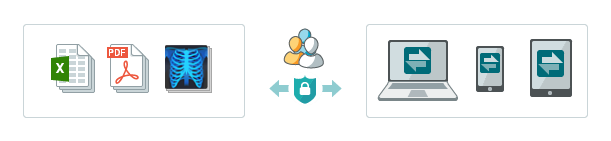
MOVEit Transfer keeps important files and data secure at rest and secure in transit. MOVEit is ideal when people and workflows handle data that requires integrity checks, audit trails, or compliance with robust policies and controls that help ensure confidentiality.
Check the Release Notes on our documentation portal to learn about new features and fixes added to this version of MOVEit Transfer.
Some example use cases of MOVEit include:
- Business-critical content.
- Patient, employee, and customer data.
- Signal (voice) or image (picture and video) content that includes PII (personally identifiable information).
- Valuable predictive analytics or machine learning models (or similarly monetized content).
- And much more…(Any content or information that needs an audit trail and integrity checks when transferred or accessed!)
MOVEit on Azure
MOVEit Transfer in Microsoft Azure Marketplace allows you to quickly deploy a fully-functional MOVEit Transfer Managed File Transfer solution with the convenience, elasticity, and extensibility of the Microsoft Azure Cloud.
Eval Now, Buy Later
Initially, you can use the virtual machine for evaluation purposes (the first 30 days are free of software licensing charges). You can use it for production purposes at any time if you buy a license.
Searching for MOVEit products in Azure Marketplace
Leverage Azure Blobs for File Storage
You can use Azure Blobs for your MOVEit Transfer filestore. Consult the MOVEit Transfer Adiministrator Guide for help configuring this feature.
Leverage SQL Azure for Database Storage
For your fully auditable, Managed File Transfer (MFT) database you can use Azure SQL. You can learn about configuration and migrating to Azure SQL in the Administrator Guide.
Platform and System Requirements
You will need a Microsoft Azure account and the ability to Remote Desktop from your desktop or a VM or host that you have access to.
Windows Azure Requirements
Microsoft Azure Subscription |
You need a Microsoft Azure Subscription. Note that although we do not charge any fees during the evaluation, Microsoft will charge this subscription for the Azure resources you use, such as compute and storage. Get your free Azure subscription here. |
Remote Desktop |
Once you deploy your MOVEit Transfer for Microsoft Azure, you will need to be able to Remote Desktop to your VM to run the Web UI (localhost) and the Configuration Utility (Win 32 application). You will need a Remote Desktop Client, such as the Remote Desktop client built into Microsoft Windows. |
Updating Your Azure VM |
After you deploy MOVEit Transfer, it is best practice to update the VM image running in Azure. |
MOVEit Transfer System Requirements
To successfully configure an instance of MOVEit Transfer from the Azure Marketplace, you need:
Azure Role |
An Azure User with an Azure Role capable of provisioning Azure VMs and creating new resource groups. You will need to provide the credentials for this user before you purchase/deploy the VM. |
SMTP Relay |
An SMTP email server capable of accepting outbound email from virtual machines running in Azure. Various third-party vendors provide SMTP services, and some, including SendGrid and socketlabs.com, offer free accounts for low-volume usage. See the section below for how to set up a free SendGrid account. Note You can also configure your MOVEit instance to use a specific SMTP server after you deploy. See the section on the DMZ Config Utility in the MOVEit Transfer Administrator Guide for details. |
Licensing
MOVEit Transfer solutions launched from the Azure Marketplace are automatically provisioned with a MOVEit Transfer evaluation license that expires 30 days from the deployment date. After that license expires, you will be unable to use MOVEit Transfer until you purchase a license from Progress Software Corporation. If you purchase a license, it can be installed into the running VM at anytime and takes effect immediately.
Deploy MOVEit Transfer on Azure
Configure and deploy an instance of MOVEit Transfer from Microsoft Azure Marketplace.
Deploy MOVEit Transfer to Azure
Use the instructions that follow to deploy your MOVEit Transfer host on Azure.
1. Sign on to the Microsoft Azure Portal. |
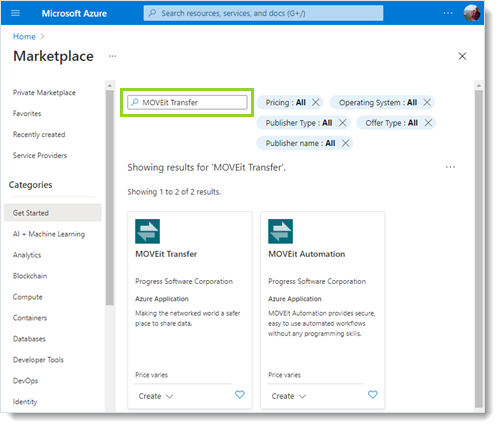
2. From your Home page in Azure, click on Marketplace and search on MOVEit or use the URL provided in your invitation email. Search and Select MOVEit from Microsoft Marketplace
|
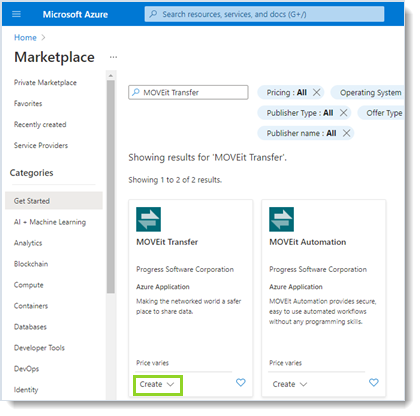
3. Click on MOVEit Transfer, and at the MOVEit Transfer welcome page, click MOVEit Transfer Deployment Wizard
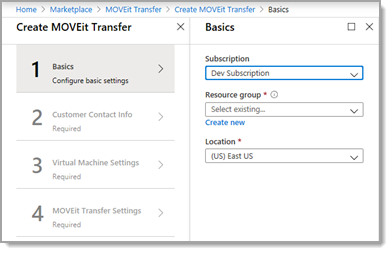
Note: Required fields in the Create MOVEit Deployment Wizard are marked with a red asterisk (*). |
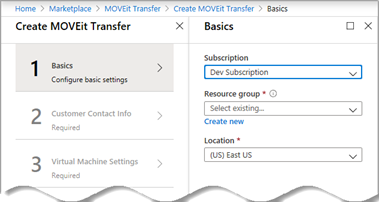
4. Follow the wizard and populate the required fields to configure and deploy your instance of MOVEit. Note: Default VM and sysadmin password requirements are specific to Azure and must be at least 12 characters long. Provide Values for the Required Fields
Provide values for the deployment wizard using the following guidelines. Required fields not mentioned here can be left as default or populated with information you choose.
|
5. Click Purchase to accept the privacy policy and deploy your MOVEit Transfer instance. It can take several minutes for your MOVEit transfer instance to be created. Check your Azure Portal notifications for current status. |
Set Up and Try Out Your MOVEit Instance
Initially, your MOVEit Transfer system has only an all-powerful "sysadmin" user, which is used only for system-wide configuration. Your first steps after deploying the VM involve signing on as this user to create an "organization" for daily use. Organizations (also called "Orgs") are functional boundaries of MOVEit Transfer where specific teams, business units, or users of a specific policy level operate.
Step |
Description |
1. |
Connect to the VM from your local machine using Remote Desktop.
|
2. |
Open a browser and sign on to MOVEit Transfer Web UI using the Sysadmin credentials. (If you just installed, you might need to wait a few moments for IIS to step through its startup cycle.) Note: A warning displays and describes an untrusted certificate (for now you are using the autogenerated certificate). You can continue. A sign-on page displays.
|
|
Finally, you can consult the Quick Start section of the MOVEit Transfer Release Notes. (You can perform these tasks by way of the MOVEit Transfer Web UI.)
|
Further Steps
Connecting to WebUI as Non-Sysadmin User
Subsequent use of MOVEit Transfer can be done from remote computers to the IP address of the Azure VM, via a web browser and a URL like https://203.0.113.8. The IP address is the same as the one you used with Remote Desktop.
Getting Help
For full information on how to use MOVEit Transfer, consult the online manual. To view the manual, select the Help view available on every page of the MOVEit Transfer WebUI after you sign-on to MOVEit Transfer.
Getting Help and Support Information Using the WebUI

Create a SendGrid Email Account (Optional)
You can use your Azure account to create a third-party email server account suitable for evaluation use with MOVEit Transfer on Azure. MOVEit Transfer uses email as a way to notify users of upload events, download events, and more.
These instructions for the SendGrid email system show a convenient way to provide an SMTP service for MOVEit Transfer, but MOVEit Transfer on Azure will work with any email system with access to your MOVEit Transfer on Azure instance. For more information on how to connect MOVEit Transfer to SNMP, see the MOVEit Transfer Administrator Guide.
Create a SendGrid Account
- In the Azure portal at https://portal.azure.com choose the + (New) at the upper left to create a new resource.
- Type SendGrid Email Delivery into the search box.
- Choose SendGrid Email Delivery.
- Choose Create.
- On the "Create a New SendGrid Account" page, provide:
- Name: Enter an arbitrary name. This will not be the account name; see below.
- Password: Confirm Password: Enter the desired SMTP account password
- Subscription: Accept the default
- Resource Group: It is recommended that you create a new resource group, and give it a unique name
- Pricing tier: Choose a service level. Note that when subscribing to SendGrid from Azure, there is a free level.
- Contact information: Enter the required contact information
- Legal terms: read the legal terms and choose Purchase
- Choose Create to deploy the service.
Once deployment is complete, in the portal, navigate to the account you created. You can search for the resource by name using the Search resources search box.
- In the account, choose Configurations.
- The SMTP username is given under USERNAME. Choose the Click to copy control to copy this long string to your clipboard.
Apply SendGrid Email Settings to the MOVEit Transfer Server
When configuring MOVEit Transfer's email settings in the Marketplace, use the following values:
- SMTP hostname: smtp.sendgrid.net
- TCP port of SMTP server: 587
- SMTP username: the username you copied from the Configurations section.
- SMTP password: the password you entered when deploying the SendGrid account.
Tips and Troubleshooting
This section includes tips for checking the state of your MOVEit Transfer Azure deployment.
Diagnosing Email Server Issues
Checking the End-to-End SMTP Service
You can check the local MOVEit Transfer SMTP service with the following PowerShell one liner directed at the local SMTP server:
Send-MailMessage –From myuser@example.org –To myOtheruser@contoso.com
                 –Subject “Test Email” –Body “Test Email (body)”
                 -SmtpServer mylocalsmtpserver -SmtpServer
—Where mylocalsmtpserver is the hostname of the local service (typically "localhost").
Checking the Remote SMTP Service
You can check the destination SMTP service that MOVEit Transfer sends to using a PowerShell session and the following syntax:
Send-MailMessage –From myuser@example.org –TomyOtheruser@contoso.com–Subject “Test Email” –Body “Test Email (body)”
-Credential (GetCredential) -SmtpServer mysmtpserver -Port 587
--Where mysmtpserver is the name of the remote server (for example,“smtp.sendgrid.net”).
--And where Get-Credential will prompt you for the credentials for the user configured with the remote SMTP service.
Note: Well-known TCP port settings for mail servers are 587 or 25.
Examine Log Files
Email-related log files can be found in C:\Windows\System32\LogFiles\SMTPSVC1. This directory contains a series of log files, one per day.
- Lines containing the local hostname (MOVEitTransfer) or localhost are for incoming connections to the local SMTP.
- Lines containing OutboundConnectionCommand or
- OutboundConnectionResponse are for outbound connections to the remote SMTP server.
- A session that consists of incoming requests but no outbound requests may be failing due to an inability to connect to the remote server. This could be the result of a misspelled server name.
- A session with authentication errors is likely due to a misspelled username or password.
Checking for Queued MOVEit Transfer Messages/Notifications
Queued outbound messages consist of files in C:\inetpub\mailroot\Queue. If files are accumulating in this directory, then the server is failing to send messages to the remote SMTP server. This could be due to an inability to connect to the remote server, possibly due to an incorrect server name. Also, it could be that the local SMTP server is "stuck"; try restarting the "Simple Mail Transfer Protocol (SMTP)" service.
Checking the MOVEit Transfer Debug Log
To ensure that MOVEit Transfer really is trying to send email messages:
- Use the MOVEit Transfer Configuration Utility to set the debug level to All. Perform the action that you believe will send an email message (such as uploading to a folder, or sending a package).
- Examine the file C:\MOVEitDMZ\Logs\DMZ_Web.log for evidence that MOVEit Transfer is really trying to send an email. Note that indications in this log of successful sending of an email refer only to successfully sending the email to the local Microsoft SMTP server.
- Most email problems will be not evident in this log, as most will be due to problems between the local SMTP server and the remote SMTP server.
Changing SMTP Settings
This section demonstrates how you can change your SMTP server settings on a MOVEit Transfer instance running in Azure.
During deployment of the Azure VM, the Marketplace offering prompts for several email-related settings. If you feel you may have entered incorrect values for any of these settings, the first step is to check them in the MOVEit Transfer Configuration Utility.
This Setting... |
Description |
Can be Changed in... |
To: |
Target email address for Azure Notifications. |
|
From: |
Originating email address. |
|
SMTP server |
SMTP server handling MOVEit Transfer in Azure requests. |
|
TCP port |
Port of TCP server if not well-known default. |
|
SMTP user |
Username of SMTP account. |
|
SMTP password |
Password of SMTP account. |
Copyright Notice
© 2021 Progress Software Corporation and/or one of its subsidiaries or affiliates. All rights reserved.
These materials and all Progress® software products are copyrighted and all rights are reserved by Progress Software Corporation. The information in these materials is subject to change without notice, and Progress Software Corporation assumes no responsibility for any errors that may appear therein. The references in these materials to specific platforms supported are subject to change.
Chef, Chef (and design), Chef Infra, Code Can (and design), Compliance at Velocity, Corticon, DataDirect (and design), DataDirect Cloud, DataDirect Connect, DataDirect Connect64, DataDirect XML Converters, DataDirect XQuery, DataRPM, Defrag This, Deliver More Than Expected, DevReach (and design), Icenium, Inspec, Ipswitch, iMacros, Kendo UI, Kinvey, MessageWay, MOVEit, NativeChat, NativeScript, OpenEdge, Powered by Chef, Powered by Progress, Progress, Progress Software Developers Network, SequeLink, Sitefinity (and Design), Sitefinity, Sitefinity (and design), SpeedScript, Stylus Studio, Stylized Design (Arrow/3D Box logo), Styleized Design (C Chef logo), Stylized Design of Samurai, TeamPulse, Telerik, Telerik (and design), Test Studio, WebSpeed, WhatsConfigured, WhatsConnected, WhatsUp, and WS_FTP are registered trademarks of Progress Software Corporation or one of its affiliates or subsidiaries in the U.S. and/or other countries.
Analytics360, AppServer, BusinessEdge, Chef Automate, Chef Compliance, Chef Desktop, Chef Habitat, Chef WorkStation, Corticon.js, Corticon Rules, Data Access, DataDirect Autonomous REST Connector, DataDirect Spy, DevCraft, Fiddler, Fiddler Everywhere, FiddlerCap, FiddlerCore, FiddlerScript, Hybrid Data Pipeline, iMail, JustAssembly, JustDecompile, JustMock, KendoReact, NativeScript Sidekick, OpenAccess, PASOE, Pro2, ProDataSet, Progress Results, Progress Software, ProVision, PSE Pro, Push Jobs, SafeSpaceVR, Sitefinity Cloud, Sitefinity CMS, Sitefinity Digital Experience Cloud, Sitefinity Feather, Sitefinity Insight, Sitefinity Thunder, SmartBrowser, SmartComponent, SmartDataBrowser, SmartDataObjects, SmartDataView, SmartDialog, SmartFolder, SmartFrame, SmartObjects, SmartPanel, SmartQuery, SmartViewer, SmartWindow, Supermarket, SupportLink, Unite UX, and WebClient are trademarks or service marks of Progress Software Corporation and/or its subsidiaries or affiliates in the U.S. and other countries. Java is a registered trademark of Oracle and/or its affiliates. Any other marks contained herein may be trademarks of their respective owners.
This document was published on Monday, November 15, 2021 at 16:32
NOV
2021