1. Why MOVEit?
MOVEit Transfer keeps important files and data secure when information is at rest or in transit. MOVEit is ideal when you handle data that requires integrity checks, audit trails, or robust policies and controls needed to ensure confidentiality.
MOVEit enables you to verify file/payload integrity for content used from (by way of MOVEit Transfer download) or output from (Transfer upload) the MuleSoft integration platform (a MuleSoft flow or subflow in Anypoint Studio or CloudHub Design Center). Events involving MOVEit data are logged, and upload and download actions can be subjected to data loss prevention rules and anti-virus/malware inspection.

|
Tip
|
MOVEit Transfer is an enterprise and cloud FIPS 140-2 compliant managed file, folder, message transfer, and collaboration system. |
1.1. Advantages and Capabilities
MOVEit was designed for information assurance policies that expect confidentiality, integrity, and accountability. This design helps organizations, groups, and business units adhere to data security standards such as HIPAA, SOX, PCI, and much more. MOVEit policies can be configured and refined on an organization, group, user role, and even folder-specific basis.
Some example use cases include:
-
Business-critical content.
-
Patient, personnel, and customer data.
-
Signal (voice) or image (picture or video) content that includes PII (personally identifiable information).
-
Valuable predictive analytics or machine learning models.
-
And much more…(any content or information that needs an audit trail and integrity checks when transferred or accessed).
1.2. The Ipswitch Product Family
MOVEit Transfer is part of the Ipswitch family of security, monitoring, and transfer products. The Ipswitch family of products includes:
-
WS_FTP (client and server). Secure file transfer applications.
-
MOVEit Analytics. Metrics, insights, and decision support for your managed file transfer operations.
-
MOVEit Cloud. Provides the MOVEit Transfer feature set as enabled by your subscription.
-
MOVEit on Azure. Run MOVEit Transfer on Azure (deployed directly from Azure Marketplace).
-
WhatsUp Gold. Network, device, and application management --including discovery, monitoring, site-reliability, and reporting.
-
and much more…
2. What’s New in This Connector
The MOVEit Transfer Connector enables you to modify, get, or save important data, files, and folders by connecting to a cloud or on-premises instance of MOVEit Transfer (or both) from the MuleSoft integration platform.
|
Note
|
The MOVEit Transfer Connector available through Anypoint Exchange expects to be run on the Mule 4 Runtime. |
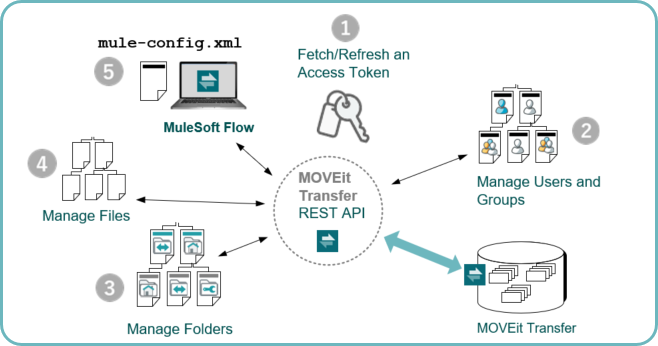
MOVEit Connector Enables You to Access MOVEit Transfer Methods and Data from a Mule Flow
| Category | Resources | |
|---|---|---|
1. |
After you launch a Mule Flow, MOVEit Connector uses valid user credentials to retrieve an access token from MOVEit. |
|
2. |
Create and manage users and groups, roles, home folders, and other properties. |
|
3. |
Create folders, manage folder actions, folder contents, and folder properties. |
|
4. |
• Upload payload from the Mule Integration platform. |
|
5. |
Your MOVEit Connector is included as one or more nodes that run within a series or sequence of other Mule applications --commonly referred to as a Flow: • A Flow defines a workflow. You initiate a Flow with a node that provides a trigger
(such as duration to start-time, recurring schedule, HTTP or FTP message event, database transaction, and much more). mule-config.xml |
3. Before You Begin
Before you begin using the MOVEit Transfer Connector in a flow, you will need the items outlined in the following table.
|
Tip
|
If you are trying this connector and the Mule integration platform for the first time, this section and the Getting Started section provide simple examples to get you up and running. |
| Pre-requisite | Description | Notes |
|---|---|---|
Choose a development environment… |
Design Center (a good place to start) Anypoint Studio. |
Design Center is a browser-based development environment that requires Internet access. Anypoint Studio is a desktop development environment. Its projects can be run locally or scaled out on premises. |
The MOVEit Transfer connector |
The connector is accessible from either Anypoint Studio or Design Center. The instructions and examples that follow expect that you have access either to Anypoint Studio or Design Center (or both). |
You can sign-up and sign-on to Anypoint Platform Design Center here. |
Base path to the MOVEit Transfer server host |
An instance of MOVEit Transfer that manages messages, files, folders or data that you want to access. |
The server must be:
|
A MOVEit Transfer Org User |
Your Anypoint Exchange MOVEit Transfer configuration must include the following:
|
It is best practice to use a dedicated user with access privileges that follow the principle of least privilege when connecting to your MOVEit Transfer system. Consider this especially if you create a default connection configuration. |
The MOVEit API Add-on |
The target MOVEit Transfer system requires the MOVEit API Add-on and the corresponding license to use the add-on. |
For MOVEit Transfer 2018SP1, 2018SP2, and the initial release of 2019, the add-on is subject to the terms of the MOVEit Transfer EULA. |
|
Tip
|
When you create a default user and connection configuration for a Mule Flow, the username/password pair requirement becomes optional. |
|
Note
|
This connector expects Mule Runtime 4.0 or later and MOVEit 2018 SP1 or later. For details, see the MOVEit Transfer Connector Release Notes. |
4. Getting Started (Run Connector in Design Center)
Use these quick steps to validate your MOVEit user credentials and run the MOVEit Connector in Design Center.

4.1. Using MOVEit in Your MuleSoft Application
| Description | Notes | |
|---|---|---|
1. |
Open Design Center |
From your web browser, navigate to the following address: https://anypoint.mulesoft.com/designcenter |
2. |
Create a Project |
Click the Create button to create a Mule Application, name it, and: • Select a Trigger module (such as Scheduler). |
3. |
Delete the unneeded Dataweave transformer. |
When you create your project, Design Studio automatically inserts a Dataweave Transformer upstream of the Target you selected. For this simple 'How To' it will not be used. Delete it from the Flow. |
4. |
Apply MOVEit Connection Information |
On the Flow palette click MOVEit Connector to open it. Click the Edit
link on the Update your Configuration message, and add the following: |
5. |
Run it, view results |
• Click Run to launch the Flow. |
|
Re-use in Anypoint (optional) |
As a starting point for your next development project, now that you have successfully run the MOVEit Connector in this Flow, you can download the .jar file from Design Center and import it as a MuleSoft project into Anypoint Studio. |
4.2. Understanding the Flow Configuration (mule-config.xml)
When you assemble a Flow to be executed by the Mule Runtime, a configuration file contains the information necessary to load each module (such as the MOVEit Transfer Connector), inject runtime properties (such as configuration values), and run the Flow.
The typical practice for assembling this file is through the UI controls in Design Center or within Anypoint Studio. Once you create the file, you can share it, reference it from within an Anypoint Project and repurpose it.
For example, the Getting Started example yields a .jar file that contains a Mule configuration (mule-config.xml).
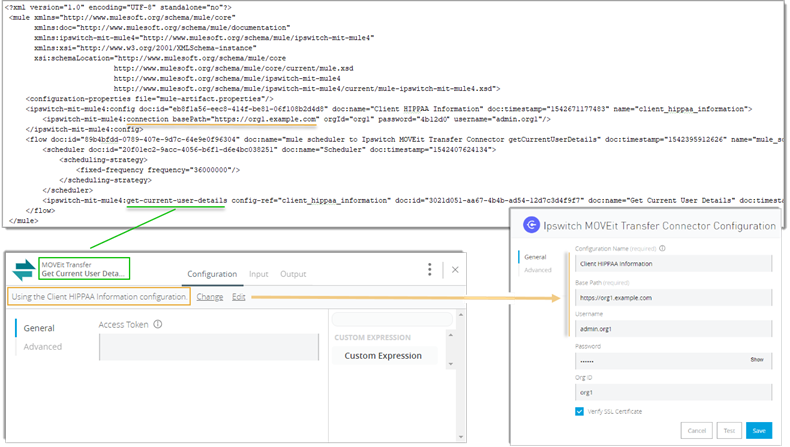
The following code snippet is the mule-config.xml used for the Getting Started exercise.
<?xml version="1.0" encoding="UTF-8" standalone="no"?>
 <mule xmlns="http://www.mulesoft.org/schema/mule/core"
       xmlns:doc="http://www.mulesoft.org/schema/mule/documentation"
       xmlns:ipswitch-mit-mule4="http://www.mulesoft.org/schema/mule/ipswitch-mit-mule4"
       xmlns:xsi="http://www.w3.org/2001/XMLSchema-instance"
       xsi:schemaLocation="http://www.mulesoft.org/schema/mule/core
                          http://www.mulesoft.org/schema/mule/core/current/mule.xsd
                          http://www.mulesoft.org/schema/mule/ipswitch-mit-mule4
                          http://www.mulesoft.org/schema/mule/ipswitch-mit-mule4/current/mule-ipswitch-mit-mule4.xsd">
     <configuration-properties file="mule-artifact.properties"/>

     <ipswitch-mit-mule4:config doc:id="eb8f1a56-eec8-414f-be81-06f108b2d4d8" doc:name="Client HIPPAA Information" doc:timestamp="1542671177483" name="client_hippaa_information">
         <ipswitch-mit-mule4:connection basePath="https://org1.example.com" orgId="org1" password="abc123" username="admin.org1"/>
     </ipswitch-mit-mule4:config>
     <flow doc:id="89b4bfdd-0789-407e-9d7c-64e9e0f96304" doc:name="mule scheduler to Ipswitch MOVEit Transfer Connector getCurrentUserDetails" doc:timestamp="1542395912626" name="mule_scheduler_to_ipswitch_moveit_transfer_connector_getcurrentuserdetails">
         <scheduler doc:id="20f01ec2-9acc-4056-b6f1-d6e4bc038251" doc:name="Scheduler" doc:timestamp="1542407624134">
             <scheduling-strategy>
                 <fixed-frequency frequency="36000000"/>
             </scheduling-strategy>
         </scheduler>
         <ipswitch-mit-mule4:get-current-user-details config-ref="client_hippaa_information" doc:id="3021d051-aa67-4b4b-ad54-12d7c3d4f9f7" doc:name="Get Current User Details" doc:timestamp="1542396899744"/>
     </flow>
 </mule>
4.3. Import the Project .jar into Anypoint Studio
After you assemble and run a Flow successfully in Design Center, you can download the .jar file for the Mule project and import it into your Anypoint IDE workspace. For details, see the section titled Run these Examples in Anypoint
5. Download, Upload, and Manage Files
Accessing files managed by MOVEit Transfer from a Mule Flow enables you to integrate secure input and output data into simple or complex workflows.
5.1. Simple Case: Round Trip Secure File Data
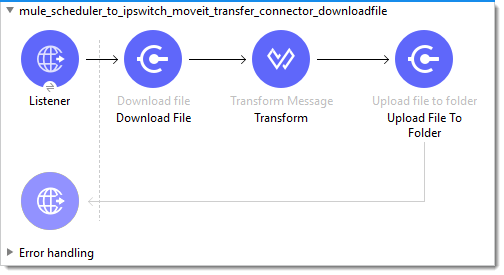
The following is a simple example of how to round-trip trusted content from MOVEit Transfer. Consider a scenario where you use the MuleSoft Integration platform to leverage data in an on-demand workflow. This example shows you how to "round trip" --get trusted content from MOVEit, use/process it, and then push file changes (payload) back to a secure "In" folder.
In terms of a Mule Flow, the steps include:
-
Set a trigger for the flow to launch.
-
Download a datafile.
-
Process it (in this simple case, a large dataset is reduced).
-
Upload the secure payload back to MOVEit Transfer into a Secure Folder.

This round-trip managed file transfer example applies the Flow outlined in the following table.
| Module | Description | Notes | |
|---|---|---|---|
|
(Trigger module) |
HTTP Listener. |
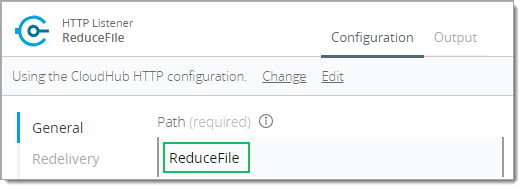
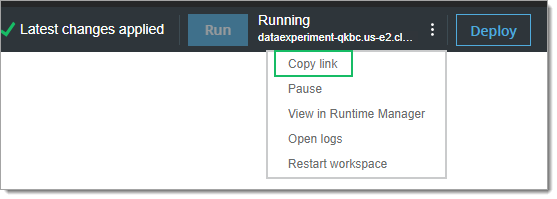
To trigger the Flow (once your Mule application service is up and running in the 'listening' or 'ready' state) 1. Copy the service hostname.
2. Make a call to the endpoint (for example, using cURL or your web browser):
|
|
Download File |
Pass in a file ID and get back a file from MOVEit Transfer. |
Payload: File streamed (non-repeatable stream) to memory. For more information, see the section titled Streaming Strategies. |
|
Transform |
This module is a placeholder. It demonstrates a simple reduction operation applied to the data. |
|
|
Upload File |
Upload payload (in this case a reduced version of the original data file) to MOVEit Transfer. |
5.2. Streaming Models (downloads)
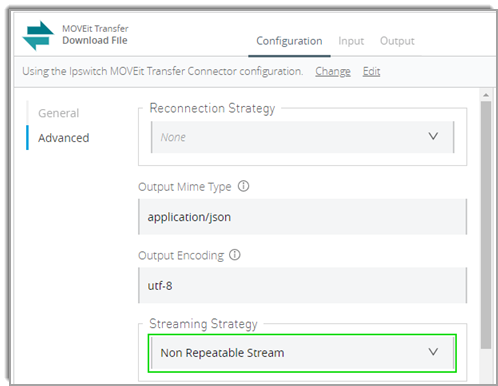
MOVEit Connector provides a new streaming capability which is ideal for processing large file downloads while avoiding web service maximum size restrictions or disrupting bandwidth or services availability for other users.
Best practice for most cases will be to use a Non-repeatable Stream.
|
Tip
|
For a detailed reference on Streaming Strategies, see the MuleSoft documentation titled Streaming Strategies Reference. |
5.3. Typical Operations
The following table outlines typical MOVEit content transfer and file management operations.
|
Note
|
For details see the
MOVEit Transfer Connector Reference Guide and the "circle i" ( )
help information in the Design Center or Anypoint Studio UI. )
help information in the Design Center or Anypoint Studio UI.
|
| Message | Description | Notes |
|---|---|---|
Upload File |
Upload content, such as: |
• Folder ID. Required value. |
Download File |
Download payload or mule variable information to a file from MOVEit Transfer. |
• File ID. Required value. |
Get File Details |
Get file modified date, ownership, size, upload verification, and more. |
No required arguments. |
Get Files in Folder |
Download files from the specified folder. |
Folder ID. Required value |
List Files |
Get a list of files this user can access. |
File access is determined by org admins, or current folder permissions, and user, group, and site policy. |
Update File |
Update/modify file details. |
File ID. Required value. |
Delete File |
Delete specified file. |
File ID. Required value. |
5.4. Example: Round Trip Secure File Data
<?xml version="1.0" encoding="UTF-8" standalone="no"?>
<mule xmlns="http://www.mulesoft.org/schema/mule/core" xmlns:doc="http://www.mulesoft.org/schema/mule/documentation" xmlns:ee="http://www.mulesoft.org/schema/mule/ee/core" xmlns:financialservices-locations="http://www.mulesoft.org/schema/mule/financialservices-locations" xmlns:http="http://www.mulesoft.org/schema/mule/http" xmlns:ipswitch-mit-mule4="http://www.mulesoft.org/schema/mule/ipswitch-mit-mule4" xmlns:xsi="http://www.w3.org/2001/XMLSchema-instance" xsi:schemaLocation="http://www.mulesoft.org/schema/mule/core http://www.mulesoft.org/schema/mule/core/current/mule.xsd http://www.mulesoft.org/schema/mule/ipswitch-mit-mule4 http://www.mulesoft.org/schema/mule/ipswitch-mit-mule4/current/mule-ipswitch-mit-mule4.xsd http://www.mulesoft.org/schema/mule/financialservices-locations http://www.mulesoft.org/schema/mule/financialservices-locations/current/mule-financialservices-locations.xsd http://www.mulesoft.org/schema/mule/http http://www.mulesoft.org/schema/mule/http/current/mule-http.xsd http://www.mulesoft.org/schema/mule/ee/core http://www.mulesoft.org/schema/mule/ee/core/current/mule-ee.xsd">
    <configuration-properties file="mule-artifact.properties"/>
    <ipswitch-mit-mule4:config doc:id="f188fa28-9295-4713-bda5-cd15a5dd181c" doc:name="Ipswitch MOVEit Transfer Connector" doc:timestamp="1543504185110" name="ipswitch_moveit_transfer_connector">
        <ipswitch-mit-mule4:connection basePath="https://org1.example.com" password="abc123" username="readwriteuser.org1"/>
    </ipswitch-mit-mule4:config>
    <financialservices-locations:config doc:id="0217fff5-876b-497e-b980-4545549a2637" doc:name="financialservices-locations" doc:timestamp="1542136566321" name="financialservices-locations"/>
    <http:listener-config doc:id="5e586ab1-d033-4a19-a716-d8302d94ce4c" doc:name="CloudHub HTTP" doc:timestamp="1543502454068" name="cloudhub_http">
        <http:listener-connection host="0.0.0.0" port="${http.port}"/>
    </http:listener-config>
    <flow doc:id="e8dec2b1-9545-49ef-aef7-04917934a78c" doc:name="mule scheduler to Ipswitch MOVEit Transfer Connector downloadFile" doc:timestamp="1541702018633" name="mule_scheduler_to_ipswitch_moveit_transfer_connector_downloadfile">
        <http:listener config-ref="cloudhub_http" doc:id="dd0c71ea-37b5-4052-88de-f7542b5daec8" doc:name="Listener" doc:timestamp="1543502460955" path="ReduceFile"/>
        <ipswitch-mit-mule4:download-file config-ref="ipswitch_moveit_transfer_connector" doc:id="5bfad922-19ab-4e01-b282-ab5b35d9081e" doc:name="Download File" doc:timestamp="1543515901884" id="527031615" outputEncoding="utf-8" outputMimeType="application/json"/>
        <ee:transform doc:id="099a0e38-7b44-4d1c-9bb8-bd60a899d441" doc:name="Transform" doc:timestamp="1541714770784">
            <ee:message>
                <ee:set-payload><![CDATA[%dw 2.0
output application/json
---
{
 order: {
     'type': 'Airline Records',
     'csvData': payload.data,
 }

}]]></ee:set-payload>
            </ee:message>
        </ee:transform>
        <ipswitch-mit-mule4:upload-file-to-folder config-ref="ipswitch_moveit_transfer_connector" doc:id="2b163cf7-43e3-4379-97a8-6ec04b6cea1c" doc:name="Upload File To Folder" doc:timestamp="1543504842877" filename="TransformedFile.json" folderId="530122379" inputStream="#[payload]"/>
    </flow>
</mule>
6. Manage Auth Tokens
Applications and connectors can use OAuth2 to retrieve or renew an auth token needed to transact with a deployed MOVEit Transfer Server. Where much of this behavior is automatic and normally part of the connector’s default configuration, this section can be helpful if you need to apply tokens directly from within your Mule application Flow.
|
Tip
|
Typically, MOVEit connector operations use a default connection profile. You can use this section if you feel the need to override this behavior. |
6.1. Switch Users Mid Flow (Get/Revoke Token)
There are two mechanisms for applying tokens to your Mule Flow:
-
Normal. Use the default MOVEit credentials and target host with most of the connector operations. Credentials are Flow properties passed to the deployed MOVEit Transfer Server and an auth token is requested as part of the operation.
-
'In Flow' Call. You can add a MOVEit Get Token connector that enables/expects non-default user credentials and applies a grant type of password or refresh_token.
You can configure a default user for a Mule Flow instead of explicitly getting and revoking auth tokens until you need to override this default. The default user scenario is illustrated in the section titled Getting Started.
To override the default, such as when you need to sign on as a different user or a user affiliated with a different org, you can fetch, renew, and cancel (revoke) an auth token using the auth token management operations (Get Token and Revoke Token).
6.2. Why Manage Access Tokens Directly?
This section is important when you encounter scenarios where you feel you need to manage user scope and duration of auth explicitly. These scenarios include:
-
Change user in the middle of a Flow.
Apply privileged access management measures (escalate permissions). -
Change orgs in the middle of a Flow.
Some users belong to multiple orgs. -
Batch execution of user-level operations.
Per-user onboarding, validation, and testing, aggregation across orgs, and much more.
| Message | Description | Notes |
|---|---|---|
Get Token |
Retrieve or Renew an access token. |
Given the specified username/password pair, use OAUTH2 to get an access token. (Grant Type = "password") Given a valid refresh token, provide the refresh token (Grant Type = "refresh_token") to get a new token. |
Revoke token |
Notify server that token is no longer in use. |
Revoking the token is best practice after use. |
|
Note
|
After the initial password token grant, it is best practice to use access tokens when you access MOVEit Transfer. |
6.3. Example: Apply Access Token for Non-default User
This section demonstrates simple 'in flow' leverage of Get Token. This example is helpful for scenarios where your task needs to change MOVEit users or orgs within the course of a single flow.

This example flow applies the sequence outlined in the following table.
| Module | Description | Notes | |
|---|---|---|---|
|
(Trigger module) |
Scheduler shown here just for simplicity. |
|
|
Get Token |
Pass in user/password pair and get back an access token and a refresh token. |
Payload: User-specific token object containing both auth and auth refresh tokens. |
|
Set Variable |
Save auth token to a Flow-wide variable. |
|
|
(MOVEit operation) |
Get Current User shown here for simplicity. |
MOVEit connector operation uses the current auth token to query
current user details. You can use Java property syntax to get the variable value. For example: |
|
Revoke Token |
After current user transactions for the current user with MOVEit are complete, notify MOVEit that it can cancel the auth token for this user. |
Canceling active auth tokens that are not needed is best practice. |
<?xml version="1.0" encoding="UTF-8" standalone="no"?>
<mule xmlns="http://www.mulesoft.org/schema/mule/core" xmlns:doc="http://www.mulesoft.org/schema/mule/documentation" xmlns:ipswitch-mit-mule4="http://www.mulesoft.org/schema/mule/ipswitch-mit-mule4" xmlns:xsi="http://www.w3.org/2001/XMLSchema-instance" xsi:schemaLocation="http://www.mulesoft.org/schema/mule/core http://www.mulesoft.org/schema/mule/core/current/mule.xsd http://www.mulesoft.org/schema/mule/ipswitch-mit-mule4 http://www.mulesoft.org/schema/mule/ipswitch-mit-mule4/current/mule-ipswitch-mit-mule4.xsd">
    <configuration-properties file="mule-artifact.properties"/>
    <ipswitch-mit-mule4:config doc:id="2ac7a7d3-7759-4839-b1ef-9312698e1122" doc:name="Ipswitch MOVEit Transfer" doc:timestamp="1542658184256" name="ipswitch_moveit_transfer">
        <ipswitch-mit-mule4:connection basePath="https://org1.demo.ipswitch.com"/>
    </ipswitch-mit-mule4:config>
    <flow doc:id="7c44252c-de48-4960-a3bd-c97153924f28" doc:name="mule scheduler to Ipswitch MOVEit Transfer Connector getToken" doc:timestamp="1542656979883" name="mule_scheduler_to_ipswitch_moveit_transfer_connector_gettoken">
        <scheduler doc:id="dbab4ffb-c804-4360-99fa-71c8838de6e0" doc:name="Scheduler" doc:timestamp="1542672277624">
            <scheduling-strategy>
                <fixed-frequency frequency="6000000"/>
            </scheduling-strategy>
        </scheduler>
        <ipswitch-mit-mule4:get-token config-ref="ipswitch_moveit_transfer" doc:id="bf97d573-3646-4b20-8218-95a41c1a7495" doc:name="Get Token" doc:timestamp="1542658803347" grantType="password" password="abc123" targetValue="#[payload]" username="admin.org1"/>
        <set-variable doc:id="863e9d45-7a33-451d-9329-8b3fda0431ae" doc:name="Set Variable" doc:timestamp="1542660084324" value="#[payload.accessToken]" variableName="accessToken"/>
        <ipswitch-mit-mule4:get-current-user-details accessToken="#[vars.accessToken]" config-ref="ipswitch_moveit_transfer" doc:id="c33aa221-57dd-4abd-bce5-93fc324e0e29" doc:name="Get Current User Details" doc:timestamp="1542660258637"/>
        <ipswitch-mit-mule4:revoke-token config-ref="ipswitch_moveit_transfer" doc:id="a5beea25-ff1b-4a7f-b7e3-055e67d2594d" doc:name="Revoke Token" doc:timestamp="1542660344705" token="#[vars.accessToken]"/>
    </flow>
</mule>
7. Manage and Onboard MOVEit Users
This section outlines MOVEit Transfer user management operations available from your MuleSoft Flow. User management from a Flow provides benefits including:
-
Integrating managed file transfer/access into workflows where it is needed.
-
Applying consistent user access and tracking to secure files and messages.
-
Batch-level user operations and much more…
|
Note
|
Most user management operations require admin-level permissions. |
7.1. Simple Case: Get My User Information
The simplest case for using this library is to check the information for the current user. To do this, simply run Get User Details with the User ID set to "self". This works for all levels of registered user --such as TempUsers, Admins, and Users (often referred to as "regular users").
|
Tip
|
Using Get User Details (Self) is a useful way to judge if the current user has the appropriate level of user role needed to perform create, modify, and delete management actions. |

This example yields a JSON properties object including the permission field value that indicates that
the current user has MOVEit Transfer Admin permissions.
<?xml version="1.0" encoding="UTF-8" standalone="no"?>
<mule xmlns="http://www.mulesoft.org/schema/mule/core" xmlns:doc="http://www.mulesoft.org/schema/mule/documentation" xmlns:http="http://www.mulesoft.org/schema/mule/http" xmlns:ipswitch-mit-mule4="http://www.mulesoft.org/schema/mule/ipswitch-mit-mule4" xmlns:xsi="http://www.w3.org/2001/XMLSchema-instance" xsi:schemaLocation="http://www.mulesoft.org/schema/mule/core http://www.mulesoft.org/schema/mule/core/current/mule.xsd http://www.mulesoft.org/schema/mule/http http://www.mulesoft.org/schema/mule/http/current/mule-http.xsd http://www.mulesoft.org/schema/mule/ipswitch-mit-mule4 http://www.mulesoft.org/schema/mule/ipswitch-mit-mule4/current/mule-ipswitch-mit-mule4.xsd">
    <configuration-properties file="mule-artifact.properties"/>
    <http:listener-config doc:id="fec5aec0-9606-4dc9-b270-c4fd93ae5ae4" doc:name="CloudHub HTTP" doc:timestamp="1542833290194" name="cloudhub_http">
        <http:listener-connection host="0.0.0.0" port="${http.port}"/>
    </http:listener-config>
    <ipswitch-mit-mule4:config doc:id="6be2ceda-9734-4d41-9004-d71e9ba8dcd8" doc:name="Ipswitch MOVEit Transfer Connector" doc:timestamp="1543248338060" name="ipswitch_moveit_transfer_connector">
        <ipswitch-mit-mule4:connection basePath="https://org1.example.com" password="myuserspassword" username="batchadmin" verifySslCert="false"/>
    </ipswitch-mit-mule4:config>
    <flow doc:id="038bc620-6b7e-44d6-bd23-892cb3765102" doc:name="HTTP Listener Config" doc:timestamp="1542832638849" name="http_listener_config">
        <http:listener config-ref="cloudhub_http" doc:id="ecc07f4e-1074-450f-be31-270e4f938464" doc:name="Listener" doc:timestamp="1543255004801" path="launcher2"/>
        <ipswitch-mit-mule4:get-user-details config-ref="ipswitch_moveit_transfer_connector" doc:id="d952b839-a4a3-4661-bcf5-9a1eb5e321c4" doc:name="Get User Details" doc:timestamp="1543254961546" id="self"/>
    </flow>
</mule>{
"defaultFolderID": 531575630,
"fullName": "API admin User",
"username": "batchadmin",
"homeFolderID": 531575630,
"statusNote": "",
"lastLoginStamp": "2018-11-26T17:56:39.94",
"displaySettings": {
"liveViewPageSize": 25,
"userListPageSize": 10,
"fileListPageSize": 100
},
"emailFormat": "HTML",
"expirationPolicyID": 0,
"passwordChangeStamp": "2018-11-26T15:44:41.517",
"forceChangePassword": false,
"receivesNotification": "RECEIVESNOTIFICATIONS",
"status": "ACTIVE",
"authMethod": "MOVEITONLY",
"email": "apiuser@example.com",
"folderQuota": 0,
"notes": "",
"orgID": 5567,
"permission": "ADMIN",
"id": "6q751q2emrfrfte4",
"language": "en"
}
7.2. Typical Operations
The following table outlines typical MOVEit User Management operations.
|
Note
|
For details see the
MOVEit Transfer Connector Reference Guide and the "circle i" ( )
help information in the Design Center or Anypoint Studio UI. )
help information in the Design Center or Anypoint Studio UI.
|
| Message | Description | Notes |
|---|---|---|
Create User |
Onboard MOVEit Transfer User |
Admin-level user role required. |
Delete User |
Remove a MOVEit Transfer User |
Admin-level user role required. |
Update User |
Modify user information. |
Admin-level user role required. |
Get User Details |
Retrieve role and properties for a user. |
For required User ID parameter, you can specify either: |
Get Current User Details |
Retrieve role and properties for current user. |
Retrieves same information as Get User Details (Self). |
Get Groups of User |
Retrieve current groups specified user belongs to. |
|
Get User Group Members |
Get a list of members back for a given Group. |
7.3. Example: Create a MOVEit Transfer User

<?xml version="1.0" encoding="UTF-8" standalone="no"?>
<mule xmlns="http://www.mulesoft.org/schema/mule/core" xmlns:doc="http://www.mulesoft.org/schema/mule/documentation" xmlns:http="http://www.mulesoft.org/schema/mule/http" xmlns:ipswitch-mit-mule4="http://www.mulesoft.org/schema/mule/ipswitch-mit-mule4" xmlns:xsi="http://www.w3.org/2001/XMLSchema-instance" xsi:schemaLocation="http://www.mulesoft.org/schema/mule/core http://www.mulesoft.org/schema/mule/core/current/mule.xsd http://www.mulesoft.org/schema/mule/http http://www.mulesoft.org/schema/mule/http/current/mule-http.xsd http://www.mulesoft.org/schema/mule/ipswitch-mit-mule4 http://www.mulesoft.org/schema/mule/ipswitch-mit-mule4/current/mule-ipswitch-mit-mule4.xsd">
    <configuration-properties file="mule-artifact.properties"/>
    <http:listener-config doc:id="fec5aec0-9606-4dc9-b270-c4fd93ae5ae4" doc:name="CloudHub HTTP" doc:timestamp="1542833290194" name="cloudhub_http">
        <http:listener-connection host="0.0.0.0" port="${http.port}"/>
    </http:listener-config>
    <ipswitch-mit-mule4:config doc:id="6be2ceda-9734-4d41-9004-d71e9ba8dcd8" doc:name="Ipswitch MOVEit Transfer Connector" doc:timestamp="1543248338060" name="ipswitch_moveit_transfer_connector">
        <ipswitch-mit-mule4:connection basePath="https://example.ipswitch.com" password="abc123" username="batchadmin" verifySslCert="false"/>
    </ipswitch-mit-mule4:config>
    <flow doc:id="038bc620-6b7e-44d6-bd23-892cb3765102" doc:name="HTTP Listener Config" doc:timestamp="1542832638849" name="http_listener_config">
        <http:listener config-ref="cloudhub_http" doc:id="ecc07f4e-1074-450f-be31-270e4f938464" doc:name="Listener" doc:timestamp="1543249668970" path="launcher"/>
        <ipswitch-mit-mule4:create-user config-ref="ipswitch_moveit_transfer_connector" doc:id="f15b7bfb-079c-46e7-8866-e4e73499ab05" doc:name="Create User" doc:timestamp="1543247135643">
            <ipswitch-mit-mule4:create-user-input email="anyuser@example.com" fullName="Emma Smith" homeFolderInUseOption="ALLOWIFEXISTS" homeFolderPath="esmith" orgID="5406" password="myuserspassword" permission="USER" username="esmith"/>
        </ipswitch-mit-mule4:create-user>
    </flow>
</mule>
8. Manage Folders
Content managed by MOVEit can be organized and subject to access permissions and policies applied to folders. Folders can use a strict, inherited policy of user access control, or can be permissive and collaborative (while maintaining an audit trail and even while applying DLP rule checking).
For convenience, consistency, and alignment, you can manage many folder operations from within your Mule Flow. Before you can write to or download a folder, you need read or write access (respectively) to that folder.
8.1. Simple Case: Get List of Folders
Use the List Folders operation to return a list of folders the current user can access.
The following example Flow gets a list of folder properties objects available to the current user (effectively the folders accessible to the user) and then uses the Transform module to reduce it to a list of folder paths in the MOVEit Transfer org together with the time they were last changed.

<?xml version="1.0" encoding="UTF-8" standalone="no"?>
<mule xmlns="http://www.mulesoft.org/schema/mule/core" xmlns:doc="http://www.mulesoft.org/schema/mule/documentation" xmlns:ee="http://www.mulesoft.org/schema/mule/ee/core" xmlns:http="http://www.mulesoft.org/schema/mule/http" xmlns:ipswitch-mit-mule4="http://www.mulesoft.org/schema/mule/ipswitch-mit-mule4" xmlns:xsi="http://www.w3.org/2001/XMLSchema-instance" xsi:schemaLocation="http://www.mulesoft.org/schema/mule/core http://www.mulesoft.org/schema/mule/core/current/mule.xsd http://www.mulesoft.org/schema/mule/http http://www.mulesoft.org/schema/mule/http/current/mule-http.xsd http://www.mulesoft.org/schema/mule/ipswitch-mit-mule4 http://www.mulesoft.org/schema/mule/ipswitch-mit-mule4/current/mule-ipswitch-mit-mule4.xsd http://www.mulesoft.org/schema/mule/ee/core http://www.mulesoft.org/schema/mule/ee/core/current/mule-ee.xsd">
    <configuration-properties file="mule-artifact.properties"/>
    <http:listener-config doc:id="d37f6f94-97d7-4599-a135-4455d9ef38e7" doc:name="CloudHub HTTP" doc:timestamp="1543260555751" name="cloudhub_http">
        <http:listener-connection host="0.0.0.0" port="${http.port}"/>
    </http:listener-config>
    <ipswitch-mit-mule4:config doc:id="45bcc7f0-d607-4794-a191-8248a8621f59" doc:name="Ipswitch MOVEit Transfer Connector" doc:timestamp="1543272282819" name="ipswitch_moveit_transfer_connector">
        <ipswitch-mit-mule4:connection basePath="https://org1.example.com" password="mypassword" username="apidownload" verifySslCert="false"/>
    </ipswitch-mit-mule4:config>
    <flow doc:id="55fcd403-be77-484b-85e3-2db90181017e" doc:name="HTTP listener to Ipswitch MOVEit Transfer Connector listFolders" doc:timestamp="1543260467040" name="http_listener_to_ipswitch_moveit_transfer_connector_listfolders">
        <http:listener config-ref="cloudhub_http" doc:id="03739e3b-32c3-4153-865a-6aedf0303810" doc:name="Listener" doc:timestamp="1543260602982" path="listfolders"/>
        <ipswitch-mit-mule4:list-folders config-ref="ipswitch_moveit_transfer_connector" doc:id="95e783e3-87c5-41a3-b2b0-6db654f74eac" doc:name="List Folders" doc:timestamp="1543262594867"/>
        <ee:transform doc:id="d1293d60-35e1-42ca-b2ab-5cadb7b6e49c" doc:name="Transform" doc:timestamp="1543271723755">
            <ee:message>
                <ee:set-payload><![CDATA[%dw 2.0
output application/json
---
{
Folders: {
    'List of Accessible Folders': [
    {
        path: payload.items.path,
        time: payload.items.lastContentChangeTime
    }
]
}
}]]></ee:set-payload>
            </ee:message>
        </ee:transform>
    </flow>
    <flow doc:id="b8db05b0-fc72-4915-8867-3ede086e40c0" doc:name="HTTP listener to Ipswitch MOVEit Transfer Connector downloadFile" doc:timestamp="1543271984131" name="http_listener_to_ipswitch_moveit_transfer_connector_downloadfile">
        <http:listener config-ref="cloudhub_http" doc:id="4ddfd562-b2c8-4a0c-9dff-9f1957ee8f29" doc:name="Listener" doc:timestamp="1543272268877" path="launchdownload"/>
        <ipswitch-mit-mule4:download-file config-ref="ipswitch_moveit_transfer_connector" doc:id="3e5f2fcb-9544-4dd5-bbc8-7a9dd9431357" doc:name="Download File" doc:timestamp="1543272787540" id="531529292"/>
    </flow>
</mule>{
"Folders": {
"List of Accessible Folders": [
{
"path": [
"/",
"/Home",
"/Home/admin.org1",
"/Home/admin.org1/Downloads",
"/Home/FinanceShare",
"/Home/FinanceShare/IN",
"/Home/Mulesoft Flow User"
],
"time": [
"2018-11-26T16:28:19",
"2018-11-26T15:44:41",
"2018-11-09T17:00:11",
"2018-11-09T17:00:11",
"2018-11-21T20:24:07",
"2018-11-21T20:24:07",
"2018-11-09T16:40:51"
]
}
]
}
}
8.2. Typical Operations
The following table outlines typical MOVEit Folder Management operations.
|
Note
|
For details see the
MOVEit Transfer Connector Reference Guide and the "circle i" ( )
help information in the Design Center or Anypoint Studio UI. )
help information in the Design Center or Anypoint Studio UI.
|
| Message | Description |
|---|---|
Copy File to Folder |
Copy file from specified folder to specified folder. |
Create Subfolder |
Create a subfolder in the target folder. |
Delete Folder |
Delete a folder from MOVEit Transfer. |
Get Files in Folder |
Download files from the specified folder. |
Get Folder Access Controls |
Get folder access control information. |
Get Folder Content |
Get list of folder contents. |
Get Subfolders in Folder |
Get subfolders in the current parent folder. |
List Folders |
Get a list of all folders the current user can access. |
Update Folder |
Update folder attributes and access information. |
Upload File to Folder |
Put file in specified target folder. |
9. Run these Examples in Anypoint Studio
Follow these instructions, when you are ready to run, clone, and re-purpose any of the examples in this guide using the Anypoint Studio interactive development environment.
|
Tip
|
These instructions are helpful if you have used Anypoint Studio or other similar interactive
development environments and you have a .jar to import from Design Center, such as one produced
from the section titled Getting Started.
|
The steps include:
| Description | Notes | |
|---|---|---|
1. |
Download the package (.jar) |
From your web browser: |
2. |
Import the package to Anypoint |
Open Anypoint Studio, and: |
3. |
Build and Run. |
1. From the Project Menu, choose Build All. |
10. Deploying My Mule Application
You can choose to deploy your Flow as a MuleSoft application or even scale it out once it gets closer to production quality. For more information, see the section in the MuleSoft documentation titled Deploying an Application


