Expiration Policies allow administrators to precisely define if, how, and when a user account will be considered expired and deleted from the system. Expiration policies can be applied globally to all members of a user class, or they can be applied to individual users, providing a high degree of control and flexibility in the expiration of old or unwanted accounts.

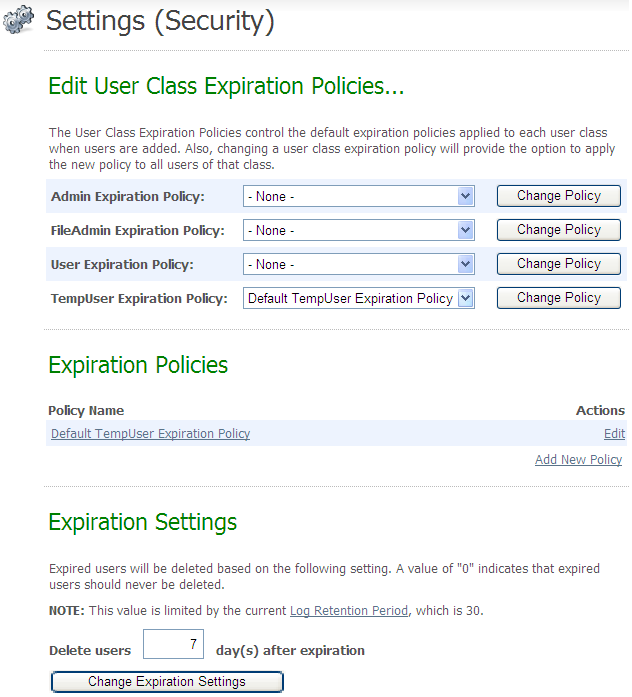
The Expiration Policies setting page consists of three parts. The first part, titled "Edit User Class Expiration Policies", allows the administrator to assign various expiration policies to each of the four available user classes. By default, no policy is selected for each user class (indicated by the "- None -" entry in the dropdown menu). Existing expiration policies can be selected for each user class in that class' dropdown menu. Clicking the "Change Policy" button for a specific user class will make the expiration policy assignment change for that user class.
If an expiration policy is assigned (or unassigned) to a user class, a confirmation page will appear asking the administrator if they wish to apply the new policy to all existing members of that user class, or leave existing policies in place and simply make the change for all future members of that user class. The administrator may also cancel the operation entirely from the confirmation page.
The second part of the expiration policy settings page, titled "Expiration Policies", lists the expiration policies available in the organization. Each policy may be edited, and those policies which are not currently selected as a default user class policy may be deleted. New profiles may also be added.
NOTE: If an expiration policy that is currently assigned to one or more user accounts is deleted, those users will be reset to use the default policy for their user class (or no policy if "- None -" is selected).
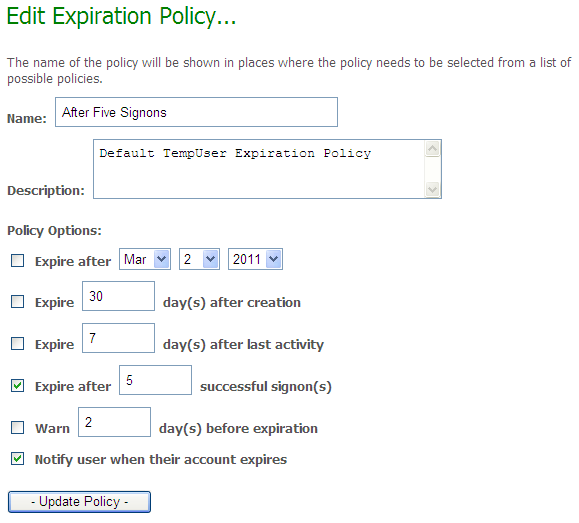
Each expiration policy must have a name, and can optionally have a description. The policy name is listed in both sections of the expiration policy settings page. A name for a new expiration policy should be chosen to convey the expiration settings of the given policy. Names such as "Expire After One Signon", or "Expire Thirty Days After Creation" are good choices. Names such as "Policy 1", or "User Policy" are less desirable. The policy name can be changed after creation without affecting the users assigned to that profile.

The options available to each expiration policy determine how users who are assigned this policy will be expired from the system, and how, if at all, they will be notified of impending expiration or the expiration itself. Several different expiration options may be selected in a single policy, and in those cases, accounts assigned the policy will be expired by the first applicable method.
Here is a list of the available expiration policy options, and descriptions of each:
Actual expiration of a user account happens in two steps. First, upon determining that an account is expired, MOVEit DMZ's nightly scheduled task will change the account status to "Inactive (account expired)", preventing the user from signing on. If the expiration policy allows it, a notification email will be sent to the expired user informing them of their status. Notifications will also be sent to interested administrators and GroupAdmins informing them of the account expiration.
For the next seven days (or for the number of days set in Expiration Settings) following expiration of the account, administrators will have an opportunity to undo the expiration by changing the user's status back to Active. This seven day window is provided to help prevent inadvertent and unwanted expirations. Administrators can also set the Expiration Setting to 0, and the inactive accounts will not be deleted.
The second expiration step happens seven days after expiration, when the user account is finally deleted. Once this has happened, it is no longer possible to recover the account.