![]()
![]()
![]()
![]()
|
|
|
|
|
Importing Client Certificates
Often the easiest way to allow a user with an existing client cert to begin authenticating with that client cert is to have the user try signing on once and then accept the certificate entries that show up in the user and organization holding tanks (see the Holding Tank page for more information). However, sometimes a user will be able to present their certificate to administrators before they sign on for the first time. In this case, administrators may import that cert into MOVEit DMZ's stores, and potentially the Microsoft Trusted Root store if necessary.
Because of the way SSL certificates work, the only component administrators will need to import a user's client cert is the "public" portion. (The "private" portion of a client certificate must be kept by the user and should NOT be given out to anyone.) If the user is able to provide the public portion of their cert, it can be imported into MOVEit DMZ using the Import Existing Client Certificate page. To reach this page, go to the client cert administration page and click the Import link.
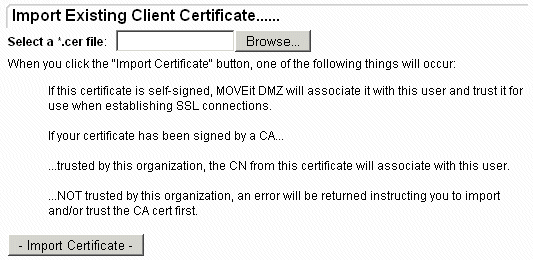
Once imported, MOVEit DMZ will be able to determine the nature of the certificate automatically. As mentioned on this page, if the cert is self-signed, DMZ will add the cert's thumbprint to the user record and import the cert into the Microsoft Trusted Root store, so that a user using the cert will be allowed to connect to the server. If the cert is signed by a CA, DMZ will check to see if that CA is trusted by the current organization first. If it is, DMZ will add the cert's CN to the user record. Otherwise, an error will be returned prompting the administrator to trust the CA before continuing.
Adding Client Certificates
If a user has an existing client certificate but is unable to provide administrators with the public portion directly, there is still a way to associate an element of that cert with the user's account, provided the user can give administrators specific information about the cert. If the user can provide either the thumbprint or CN of their client cert, administrators may add this information to the user record by going to the client cert administration page and clicking the Add (manually) link.
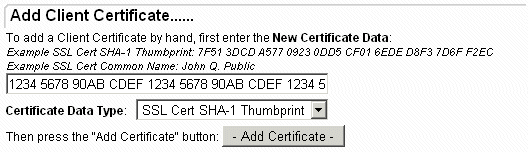
Here, the administrator may add either the cert thumbprint or CN manually in the provided textbox, and then select which data type they are entering. Clicking the Add Certificate button will add the entered information to the user record.
Note: This method does not take care of any trust issues. In order for the user to connect to the server with their client cert, it must still be trusted, either by being in the Microsoft Trusted Root store if self-signed, or by being signed by a trusted CA.
Creating New Client Certificates
If a user does not have a client certificate, a certificate signed by the organization's CA can be generated by MOVEit DMZ. This cert will be automatically associated with the user account by thumbprint and provided to the administrator as a "[username].pfx" file so that the administrator can provide the cert to the user. The user must then import the new cert into their client cert store for whatever client they are using to connect to the server. (In most Windows environments, just opening a "*.pfx" client certificate file will launch a friendly client certificate import wizard.)
To create a new client cert for a particular user, go to a that user's SSL client cert administration page and click the Create New link. If you do not currently have an organizational CA to sign new client certificates, you will be provided with a link that will help you create one (if you are a full Admin). Otherwise, you will be taken to a form that asks for standard certificate information. Note that several fields, such as name, email address and organization will already be filled in with known values.

Note: Be sure to remember the password either entered or selected. This password will need to be provided to the end user in order to successfully import the new cert.
Clicking the Create Certificate button will bring up a confirmation page, where the details of the new cert will be presented.
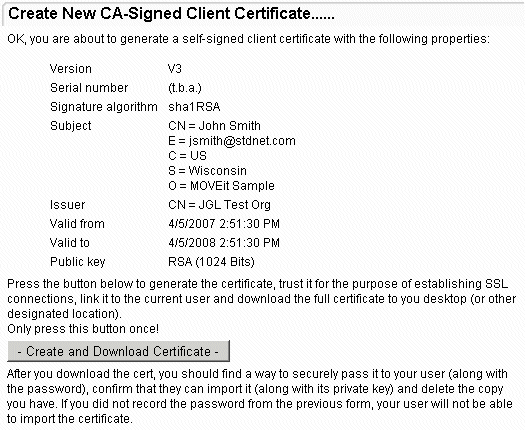
Upon clicking the Create and Download Certificate button, the certificate will be created, signed by the org CA, associated with the user, and presented to the administrator for download. The administrator will then be responsible for providing the new "*.pfx" cert file to the user so it can be imported, along with the password that was selected on the initial Create Client Certificate page.
The user should follow the procedures provided in the Getting Started - SignOn section to import their client cert into their browser.