Content Scanning is an option that allows MOVEit DMZ to control what data is sent to and from a MOVEit system based on the content of the data. This process protects a user's system from being infected by viruses or from losing or accepting critical data, typically when MOVEit DMZ is separated from the main system by a firewall. MOVEit DMZ will forward the data using Internet Content Adaptation Protocol (ICAP) to a user's Anti-Virus (AV) server and/or Data Loss Prevention (DLP) server before it completes the transmission. Depending on the results returned by the server(s), MOVEit will allow or block the transmission.
Users must install and configure the AV and/or DLP servers separately. Different scanning servers may have different capabilities. A server may be configured to do AV, DLP or both. You can configure MOVEit to communicate with multiple different AV and DLP servers. You enable scanning at the system level, but you can have only one AV and one DLP server enabled at a time. You can then disable a specific AV or DLP process at the organization level.
Important: When you configure scanning for both AV and DLP, MOVEit DMZ sends the data to both processes simultaneously. When the scanner reports a virus or a DLP policy violation that is configured in MOVEit to block the transmission, the transmission fails.
The Content Scanning feature allows scanning of incoming files using a remote anti-virus server. MOVEit DMZ will submit incoming files to the anti-virus server using the ICAP protocol. Files that are clean are then passed into the MOVEit DMZ filesystem.
Overview
MOVEit DMZ currently supports the following anti-virus programs:
For information on installing and configuring the Sophos AV scanner, refer to your Sophos documentation.
For information on installing and configuring the Symantec ICAP AV scanner, refer to your Symantec documentation.
Note: These versions of the anti-virus scan engines support the ICAP protocol (RFC3507 for more information), which is required to interface with MOVEit DMZ. Other "desktop" versions from these same vendors will not work with MOVEit DMZ.
Before you can configure content scanning for incoming files, you must have one of these anti-virus scanners configured on a machine that is accessible to the MOVEit DMZ system.
Note: If you are using the AS2 Module to transfer files, be aware that content scanning does not apply to AS2 transfers. Use MOVEit Central to scan AS2 transfers for viruses.
Configuring Anti-Virus Scanning for MOVEit DMZ Hosts
After you have configured the anti-virus server, you need to set up content scanning for your MOVEit DMZ organizations. To access the Content Scanning settings, you must be logged on as sysadmin. These settings apply to all MOVEit DMZ organizations on the system. Under System Settings, Content Scanning, select Anti-Virus. For a description of each of the settings, see Web Interface - Settings - System - Content Scanning.
You can enable or disable Content Scanning for each organization in Settings - Security Policies - Content Scanning. You need to be signed on as an Organization administrator.
Enabling the content scanning option causes MOVEit DMZ to scan uploaded files as follows:
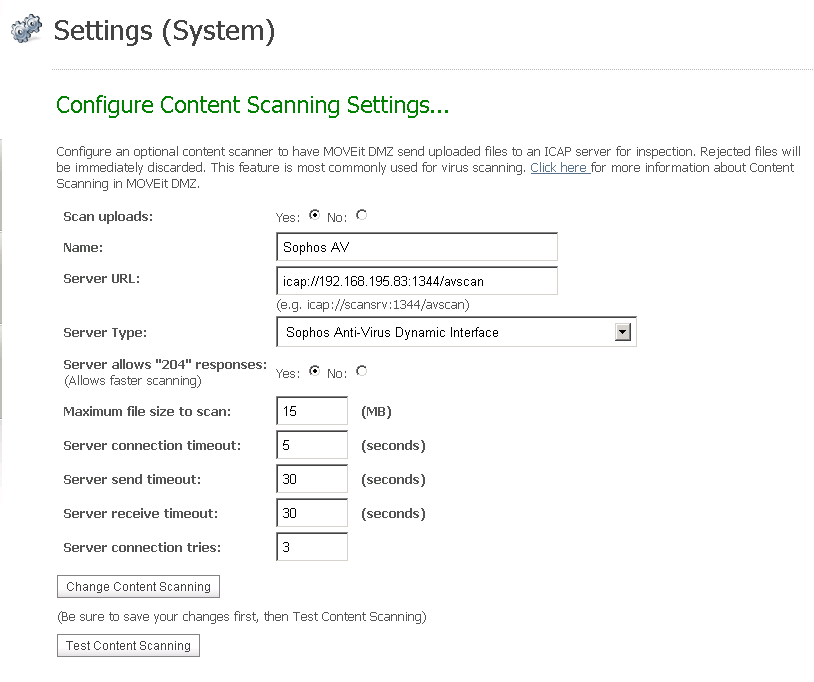
The following screen shows an example of the configuration for a Sophos ICAP AV scanner.
The Content Scanning feature sends incoming data from file transfers and Ad Hoc transfers, including subject, note/body and attachments, to an external Data Loss Prevention (DLP) server before MOVEit DMZ determines whether to complete the transmission. MOVEit DMZ uses the ICAP protocol to submit incoming data to the DLP server. The DLP server applies configured data protection policies as it scans the data. When the DLP server returns its response, MOVEit configurations determine whether to block, quarantine or allow the transmission. MOVEit logs all DLP policy violations returned by the DLP server.
Overview
MOVEit DMZ currently supports the following data loss prevention (DLP) programs:
Note: We only claim support for Symantec DLP version 12 or 12.0.1 when integrated as described specifically in this section. Later versions may not provide scanning results in a consistent manner, potentially leading to false negatives.
Before you can configure content scanning for incoming files, you must have one of these DLP scanners configured on a machine that is accessible to the MOVEit DMZ system.
For information on installing and configuring the various scanners, refer to their official documentation. Two of these scanners, McAfee and Symantec, require additional specific changes to their configurations to properly communicate with MOVEit. These requirements are described in the topic "Configuring DLP Scanning for MOVEit DMZ Hosts".
Note: These versions of the DLP scan engines support the ICAP protocol (RFC3507 for more information), which is required to interface with MOVEit DMZ. Other "desktop" versions from these same vendors will not work with MOVEit DMZ.
Note: If you are using the AS2 Module to transfer files, be aware that content scanning does not apply to AS2 transfers.
Configuring DLP Scanning for MOVEit DMZ Hosts
There are three major tasks to implement Data Loss Prevention (DLP) scanning in MOVEit DMZ.
Enabling the content scanning option causes MOVEit DMZ to scan uploaded files as follows:
Two of these DLP scanners, McAfee and Symantec, require additional configurations. Perform the following tasks as appropriate for your installation.
You should see the following window.
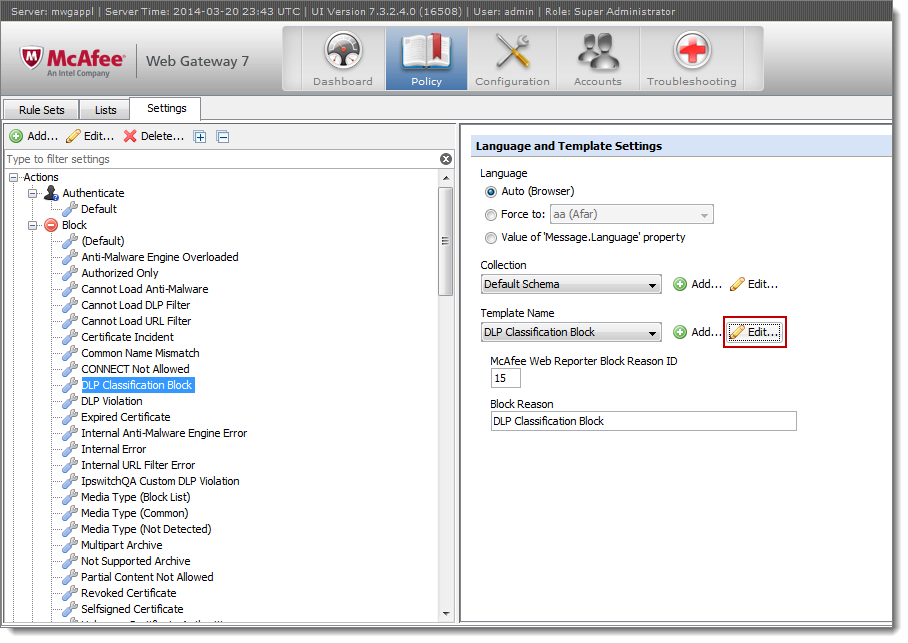
The HTML Editor appears in the right pane.
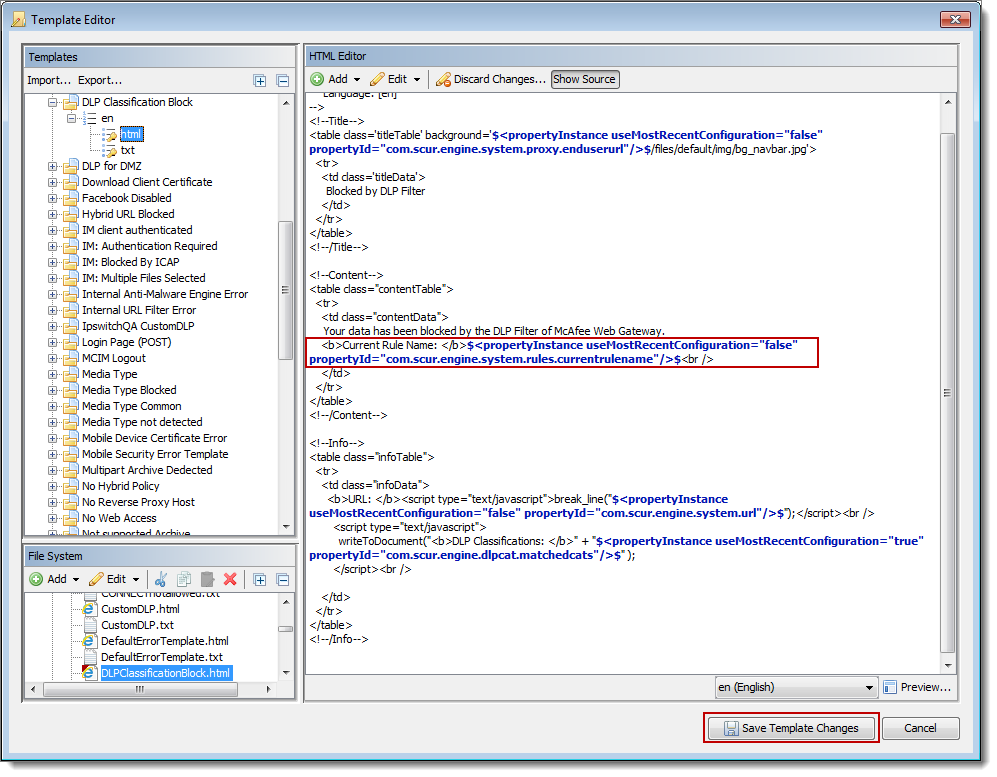
<b>Current Rule Name: </b>$<propertyInstance useMostRecentConfiguration="false" propertyId="com.scur.engine.system.rules.currentrulename"/>$<br />
Your window should appear as follows:
Note: You should already have configured the policies in Symantec that you want to use.
The list of rules you configured for your system appears.
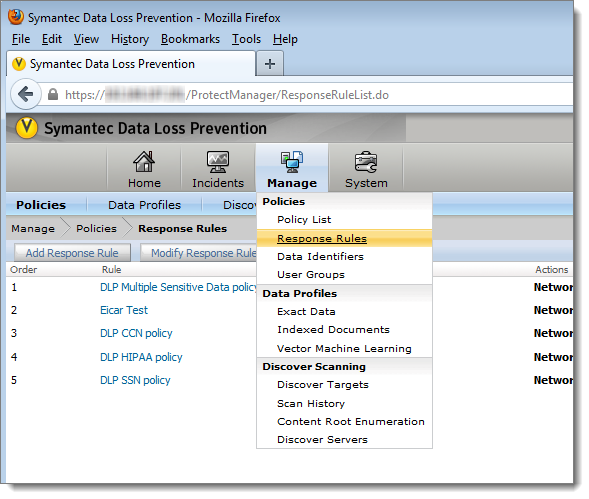
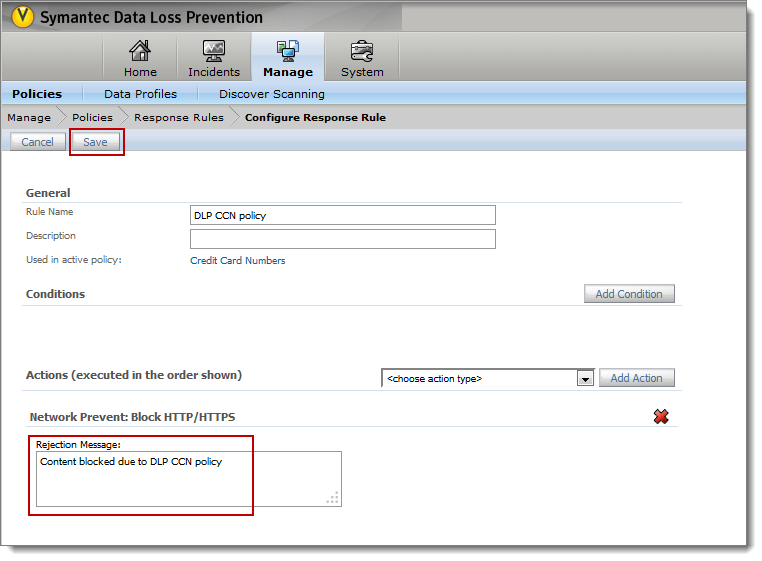
The Configure Response Rule window appears.
"Content blocked due to "
After you have configured the DLP server, you need to set up content scanning for your MOVEit DMZ organizations.
The Configure Content Scanning Settings page appears.
For a description of each of the settings, see Web Interface - Settings - System - Content Scanning. These settings apply to all MOVEit DMZ organizations on the system.
Important: You can set Scan Uploads to Yes for only one DLP scanner at a time. That is, only one DLP scanner can be enabled on your system at any give time.
Repeat this task for each organization in your system that will use DLP content scanning. You will perform four basic procedures:
To enable content scanning for an organization, proceed as follows:
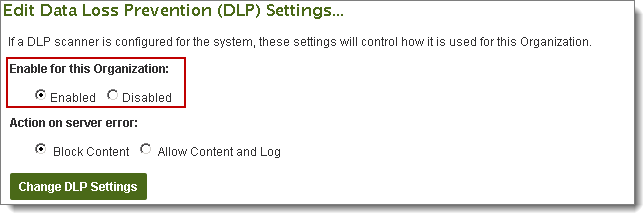
To continue and create rulesets and their rules, proceed as follows:
The Add DLP Ruleset pane appears.
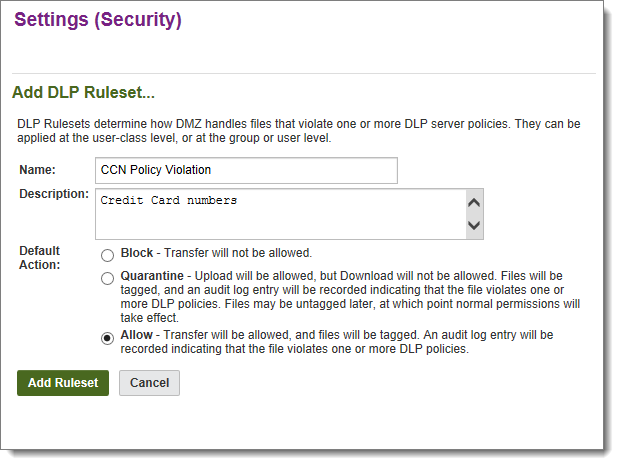
For a description of each of the settings, see Web Interface - Settings - Security Policies - Content Scanning - Data Loss Prevention (DLP)
The Add DLP Rule pane appears.
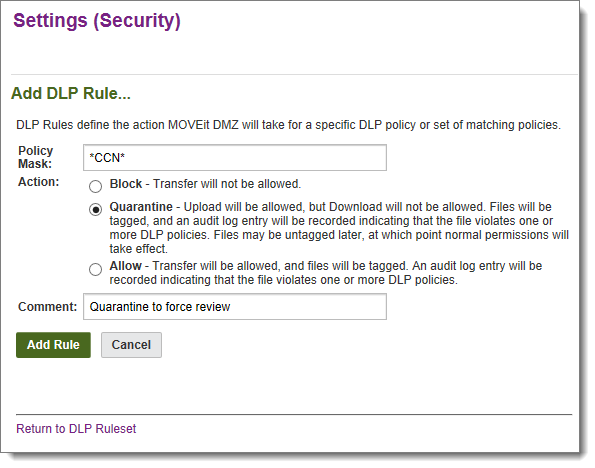
For a description of each of the settings, see Web Interface - Settings - Security Policies - Content Scanning - Data Loss Prevention (DLP)
Success or error messages appear in the ribbon at the top of the pane.
To continue and assign DLP rulesets to user classes, proceed as follows:
A confirmation pane appears.
Note that this will apply to all users in the class, including those for whom a ruleset was applied at the user level.

To continue and assign rulesets to specific users, which overrides the ruleset assigned to the user class for that user, proceed as follows:
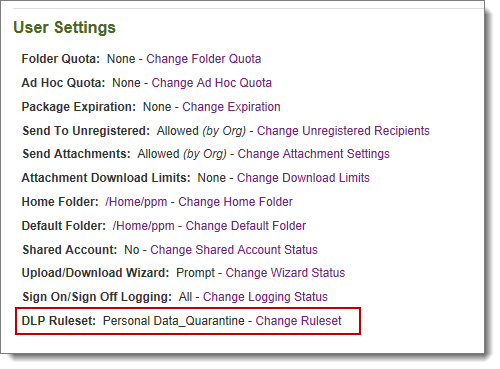
A User Profile, Change DLP Ruleset pane appears.
You should now be able to test your configurations.
The following steps are for administrators who configured DLP for an organization to do some initial testing.
If Content Scanning is enabled, MOVEit DMZ checks every few minutes to make sure the enabled AV and/or DLP scanner is available. This is part of the SysCheck routine (see Advanced Topics - System Internals - Scheduled Tasks), which can generate a built-in notification. It first checks the AV scanner and then the DLP scanner. If the either scanner is unavailable, SysCheck sends an email message to the Send Errors To email address and warns that the MOVEit DMZ server will not be able to transfer files until this situation is addressed. When the scanner becomes available again, SysCheck sends an email that states that scanning is now working.
Note: The system administrator should always test the connection when configuring a content scanner. They can also run MOVEit DMZ Check on demand.
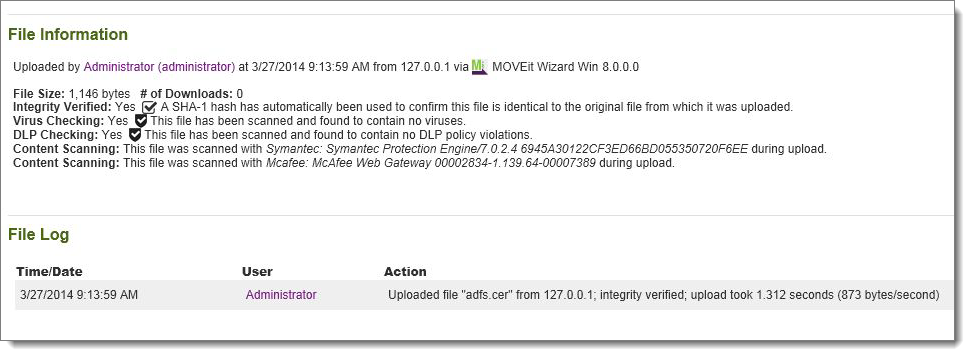
If a file was scanned, file detail pages will display the anti-virus (AV) or the data loss prevention (DLP) server information.
In the following example, the first line of Content Scanning information is for the AV server and the second line is for the DLP server.
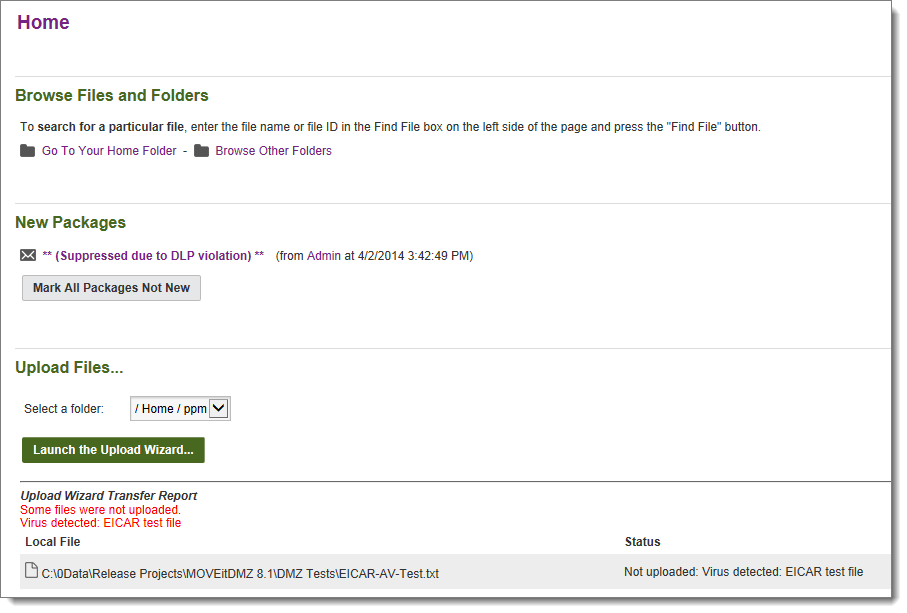
If a file fails the scan, the user who uploaded the file will see an error message on the browser page, for example:
Log file entries will report the user-configured name of the AV or DLP server used during the file upload. File records will also report the self-identification, version, and AV virus definition tag or DLP policy violation from the server, for example:
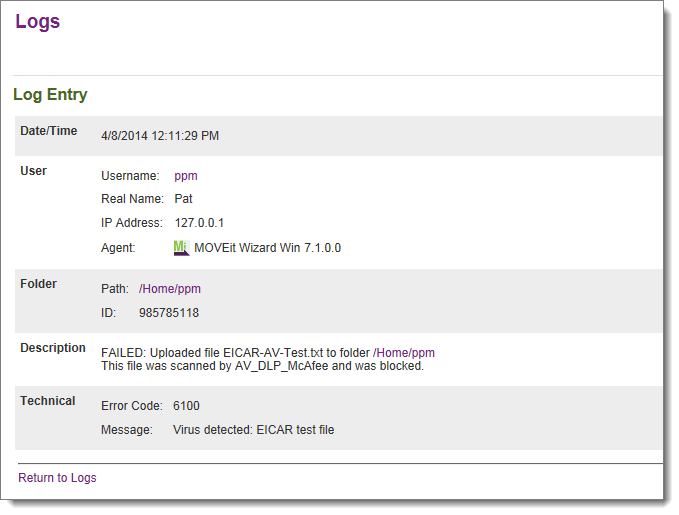
Error code numbers (6100 - 6103) are used to report AV errors. This will help when filtering logs. If an upload fails due to content scanning, the corresponding log table records will contain the AV server name and, if possible, the name of the virus.
Error code numbers 0 and 6150 are used to report DLP policy violations, as follows:
Notification macros for content scanning, if enabled, can report the scan results for both anti-virus (AV) and data loss prevention (DLP) scans.
AV and/or DLP information may be included in the following notifications:
The standard templates for these notifications do not include the content scanning results. You can add the macros that report the scan results by creating custom notification templates. Custom notifications are set in an organization via Settings | Appearance | Notification | Custom.
These reports show various types of content scanning activity. Two reports give specific information about scan results: Violations Blocked and DLP Violations (Allowed and Blocked). The remaining reports are maintenance reports that show aggregate counts.
If you are logged in as an organization administrator, the report shows scan results for your organization. If you are logged in as a system administrator, the report can show multiple organizations.
Note: Typically, reports may contain up to 30 days of online audit records and 30 days of online performance statistics, depending on how you run the scheduled cleanup tasks that archive the older data.