![]()
![]()
![]()
![]()
|
|
|
|
|
Integration of MOVEit Transfer with other existing web applications can be achieved using several MOVEit Transfer features. To offer seamless transitions between an existing web application and MOVEit Transfer, external authentication, single signon, and logo and color scheme customization all need to be combined. For MOVEit Transfer API based web applications that need to transfer users to the MOVEit Transfer server without requiring another signon, the session transfer capability can also be used.
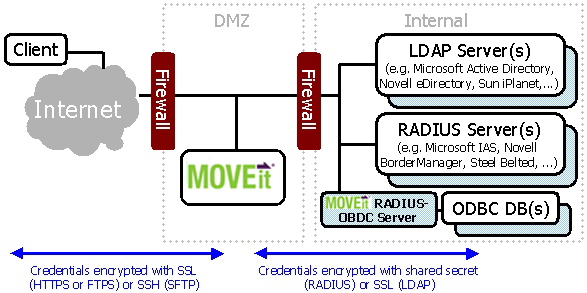
To keep the user from having to remember multiple login accounts, and to ease maintenance of account databases, use the MOVEit Transfer external authentication feature to tie MOVEit Transfer into your existing user authentication facility. MOVEit Transfer supports authenticating against both RADIUS and LDAP servers, along with its own internal user database. If you are using a SAML Identity Provider for authentication, MOVEit Transfer can be configured to use the Identity Provider. See the External Authentication section of the User Policy Settings page for more information.
To allow an existing web application to transfer a logged in user seamlessly to MOVEit Transfer, MOVEit Transfer accepts username and password information via HTML form fields. Optimally, the existing web application should provide a secure page with a button the user can click to transfer to the MOVEit Transfer application. For more information, see the Simple Single Signon Support section of the URL Crafting..
MOVEit Transfer also supports SAML Single Signon via a third-party Identity Provider. For more information, see User Authentication - Security Policies- Single Signon.
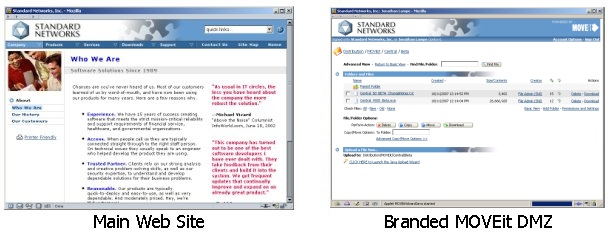
The custom logo and color scheme features of MOVEit Transfer can be used to make MOVEit Transfer appear as similar to a company's existing web application as necessary. You can add corporate logos and bullet images, and use the custom HTML header feature to add more advanced header code, such as flash logos or javascript menus. Select one of the included stock color schemes, or add a custom color scheme to match it exactly. For more information, see Brand Settings and Custom Schemes.
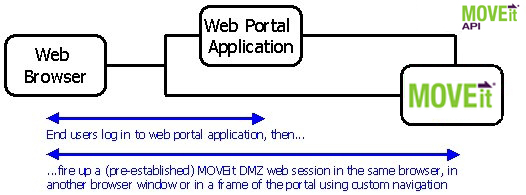
Some customers use MOVEit Transfer API to provide some MOVEit information and services inside their own web applications. Instead of logging on directly to MOVEit Transfer, visitors to these sites instead log on to the web application, which uses an internal copy of MOVEit Transfer API to do its own logon to MOVEit. This way, companies can provide information from their MOVEit Transfer server to visitors without having them leave the company website. However, for more advanced features, such as the MOVEit Wizard, it may be necessary to have the user move to the MOVEit server itself. Normally, the existing session that the MOVEit Transfer API object has with MOVEit cannot be transferred across servers, meaning the user would have to sign on again to access MOVEit directly.
To avoid this problem, MOVEit provides a mechanism for transferring an existing client session from the API-enabled server to the MOVEit server. First, the host that the MOVEit Transfer API application resides on must be marked as Trusted (see the Trusted Hosts section of the System Remote Access Policy page for more information). Next, the API application must send the user to a special ASPX page provided by MOVEit Transfer, called apilink.aspx, and provide the current session ID using an HTML form. This page takes the session ID argument and sets the appropriate cookie information on the client's browser, then forwards the client to MOVEit Transfer. The following example shows a URL and session id sent via the HTTP POST method.
Note: Previous versions of MOVEit Transfer suggested using the HTTP GET method to send the session id. Security best practices call for using the POST method instead of the GET method. If your web integration uses HTTP GET, and you want to continue to use the GET method, you must set the following registry entry:
Set the MOVEit Transfer registry value AllowInsecureQueryStrings to "1" to allow GET requests for sensitive transactions, and allow GET requests to include session IDs in apilink.aspx. For more information, see the Registry Settings section in the Technical Reference topic.
The original GET example suggested this:
https://moveit.yourcompany.com/apilink.aspx?sessionid?=<sessionID>
You can use a POST example like the following:
<BODY onload="document.forms[0].submit();">
<FORM action="https://moveit.yourcompany.com" method="POST">
<INPUT type="hidden" name="transaction" value="signon"/>
<INPUT type="hidden" name="username" value="{myusername}"/>
<INPUT type="hidden" name="password" value="{mypassword}"/>
<NOSCRIPT>
<P>Press this button to continue:</P>
<INPUT type="submit" value="Continue"/>
</NOSCRIPT>
</FORM>
</BODY>
The session ID can be accessed from the MOVEit Transfer API object. See the MOVEit Transfer API documentation for more information.
MOVEit Transfer supports direct, secure uploads and downloads initiated by other web applications.
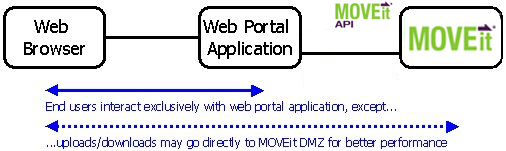
Using MOVEit Transfer in this manner allows customers to use MOVEit Transfer for secure storage of all their portal's sensitive files. It also allows customers to take advantage of MOVEit Transfer buffered transfers; otherwise handling of large files is an issue with many portal applications because they attempt to work with files on disk or all at once in memory. Typically, MOVEit Transfer API is used to initiate a secure upload and download by performing a session transfer at the same time. Complete documentation about this procedure (and a sample application) is available in the MOVEit Transfer API Windows documentation set.
See also Direct Download in Advanced Topics - URL Crafting.