![]()
![]()
![]()
![]()
|
|
|
|
|
このガイドでは、Windows 版 OpenSSH のコピーが既にインストールされていることを前提としています。
Windows 版 OpenSSH をまだインストールしていない場合は、このクライアントのインストール時に、[Choose Components (コンポーネントの選択)] セクションの [Server (サーバー)] ボックスを必ずチェック解除してください。
sftp -oUserKnownHostsFile=SSHDIR\known_hosts user@host
ホストが不明であるという警告が表示されます。質問の答えとして「yes」と入力します。ホストのキーが known_hosts ファイルに追加されます。次に、CONTROL+C キーを押してアプリケーションを終了します。
例:
C:\Program Files\OpenSSH\bin>sftp -oUserKnownHostsFile=C:\Progra~1\OpenSSH\bin\ssh\known_hosts sshkeyboy@dotnet.corp.stdnet.com
Connecting to dotnet.corp.stdnet.com...The authenticity of host 'dotnet.corp.stdnet.com (192.168.3.15)' can't be established.RSA key fingerprint is ce:08:6f:28:87:b6:50:f4:84:e5:37:c2:68:89:33:2a.Are you sure you want to continue connecting (yes/no)? yes Warning:Permanently added 'dotnet.corp.stdnet.com,192.168.3.15' (DSA) to the list of known hosts. sshkeyboy@dotnet.corp.stdnet.com's password:
(CONTROL+C)
C:\Program Files\OpenSSH\bin>
ssh-keygen -t rsa
キーの保存先ファイルを入力するよう求められたら、次の値を指定します。
SSHDIR\id_rsa
パスワードの入力を求められたら、Enter キーを押します (確認を求められたら、Enter キーを再び押します)。サーバーの認証に使用する RSA キーが作成されます。ssh-keygen プログラムによってキーファイルに適切なアクセス許可が自動的に与えられます。
例:
C:\Program Files\OpenSSH\bin>ssh-keygen -t rsa Generating public/private rsa key pair.Enter file in which to save the key (P7 $"/.ssh/id_rsa): c:\progra~1\OpenSSH\bin\ssh\id_rsa Enter passphrase (empty for no passphrase):Enter same passphrase again:Your identification has been saved in c:\progra~1\OpenSSH\bin\ssh\id_rsa.Your public key has been saved in c:\progra~1\OpenSSH\bin\ssh\id_rsa.pub.The key fingerprint is:44:a8:8c:88:3f:3f:91:8a:16:07:e4:c6:4a:6e:b8:df xxxx@jglshuttle
C:\Program Files\OpenSSH\bin>
sftp -oUserKnownHostsFile=SSHDIR\known_hosts -oIdentityFile=SSHDIR\id_rsa user@host
ユーザーのパスワードの入力を求められます。Control-C キーを押してプログラムを終了します。
例:
C:\Program Files\OpenSSH\bin>sftp -oUserKnownHostsFile=c:\progra~1\OpenSSH\bin\ssh\known_hosts -oIdentityFile=c:\progra~1\OpenSSH\bin\ssh\id_rsa sshkeyboy@dotnet.corp.stdnet.com Connecting to dotnet.corp.stdnet.com... sshkeyboy@dotnet.corp.stdnet.com's password:
(CONTROL+C)
C:\Program Files\OpenSSH\bin>
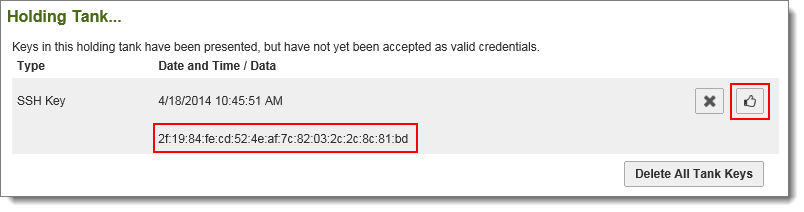
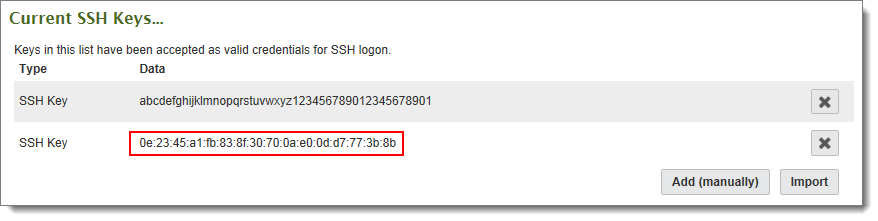
ユーザーのプロファイルを開いて、[User Authentication (ユーザー認証)] > [SSH Policy (SSH ポリシー)] > [Current SSH Keys (現在の SSH キー)] でこのフィンガープリントを追加します。適切に設定されたユーザーのプロファイルは次のようになります。

sftp -oUserKnownHostsFile=SSHDIR\known_hosts -oIdentityFile=SSHDIR\id_rsa user@host
例:
C:\Program Files\OpenSSH\bin>sftp -oUserKnownHostsFile=c:\progra~1\OpenSSH\bin\ssh\known_hosts -oIdentityFile=c:\progra~1\OpenSSH\bin\ssh\id_rsa sshkeyboy@dotnet.corp.stdnet.com Connecting to dotnet.corp.stdnet.com... sftp> pwd Remote working directory: /Home/SSH Key Boy sftp> cd .. sftp> cd .. sftp> dir Distribution Home WebPost sftp>
C:\>type sftp_commands.txt cd /Home/Steve put certreq.txt dir quit
C:\>c:\progra~1\openssh\bin\sftp -oUserKnownHostsFile=c:\progra~1\openssh\bin\ssh\known_hosts -oIdentityFile=c:\progra~1\openssh\bin\ssh\id_rsa -b sftp_commands.txt steve@dotnet.corp.stdnet.com Connecting to dotnet.corp.stdnet.com... sftp> cd /Home/Steve sftp> put certreq.txt Uploading certreq.txt to /Home/Steve/certreq.txt sftp> dir DecSet_6858908.exe MIFreelyInst_9971297.exe brain_1731860.wav certreq_1140952.txt decryptedFile_5848271.dat dmz_backups_2157003.html webpost_bundle_4594384.xml sftp> quit