![]()
![]()
![]()
![]()
|
|
|
|
|
In addition to SQL Server and MySQL Server, you can now configure MOVEit Transfer to use Azure SQL as its database server. This topic provides instructions on how to take an existing MOVEit Transfer SQL Server database and deploy it as an Azure SQL Database.
![]() Important: Your application server ( MOVEit Transfer Server) and database need to be configured for the same timezone. You can reveal the configured timezone to users using Org-level controls (SETTINGS -> Display -> Regulatory Compliance -> "GMT" timezone offset statement).
Important: Your application server ( MOVEit Transfer Server) and database need to be configured for the same timezone. You can reveal the configured timezone to users using Org-level controls (SETTINGS -> Display -> Regulatory Compliance -> "GMT" timezone offset statement).
![]() Azure SQL runs in Universal Coordinated Time (UTC). Your MOVEit Transfer application server nodes will need to match this if you are using the two-factor authentication enabled from the WebUI (Authenticator App, E-mail, and so on). If you choose to ignore this best practice, there are other forms of authentication that you can apply such as client certificates.
Azure SQL runs in Universal Coordinated Time (UTC). Your MOVEit Transfer application server nodes will need to match this if you are using the two-factor authentication enabled from the WebUI (Authenticator App, E-mail, and so on). If you choose to ignore this best practice, there are other forms of authentication that you can apply such as client certificates.
You will need an Azure SQL database server to migrate your existing database to. If you have not already created an Azure SQL database server, you can sign on to the Azure Management Portal and create one.
You will need the following server information in Task 1:
If you want to move your MOVEit Transfer MySQL database to Azure SQL, you can use the MySQLToMSSQL utility to generate Azure SQL schema, and then import into Azure SQL. (The MySQLToMSSQL utility now provides schema conversion support for Azure SQL.)
Deploy your MOVEit Transfer database to an existing Azure SQL database server.
Step |
Description |
1. |
Install SQL Server Management Studio (SSMS). Sign-on or remote desktop to the host/VM where the MOVEit Transfer server is running and install the latest version of SSMS
|
2. |
Launch SMSS and connect to the SQL Server Host where the current MOVEit Transfer database is. |
3. |
In Object Explorer, expand the Databases folder, right click the current MOVEit Transfer database and chose the following: Tasks > Deploy Database to Microsoft Azure SQL Database. The Deploy Database to Microsoft Azure SQL Database wizard displays. |
4. |
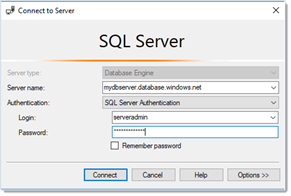
Click Next to proceed to the Specify Target Connection screen on the Deployment Settings tab and click Connect. The SQL Server Connect to Server dialog displays.
|
5. |
Provide information to connect to the target Azure SQL server and click Connect.
|
6. |
Provide information to configure the MOVEit Transfer that will be installed in Azure SQL.
|
7. |
On the Verify Specified Setting page, Choose Finish. [Export process begins] On the Operation Complete page, choose Close. |
Reset the MOVEit Transfer database login in the migrated database.
Step |
Description |
1. |
In SMSS, expand Databases > System Databases and right click on master and choose New Query. |
2. |
In the new query window, type:
—where my-password is the existing SQL Server user password. (If you don't remember it, you can use a new password and update it below.) |
3. |
Click Execute to run the procedure and set your password. |
Step |
Description |
1. |
On your Windows Server running MOVEit Transfer, startup the Windows Server Registry editor (regedit). |
2. |
Locate the following registry key:
|
3. |
Add the following subkey to the SQLServer subkey (if not there already).
|
Use the MOVEit Transfer Configure utility to connect the MOVEit Transfer server to Azure SQL.
Step |
Description |
1. |
Sign-on or remote desktop to the host/VM where the MOVEit Transfer server is running |
2. |
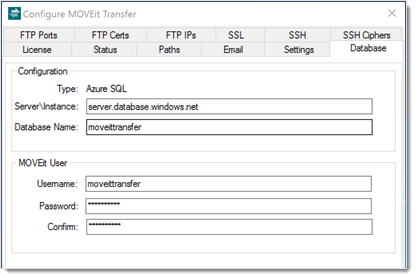
Launch the MOVEit Transfer Config console and select the Database tab.
|
3. |
Provide the following information so MOVEit Transfer server can connect to its new Azure SQL database:
|
4. |
Click Test Connection to ensure your credentials and connection information are valid. Then click Ok to apply your changes. Your MOVEit Transfer system will now use the new Azure SQL database. |