Sending a package is like sending an email with attachments.
The Package Actions panel can appear on your Home page, the Packages page, or both:
|
|
|
![]() Features and fields in the New Package dialog can vary based on your organization policy and your level of permissions. Your MOVEit Transfer administrator and site policy can determine options available when you send a package.
Features and fields in the New Package dialog can vary based on your organization policy and your level of permissions. Your MOVEit Transfer administrator and site policy can determine options available when you send a package.
![]() For keyboard-only systems, use the Tab key to browse and select the next item on the page, the Enter key to press buttons (once selected), and Spacebar to check or clear a checkbox.
For keyboard-only systems, use the Tab key to browse and select the next item on the page, the Enter key to press buttons (once selected), and Spacebar to check or clear a checkbox.
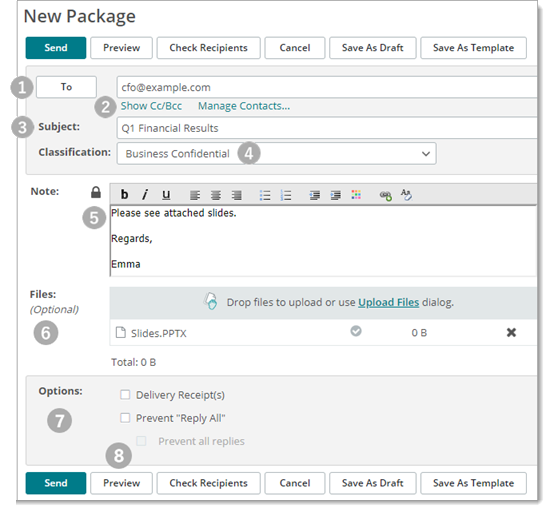
New Package Dialog (WebUI shown)

# |
Description |
1. |
To: Include an email address for each recipient. Use a comma (",") to create a list if you have more than one group's or user's email address. If your organization has the Address Book feature configured, click the To, CC, or BCC fields and select an address from the dropdown list. From: (not shown in this figure) The From field is available if you have access to another user's mailbox (shared mailboxes is enabled). Click to select a user to be listed as the package sender. If the From field is not available, the package lists you as the sender. |
2. |
Show CC and BCC adds these fields to the page. Recipients cannot view BCC recipients. |
3. |
Subject Description of the package. Appears in the new package notification email, and identifies the package in package lists. |
4. |
Classification A business impact or information security marking you select for this package.
|
5. |
Padlock icon
|
6. |
Files List the number of attached files that you added. The way you add files depends on whether you have enabled a wizard. Note: If no wizard is enabled, click Choose File or Browse, select a file, and click Upload. For more information, see Upload a File Without the Wizard. Launch the Upload Wizard This link is available if you have enabled a wizard. Click to open the wizard. In the wizard, drag and drop files, or click Add File to locate and select files. For details about the available wizards, and how to enable and use them, see
|
7. |
Options The options that appear depend on how your organization is configured. If an option has been locked by the administrator, the value appears, but you cannot change it.
|
8. |
Preview Shows what your note will look like to recipients. On the Preview page, click Edit to make changes. |
|
Check Recipients Verifies that the email address you entered are valid. |
Save as Draft Saves the package as a draft. You can open it from the Drafts mailbox. Drafts can be edited or sent. After a draft is sent, it is deleted from the Drafts mailbox. |
|
Save as Template Saves the package as a template in the Templates mailbox. You can open a template, edit it, and send it. The original template remains unaltered in the Templates mailbox. |
If you sent a package to an unregistered recipient (that is, recipients that are not MOVEit users) you might be prompted to provide a password. The Provide Password page opens.
If you select this option, send the suggested password to the recipient.
If you select this option, follow the requirements and type a custom password two times. Send this password to the recipient.
Important: For this option, you must provide the password to the unregistered recipients by sending it as a separate email, phone call, FAX, and so on in accordance with your organization's security policy.
When the Send button is clicked, MOVEit uses the following rules to reconcile each email address as a package recipient: