Running a Layer 2 Network Discovery
Layer 2 Network Discovery scans your network for devices, using the protocol(s) and settings you selected. After devices are found, you may view the new discovery results in the WhatsConnected console.
To run a Layer 2 Network Discovery:
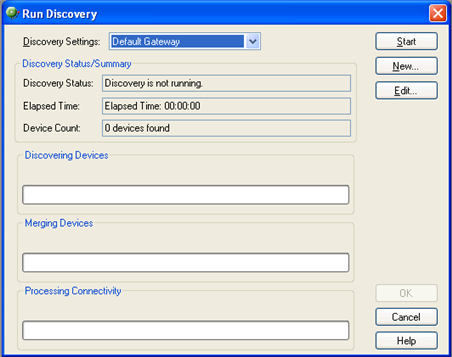
- From the console click Discover > Network. The Run Discovery dialog appears.
- From the Discovery Settings list, select the discovery configuration that you want to run. To learn more about discovery configurations, see Configuring Layer 2 Network Discovery.
- Click New. The Network Discovery Setup wizard appears.
- or -
Select an existing profile in the Discovery Settings list, then click Edit. The Network Discovery Setup wizard appears.
- or -
Select an existing profile in the Discovery Settings list, then click Start. The Network Discovery for the selected profile runs. Go to step 11. - In the Name box, enter a discovery configuration name that identifies the network (or part of the network) you want to discover. If you are editing an existing profile, the name is entered by default.
- Select a method for discovering the network. Either ARP Cache or Ping Sweep discovery, then click Next. For more information about discovery types, see About Layer 2 Network Discovery scan types.
- Enter an IP Seed Scope to define the starting point of either the ARP Cache discovery, or the IP ranges to use in the Ping Sweep discovery.
- Click Add Default Gateway to add your default network gateway to the IP Seed Scope.
- Click Advanced to further define the IP scope configuration of the discovery process.
To learn more about Advanced IP scope settings, see Discovery Advanced IP Scoping.
- Click Next. The Discovery Protocol Settings dialog appears.
- Select the credentials you want to use in the discovery process. Click Settings to add new or edit existing credentials. Enter the SNMP read communities as well as any Timeout and Retry information for the SNMP and ICMP requests.
Note: You can add SNMP, SSH, Telnet VmWare, and Windows credentials from the Protocol Settings/Credentials dialog. Add credentials based upon the types of network devices you want to discover. For more information, see Configuring network protocols and credentials.
- If needed, collect Windows Inventory Information. Select one of the options to determine whether you want basic or detailed information extracted from WMI devices found during the discovery process:
- Basic Windows inventory (OS, BIOS, Memory, Disk Drive...).
- Detailed Windows inventory (Basic + Software and Windows Updates).
- Select the credential discovery priority:
- Select a credential in the list, then click Move Up to increase the priority for the selected set of protocol settings/credentials in the list. The first protocol settings/credentials in the list have priority for the discovery scan and the subsequent protocol settings/credentials have priority in the order listed.
- or - - Select a credential in the list, then click Move Down to lower the discovery scan priority for the selected protocol settings/credentials.
Tip: As the network discovery runs, each protocol/credential setting is used, in the order listed in the Discovery Protocol Settings dialog, until a successful community name is found. Consider keeping the number of community names to a minimum to increase the efficiency of the network scan. Use the Move Up and Move Down options to move the most preferred credentials to the top of the list.
- Select a credential in the list, then click Move Up to increase the priority for the selected set of protocol settings/credentials in the list. The first protocol settings/credentials in the list have priority for the discovery scan and the subsequent protocol settings/credentials have priority in the order listed.
- Click Finish. The wizard closes and the new discovery configuration is automatically added to the Discovery Settings list in the Run Discovery dialog.
- Click Start to run the discovery process.
- When the discovery progress is complete, click OK. The Device Categories dialog appears. You can view network device information in this dialog or use the View menu for other network viewing options. For more information, see Viewing Network Data.