Example - Using a Network Statistic Monitor to check for IP data received and discarded
You can use the Network Statistic Monitor to verify that various types of packet and connection statistic information for network protocols, such as IP, TCP, and UDP, are within the thresholds that you define as acceptable. By doing so, you can ensure that devices handle specific types of network data as expected.
For example, you can use the IP received discarded threshold monitor to watch for situations where a router with Quality of Service (QOS) has priorities set for Voice over IP (VoIP). In these situations, other IP datagrams that a router receives are buffered for delayed processing to give processing priority to the VoIP data. If the buffer space is overrun, lower priority IP datagrams are discarded even though the router initially received them. In this example, we will configure and assign a Network Statistic Monitor that monitors thresholds set for IP data that is received by a router but discarded from the buffer. We will also configure and assign an Email Action to notify you if the monitor fails.
To configure a Network Statistics Monitor:
- Go to the Active Monitor Library.
- From the web interface, click GO. The GO menu appears.
- If the WhatsUp section is not visible, click WhatsUp. The WhatsUp section of the GO menu appears.
- Select Configure > Active Monitor Library. The Active Monitor Library appears.
- or -
- From the main menu bar of the console, select Configure > Active Monitor Library. The Active Monitor Library appears.
- In the Active Monitor Library, click New. The Select Active Monitor Type dialog appears.
- Enter a Name for the monitor, such as
Cisco Router Buffer Overflow Monitor. - Enter a Description for the monitor. This description is displayed next to the monitor name in the Active Monitor Library.
- Under the Thresholds to monitor section of the dialog, select IP received discarded.
- Click OK to save changes.
After configuring the IP received discarded monitor, you need to assign it to the device(s) that you want to check using the monitor. In the next steps of this example, you will assign the monitor to a single device, then using the Action Builder, configure and assign an Email Action that will notify you when the monitor goes down.
Tip: You can also assign the monitor to multiple devices at one time via Bulk Field Change. For more information, see Assigning a monitor to multiple devices.
To assign the IP Received Discarded monitor, and configure and assign an Email Action:
- Go to the properties for the device to which you want to assign the monitor.
- From either the Device View or Map View, right-click the device. The right-click menu appears.
- Select Properties. The Device Properties dialog appears.
- Click Active Monitors. The Device Properties - Active Monitors dialog appears.
- Click Add. The Active Monitor Properties dialog appears.
- Select the Cisco Router Buffer Overflow Monitor, then click Next.
- Set the monitor's polling properties, then click Next.
- Select Apply individual actions, then click Add. The Action Builder appears.
- Select Create a new action, then click Next.
- Select the Email Action, then click Next.
- Under Execute the action on the following state change, select Down; this option specifies that WhatsUp Gold will issue a state change after the monitor has detected that the router has received IP data, but the buffer has been overrun with too much data. Click Finish. The New Email Action dialog appears.
Note: On the console, ensure that the Mail Destination tab is selected.
- Enter a Name for the monitor, such as
Cisco Router Buffer Overflow Monitor. - In SMTP Mail Server, enter the IP address or Host (DNS) name of your email server (SMTP mail host).
- Enter the Port on which the SMTP Server is installed. The default SMTP port is 25.
- Optionally, change the Timeout from the default of 5 seconds.
In Mail To, enter the email addresses to which you want send the notification. You can enter two addresses, separated by commas (with no spaces). The address should not contain brackets, spaces, quotation marks, or parentheses.
- Select SMTP server requires authentication if your SMTP server uses authentication. This enables the Username and Password options.
- Enter a Username and Password to be used with authentication.
- Select Use an encrypted connection (SSL/TLS) if your SMTP server requires data encryption over a TLS connection.
- Click Mail Content to enter the notification content.
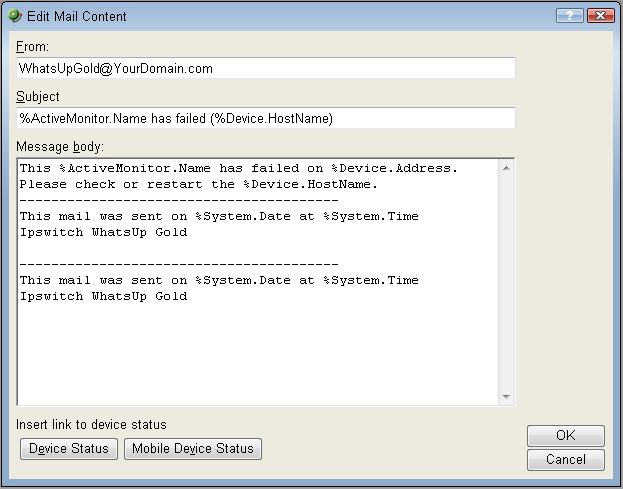
- In From, enter the email address that will appear in the From field of the email that is sent from WhatsUp Gold.
- In Subject, enter
%ActiveMonitor.Name has failed (%Device.HostName). This message indicates the device type, its down state, and the hostname of the device on which the monitor has failed. - In Message body, enter
This %ActiveMonitor.Name has failed on %Device.Address.Please check or restart the %Device.HostName.----------------------------------------This mail was sent on %System.Date at %System.TimeIpswitch WhatsUp GoldThis message indicates that the device, such as a router, has reached the threshold where IP data has overrun the buffer and should be checked or restarted.
Tip: Optionally, you can add a link to the Device Status or Mobile Device Status report for the device to which the monitor is assigned.
- Click OK to save changes.
- On the Active Monitor Properties dialog, click Finish.