Creating user accounts
After you have configured a host, you can add users to the host.
Note: If you are using a Microsoft Windows user database or some ODBC databases, you must use the respective database management tools to create and delete users. After the user is created, you can modify other settings in WS_FTP Server Manager.
To create a new user on a host:
- From the menu, select Hosts > Users. The Users page opens.
- Click Create. The Create User page opens.
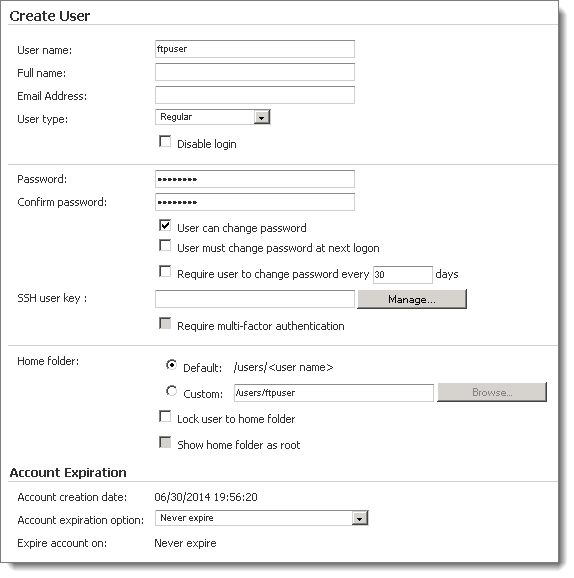
- Enter the appropriate information for each of the fields.
- Username. Enter the username for this user. The username is provided to authenticate with the server.
- Full name. Enter the full name of the user if desired.
- Email address. Enter a valid email address for this user. This email address can be referenced in notifications by using the notification variable: %emailaddress
- User type. Select a user type.
- Regular. Select this option to make this user a regular user.
- Anonymous. Select this option to designate this user as an anonymous user.
- Host administrator. Select this option to grant this user host administrator privileges. Host administrators have full permissions to all folders on the host and can manage the host through the Ipswitch Web Admin.
- System administrator. Select this option to grant this user system administrator privileges. System administrators have full permissions to all folders on the hosts and can manage all aspects of all hosts through the Ipswitch Web Admin.
- Disable login. Select this option to disable this user account. If this option is selected, this user cannot log in to the server.
- Password. Enter a password for this user.
- Confirm password. Re-enter the password for this user.
- User can change password. Select this option to allow this user to change his or her password. This option is not available on hosts that use Microsoft Windows, or Microsoft Active Directory.
- User must change password at next logon. Select this option to force the user to change his or her password the next time he logs in to the FTP server or the SSH server. This option is disabled by default. This option is available only if User can change password is enabled.
For the FTP Server:
When the user attempts to log in from the client, the FTP server returns:
560 Password expired, use 'pass oldpassword newpassword'
The user must then log in and, in the Password box, enter the old password and the new password, separated by a space: 'oldpassword newpassword'
The password is reset to the new password.
For the SSH Server:
The SSH Server issues an SSH_MSG_USERAUTH_PASSWD_CHANGEREQ packet to the client. In response to this message, the client should prompt the user for the new password.
In either case (FTP or SSH), the server ensures that the new password meets criteria for any password rules for the host. If the password is accepted, the server resets the User must change password at next logon option.
- Require user to change password every x number of days. When this option is selected, users are required to change their password at least once during the time frame specified. If a user fails to change his password during the allotted time, he cannot authenticate to the server. If this option is selected, the number of days remaining before this user must change his password is listed below this field. This option is available only if User can change password is enabled.
- SSH user key. SSH user host keys are one of the methods used by SSH listeners to authenticate users. Click Manage to add, remove, create, import, or delete SSH user keys. This option is not available to users in an Active Directory user database or a Microsoft Windows user database since they cannot authenticate using a public key.
- Require multi-factor authentication. When this option is selected, users must authenticate to the SSH server using both a password and SSH user key. You cannot select this option unless a password and one or more SSH user keys are associated with this user's account. Administrators should ensure that the SSH listener associated with this host allows both password and public key methods of authentication, otherwise users who require multi-factor authentication will not be able to connect to the SSH server.
- Home folder. Select whether you want this user's home folder to be created in the default location or a custom location. If you select Custom, enter the full path to the folder or click Browse to locate it.
- Lock user to home folder. Select this option to prevent this user from navigating outside their home folder.
This option does not apply to administrator users, even though it can be selected for those users. System and Host Administrators can always navigate outside their home folder.
- Show home folder as root. This option can be used only if Lock user to home folder is selected. If this option is selected, the user's home folder will be displayed to the user as the root of the FTP directory's path. (For instance, if the user chooses the following directory:
/Users/ThisUsersHome/OneOfMyFolders, if this option is selected, the user will only see/OneOfMyFolders.)This option does not apply to administrator users, even though it can be selected for those users. System and Host Administrators can always see the full path to the user's home folder.
The log file will always show the full path to the user's home folder.
Notifications will display the full path to system and host administrators, and if Show home folder as root is selected, will not display the full path to a user.
To select the home folder options for all users on the host, use the iftpaddu command line options (+lock for Lock user to home folder and +root for Show home folder as root ). The iftpaddu command supports the WS_FTP Server user database, but cannot be used with external user databases.
- Account creation date. Today's date is displayed.
- Account expiration option. This option is used to specify when and how a user account should expire.
- Never expire. Select this option if you do not want the user account to expire.
- Expire on the expiration date. This option expires the account on the specified date.
- Expire in set number of days after creation. This option expires the account a set number of days after the account was created.
- Expire in set number of days after last logon. This option expires the account a set number of days after the account's last logon.
- Expire account on. If you have selected Expire on the expiration date, a date field appears here. Use the calendar (
 ), select the date after which you want this account to expire. If you selected Expire in set number of days after creation or Expire in set number of days after last logon, enter a number of days here.
- Click Save.
Note: If you want to create a user account on a host other than the current host, you can switch hosts by selecting Host > Current Host > Change Hosts from the menu. Select the host you want to create a user account for, then follow the steps as listed above.