These instructions show you how you can migrate your existing MOVEit Transfer file store to be served from the Microsoft Azure Storage Service.
Your file store is a mounted drive, volume, or cloud service available to MOVEit Transfer where encrypted files and packages can be saved and accessed. For more information, see the visual in the section titled System Requirements.
The option to move your existing files and packages to Microsoft Azure Blob Storage enables you to leverage a file store that is:
![]() It is best practice to leverage Azure Blob storage if you are running a MOVEit Transfer instance from Azure and if you are running the Azure Storage Service in the same Azure region (for lowest latency). For more information, consult the best practices topic in the MOVEit Transfer Administrator Guide.
It is best practice to leverage Azure Blob storage if you are running a MOVEit Transfer instance from Azure and if you are running the Azure Storage Service in the same Azure region (for lowest latency). For more information, consult the best practices topic in the MOVEit Transfer Administrator Guide.
The MOVEit Transfer Blob Storage Conversion utility migrates the root filestore of your MOVEit Transfer organizations (Files\{orgId}) to Azure Blobs Storage. Other, non-root filestore files are not moved.
![]() Non-root filestore files such as logs, certs, Web UI branding, and licenses remain local (or, in the case where MOVEit Transfer was deployed as a Web Farm, they remain on the UNC file share).
Non-root filestore files such as logs, certs, Web UI branding, and licenses remain local (or, in the case where MOVEit Transfer was deployed as a Web Farm, they remain on the UNC file share).
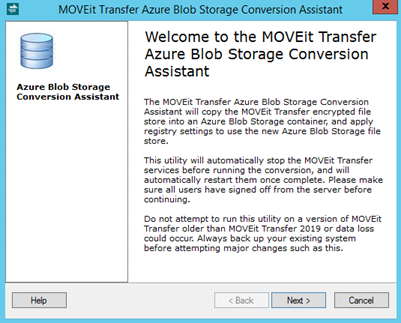
Welcome Screen of Migration Utility (the Blob Storage Conversion Assistant)

You will need the following:
Requirement |
Description |
Azure Account |
You will need sign-on credentials to your Azure account. To create an Azure Account navigate to the Azure Management Portal and click Create one! Azure Management Portal Sign-on Screen
|
Azure Blob Storage Service |
You can create a Blob Storage service if you have one of the following:
|
Container Name |
Storage service container name. (Essentially a Blob top-level folder name) |
An API Key |
An API key used when MOVEit Transfer connects to Azure Storage.
|
Migration Tool |
Get the MOVEit Transfer Azure Blob Migration Utility from the MOVEit Community Site. It is available from the My Products Page. |
![]() It is best practice to send out a notification email to MOVEit Transfer users before you perform maintenance operations such as filestore migration.
It is best practice to send out a notification email to MOVEit Transfer users before you perform maintenance operations such as filestore migration.
This task is needed to prevent users from modifying files in the active datastore before the migration completes.
Step |
Description |
1. |
Remote desktop or sign-on to the host where the MOVEit Transfer Server is running. |
2. |
Open the Configure MOVEit Transfer Console. |
3. |
Click the Status tab and close services to prevent users from modifying the MOVEit Transfer filestore.
|
Step |
Description |
1. |
Extract the files from the MOVEit Transfer Utilities .zip file. |
2. |
Launch the MOVEit Transfer-LocalFsToAzureBlobs application.
|
3. |
Allow file migration the time it needs to complete.
|
After you migration completes, you can verify that MOVEit Transfer is pointing at your Azure Storage Service by checking the Configure MOVEit Transfer Console.
Step |
Description |
1. |
From the host where the MOVEit Transfer Server is running, open the Configure MOVEit Transfer Console. |
2. |
Click on the Filesystem tab. MOVEit Transfer now points to Azure storage.
|