Clients
The Wireless Clients page displays a table of wireless clients connected to your network and all available data on each connection. The client name is determined by Wi-Fi authentication and may not be present under all authentication schemes. If the client name is not available or cannot be determined, the client's MAC address is displayed. If a client is displayed as 0.0.0.0, this indicates the device's controller is unable to obtain its IP address or the access point cannot determine it.
For each client connected during the selected time interval, the following information is displayed:
- Client. The name assigned to the wireless client connected to the access point.
- MAC. The MAC address specific to the client connected to the access point.
- SSID. The SSID broadcast by the access point to which the client is connected.
- Device. The access point to which the client is connected.
- First Seen. The date and time the client first connected during the defined date/time interval.
- Last Seen. The date and time the client disconnected during the defined date/time interval.
- Bytes Sent. The amount of data sent by the client during the session.
- Bytes Received. The amount of data received by the client during the session.
- Percent Connected. The percent of time the client was connected in relation to the First Seen and Last Seen times displayed.
Note: If Current is selected as the reporting interval, the Clients page only displays data for clients currently connected.
Clicking the icon ![]() to the right of any client name causes details for that client to open in a full page view. For additional information, see Individual Client Detail.
to the right of any client name causes details for that client to open in a full page view. For additional information, see Individual Client Detail.
To create a custom filter for a column:
- Click the
 icon for the column you want to filter.
 - Use the lists and entry fields within the dialog that appears to define the filter.
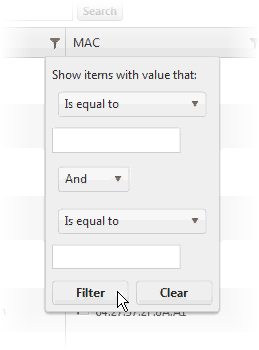
- Click Filter to apply the filter to the column.
Note: Multiple columns can have filters applied simultaneously.
To search for a specific client:
- Enter an SSID, a client’s name, a client’s MAC address, or a client’s IP address in the search box.
- Click Search. The list is filtered to display only devices matching your search criteria.
Note: The search box supports partial search terms but not 'wildcard' characters.
Note: When comparing a client's MAC or IP address against the entered search term, the results returned reflect clients' IP or MAC addresses that begin with the search term entered. When comparing a client's name or SSID against the entered search term, results returned reflect SSIDs and names containing the search term entered.
To assign clients to a new or existing client group:
- Click the check box next to the MAC address for each client to be added to the group.
- Click Assign Group.
- Select a group from the list within the dialog that appears or enter a new group name if you are creating a new client group.
- Select the radio button for either MAC Address or MAC Prefix to set the group Entry Type.
- Click Assign.
For information on creating client groups, see Configuring Wireless Client Groups.