- Open the Reports module.
- There are two ways to create a schedule:
- Under the Schedule tab, click Create and then select a template from the drop-down list
- Under the Templates tab, select a template you want to use as the basis of your schedule, and click Schedule report
The Create Schedule dialog opens.
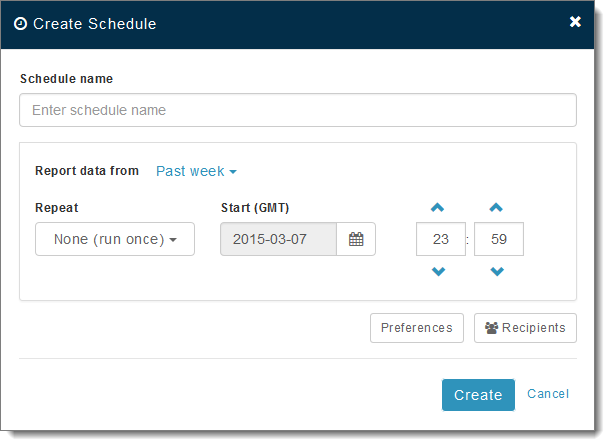
- Enter a Schedule name. This is the name that will appear in the Schedule list.
- Next to Report data from, select a time range of data to include in the report. Time ranges are relative to the time when the report runs.
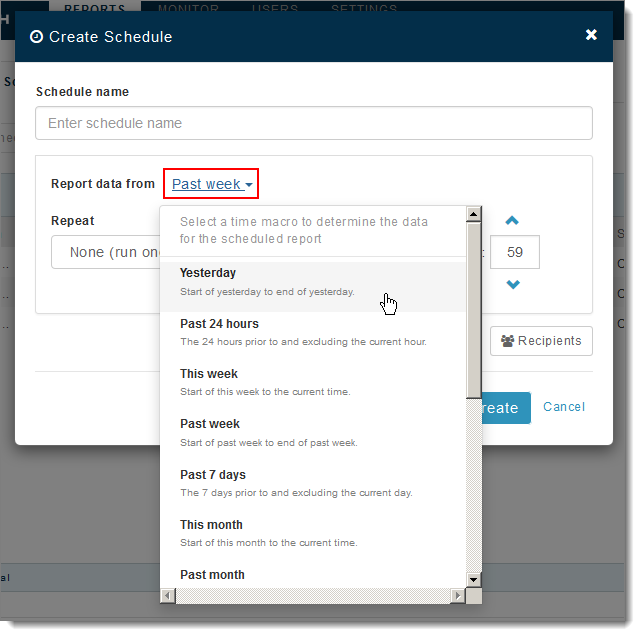
- Yesterday: Start of yesterday to end of yesterday.
- Past 24 hours: The 24 hours prior to and excluding the current hour.
- This week: Start of this week to the current time.
- Past week: Start of past week to end of last week.
- Past 7 days: The 7 days prior to and excluding the current day.
- This month: Start of this month to the current time.
- Past month: Start of past month to en of last month.
- Past 30 days: The 30 days prior to and excluding the current day.
- This quarter: Start of this quarter to the current time.
- Past quarter: Start of past quarter to end of last quarter.
- This year: Start of this year to the current time.
- Past 12 months: The 12 months prior to and excluding the current month.
- Last 15 months: The 15 months prior to and including the current month.
- Select a schedule Start (GMT) date and time: Click the calendar icon to select a date in the future, and enter a start time in the hour and minute boxes provided.
To clear the date, click the calendar icon and then click Clear.
Important: Remember, all times are in GMT. If, for example, you are in the Eastern Standard Time zone and it is 2:00 pm and you want to schedule a report to run immediately, for Start time you must enter 19:00 (2:00 pm + 5 hours offset from GMT = 7:00 pm, which is 19:00).
Note: If you set a Start time in the past, the schedule will not run.
Note: If you will repeat this schedule on a recurring basis (next step), do not select the 31st of the month as a Start date.
- Optional: Select a Repeat mode. The default is None (run once). Select a repeat frequency from the drop-down list.
- None (run once): Run one time only. Schedule will remain in the Schedule list but will not run again.
- Hourly: Select the number of hours between successive schedule runs. Example: If the start hour is 11:18 am and you select three hours, schedule will run again at 2:18 pm, 5:18 pm, 8:18 pm, etcetera.
- Daily: Repeats every day at the start time.
- Weekdays: Repeats every weekday at the start time. Note: If you start the schedule on a weekend, the first report run will occur on Monday.
- Weekly: Select the number of weeks between successive schedule runs, and which days to run the schedule. Schedule will repeat every week at the same start day/time.
- Monthly: Repeats every month on the start day/time. Note: The schedule will run only in months that contain that day. Example: if you start the schedule on July 31st, Ipswitch Analytics will generate reports only in January, March, May, October and December.
- Annually: Repeats every year on the start day/time.
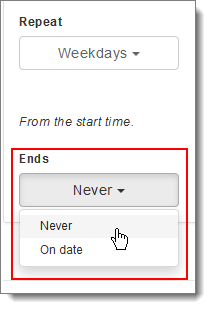
When selecting a Repeat mode, you must specify when the schedule Ends:
- Never: The schedule will repeat indefinitely into the future.
- On date: Specify the last calendar day to run the schedule.
Note: If you save the schedule now, the schedule will deliver report(s) to the Library only; only you, Administrators and System Administrators will have access to view the Library report.
- Click Preferences to specify the following:
- Report name: Enter a name for the report. The suggested name is the same as the schedule name, but you can change it. The report name will show in the Library (if delivered there), or will become the file name if delivered as a PDF or CSV attachment.
- Optional: Select a Macro from the drop-down list to the right of Report name to append a dynamic date/time at the end of the report name. Descriptions of each macro display in the drop-down list
- Description: Enter a description for the report. This description will appear next to the report name in the Library.
- Report Type: Select where you want to deliver the report:
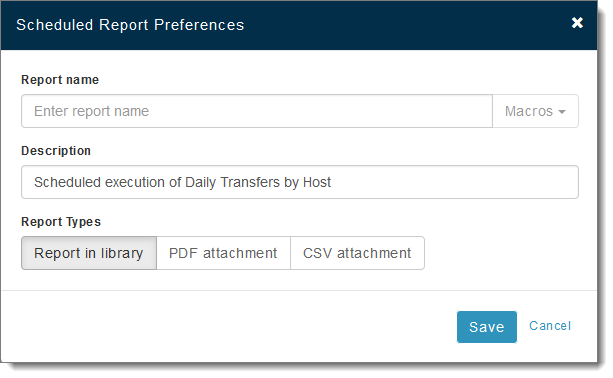
Click Save when you are finished.
- Click Recipients.
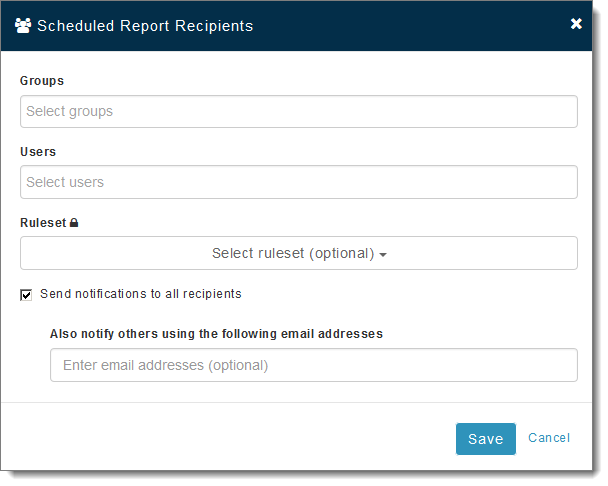
Important: If you don't select any recipients, the report will deliver to the Library only, where it will be accessible only to Administrators and System Administrators. Recipients will receive the report via email only if you select Send notifications to all recipients.
There are two types of Recipients:
- Users and User Groups: These recipients will have access to view the report in the Library (if sent there). If Send notifications to all recipients is checked, these recipients will receive an email that contains a link to the Library report and/or the attached report in PDF or CSV forma (depending on the Report Type you selected in Step 7). Warning: If you are a Creator, you must include your user name or user group here, otherwise you will not be able to view the Library report. Administrators and System Administrators can view all Library reports at all times.
- External email addresses: Manually enter one or more email addresses (separated by commas) beneath Also notify others using the following email addresses. If Send notifications to all recipients is checked, these email recipients will receive an email that contains a link to the Library report and/or the attached report in PDF or CSV forma (depending on the Report Type you selected in Step 7). Note: If the email address is not an address that is recognized by Ipswitch Analytics, links to Library reports will require sign in to Ipswitch Analytics.
The following email notification shows a recipient who has received PDF and CSV report attachments, as well as a link to the report in the Library:
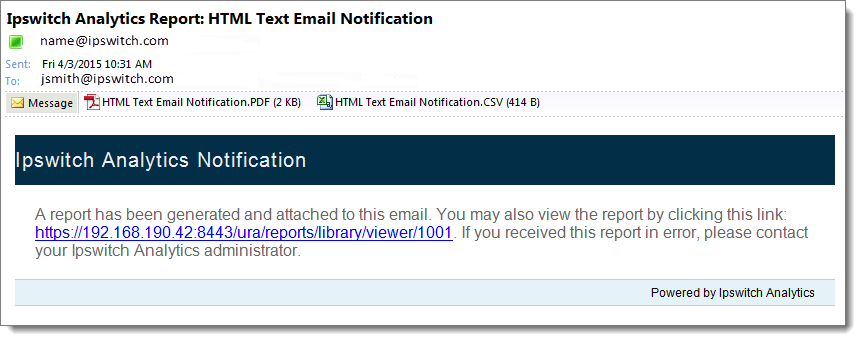
The link opens the Library, where the recipient can locate the report name in the title of the email. Recipients will see only Library reports for which they have permission.
Administrators and System Administrators only: Optionally select a Ruleset to control what MOVEit sources will contribute data to the scheduled report.
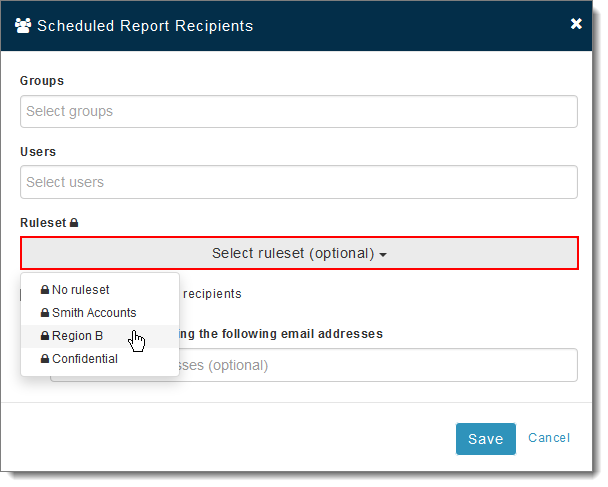
Note: You must first create a ruleset before the Ruleset option will display here.
Important: If a schedule's underlying template contains filter settings AND you assign a ruleset to the schedule, the report will include only the MOVEit data sources allowed by both. For example, if the template's filter allows data only from servers A and B and the schedule ruleset alllows data only from servers B and C, the final report will not include data from server B.
Click Save when you are finished with Recipients.
- Click Save again to save the schedule.
The schedule appears in the Schedule list showing Status > Scheduled.


