![]()
![]()
![]()
![]()
|
|
|
|
|
Configuring and managing user authentication (SETTINGS > Security Policies - User Auth).
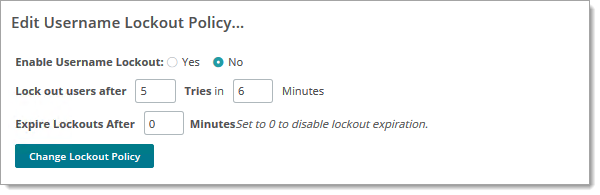
A username lockout policy specifies the number of incorrect password a user can enter within a specified time period, after which the user account is locked. Lockouts can be set to expire after a configurable amount of time has elapsed.
Make your selections and click Change Lockout Policy
Options:
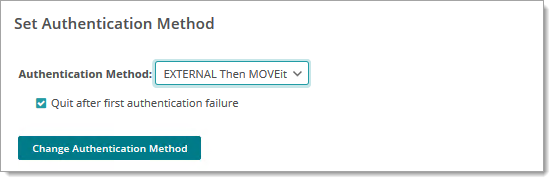
By changing the authentication method to an external server, you place the responsibility of user security on that server. If your authentication server is compromised, the data contained within MOVEit Transfer might also be compromised. If you switch authentication methods to External Only, users must be configured on the external server in order to be able to sign on to MOVEit Transfer.
Options:
Note: This is the only mode in which the Change password on next signon checks are enforced.
Authentication Sources
When a user signs on to the organization for the first time, each active authentication source is tried, in the order listed. If a user successfully authenticates to a source, that source is recorded in the user's profile, so that the user is authenticated against it at the next sign-on. (See the Authentication Source Affinity section of the User Profile page for more details).
The Add/Edit External Authentication Sources list is available when the Auth Method is set to EXTERNAL, Then MOVEit or EXTERNAL Only.
Use the up and down arrows in the Actions column to change the order in which the authentication sources are queried. For more information, see External Authentication.
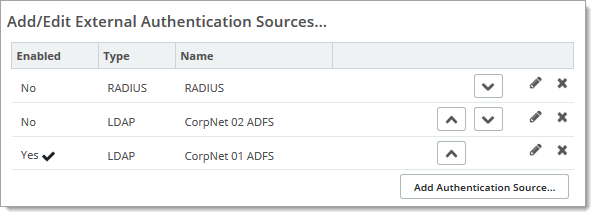
Use the up and down arrows in the Actions column to change the order in which the authentication sources are queried.
For more information about adding and configuring external authentication sources, see External Authentication.
This section lets an administrator edit the default Deny Multiple Sign Ons setting for the organization. New users will be created with the default setting, and when changed, an option is provided to set all current users with the new setting value.
This section is where administrators may list, add, edit, delete, and assign account expiration policies. These policies govern how accounts that are assigned the policy will be considered expired and removed from the system. For more information about creating and assigning expiration policies, see the Expiration Policies Feature Focus page.
Use this account expiration setting... |
if you want to... |
Edit Account Expiration Policy |
Create, edit, and apply a custom account expiration policy for any specific user class. Expiration policies can be defined with:
|
Delete Users after Expiration |
Remove expired accounts automatically (with an optional grace period). |
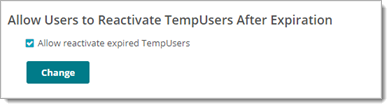
Allow Users to Reactivate TempUsers after Expiration
|
Enable MOVEit Transfer to reactivate an expired TempUser account when triggered by one of the following conditions:
|
The Single Sign on feature allows MOVEit Server to authenticate a user without requiring sign on, provided that user is already signed on to a third-party user directory (such as Microsoft Active Directory) using their network or corporate account. This section is where administrators can set up MOVEit as a service provider and configure one or more identity providers. For information on configuring Single Sign-on, see the User Authentication - Single Sign-on page. For information on general requirements, supported functionality, and how to deploy single sign on to users, see the Single Sign-on Feature Focus page.
See the section titled Multi-Factor Authentication.
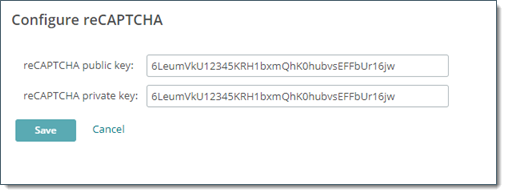
In order to generate a pattern that a human can read and a machine cannot predict, you need a private and public key. reCAPTCHA challenge prompts can be enabled from different workflows (guest user sign on and password reset, for example) where you want to add an extra-layer of security to mitigate risk of sensitive operations or workflows being compromised by a web bot or malicious script.
To get the keys, search the web for recaptcha follow the links to use the reCAPTCHA service on your site and to sign up, as applicable. The service is part of Google, so you need to create or use an existing Google account. Log in, enter a domain name and the page will display the Public Key and Private Key. Copy them and paste them into the two fields here.
For more information, you can also visit the reCAPTCHA FAQs site.
![]() If you have reCAPTCHA enabled for Unregistered Senders or password reset, never clear the reCAPTCHA key fields. Always clear (disable) the use of reCAPTCHA for reCAPTCHA-enabled workflows prior to removing these keys. If either of these user scenarios are enabled, valid keys must be present in order for reCAPTCHA patterns to be generated and for your Unregistered Recipients to be able to send packages and/or users to begin a reset password workflow.
If you have reCAPTCHA enabled for Unregistered Senders or password reset, never clear the reCAPTCHA key fields. Always clear (disable) the use of reCAPTCHA for reCAPTCHA-enabled workflows prior to removing these keys. If either of these user scenarios are enabled, valid keys must be present in order for reCAPTCHA patterns to be generated and for your Unregistered Recipients to be able to send packages and/or users to begin a reset password workflow.