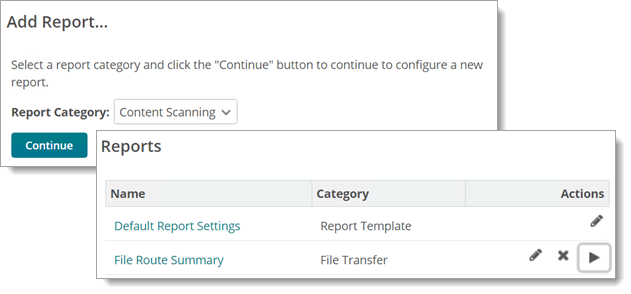
Reports provide access to MOVEit Transfer performance and status data. A report is a set of instructions for executing a data query, formatting the results, and saving the resulting report to a specific location. Reports can be created either with one of the built-in categories and types, or the Custom category, which allows administrators to enter their own query parameters or import specialized reports. For more information about defining Custom reports, see the Custom Reports page.
Use the Reports page to add, edit, execute, and delete automated reports, and to access the Statistics page.

To add a report, select the category of report you wish to create, and click the Continue button. This will bring up the Add Report page (for a list of report categories, and the report types available in each category, see the Report Types page). To edit an existing report, click on the name of the report in the report list, or click the Edit link associated with the report.

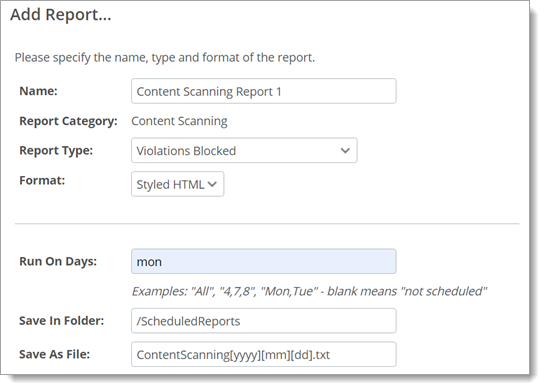
Each report must have a name, which will be listed on the reports page. The name for the new report should be chosen to convey the category and type of the given report. Names such as "Total File Transfer Report" or "Memory Usage for the Last Month" are good choices. Names such as "Report 1" or "My Report" are less desirable. The report name can be changed after creation without affecting the operation of the report.
The type of report to execute is selected from this drop-down menu. Each report category has several report types to choose from. Most report categories have Total reports, which provide aggregated information, as well as By Month, By Week, and By Day reports, which break the aggregated information into the selected timespans. A complete list of report categories and the types available in each can be found on the Report Types page.
The format of the report is selected here. This defines how the report information will be presented. Available formats are:
<DMZReport>
<ReportRow>
<Column_Name>Value</Column_Name>
<Column_Name>Value</Column_Name>
...
</ReportRow>
...
</DMZReport>
Reports may be scheduled to run on specific days of the week, or days of the month. Enter the days you wish the report to run in this field, or "All" to have it run every day. Scheduled reports will be run during the nightly scheduled task on the days configured. By default, this task runs at 1am. You may also leave this field blank if you do not want reports to run automatically.
Some examples of values which may be entered in this field and how those values would be interpreted may help.
These fields determine where the resulting report document will be saved. The Save In Folder value should be a MOVEit Transfer folder path, and will be where the report document will be saved on the system. The value does not need to be an existing folder, as MOVEit Transfer will create the folder if it does not exist. Date macros may also be used to create date-specific folders. For example: "Distribution/Reports_[yyyy][mm]" would save reports to a folder named "Distribution/Reports_200510" during the month of October, 2005.
The Save As File value defines the name of the file which the report document will be saved to. As with the Save In Folder value, date macros can be used to create date-specific filenames. For example: "Total_File_Transfers_[yyyy][mm][dd].txt" would save a report to a file named "Total_File_Transfers_20051020.txt" on October 20, 2005.
If the Overwrite Existing File option is checked, the report generator will attempt to delete a file that has the same name as the new report, if such a file exists. This is especially useful for reports with static names, as errors could occur if the destination folder is not configured to allow file overwrites.
The rest of the configuration of a report deals with setting the available parameters for the report type. These parameters can narrow down the scope of report, as well as define the output of a report. To see which parameters are available for each report category, see the Report Types page. Available parameters are:
Date and time macros provide a powerful way to define dates, times and date-and-time ranges relative to the current date and time. The six basic elements of date and time macros are:
To express relative dates and times, plus (+) and minus (-) modifiers are used within the square brackets of the macros. For example, "[DD-2]" represents two days ago. Date and time macro modifiers affect the entire macro expression. Some examples of this behavior may help explain it.
Schedule and Date Macro HINTS:
The rest of the configuration of a report deals with setting the available parameters for the report type. These parameters can narrow down the scope of report, as well as define the output of a report. To see which parameters are available for each report category, see the Report Types page. Available parameters are:
Scheduled reports will be run during the nightly scheduled task on the days configured in the Run On Days field. However, reports may also be run manually using one of two buttons in the Run Report section.
![]() For keyboard-only systems, use the Tab key to browse and select the next item on the page, the Enter key to press buttons (once selected), and Spacebar to check or clear a checkbox.
For keyboard-only systems, use the Tab key to browse and select the next item on the page, the Enter key to press buttons (once selected), and Spacebar to check or clear a checkbox.
Select Play Button Using Tab Key

Clicking the "Run Report and Download" button will cause the report to be created and sent directly to the browser. At this point, the browser should prompt to save or open the file. Clicking the "Run Report and Save" button will cause the report to be created and saved just as scheduled reports would be, in the folder specified by the Save In Folder value, with the filename specified by the Save As File value.
Additionally, an administrator may click the Run link for a report in the report list on the main Reports page. This link will perform the same action as the "Run Report and Download" button above.
The Default Report Settings entry exists in order to save administrators from having to enter similar configuration information into each report they add. Configuration information entered in this report entry will be automatically provided when adding new reports. Therefore, settings that many reports will have in common (Format, Schedule, etc) should be configured here.
Because the Default Report Settings entry is not a real report, it cannot be run, and cannot be deleted. Editing the entry, however, works just like editing any other report. Note that changes made to the Default Report Settings entry will NOT be applied to existing reports, only to new reports.
The layout of Styled HTML format reports is controlled by a template file called "reporttemplate.htm" A copy of this file can be found in your "(webroot)\templates\en" folder (e.g., "d:\moveitdmz\wwwroot\templates\en") Do not change this file; it will be overwritten every time you upgrade. Instead, follow one of these two brief procedures:
To change the Styled HTML format for all organizations:
To change the Styled HTML format for a particular organization:
Note that changes made to this file will be applied immediately to new reports. However, changes made to this file will not affect any reports already created. If you have custom versions of reporttemplate.htm in both an organization-specific subfolder and the main "custom" subfolder, the organization-specific version will apply.
The following macros may be used in reporttemplate.htm.