Configuring a notification policy
Note: It is not required that you select a notification policy for use with every threshold. If you do not select a notification policy, no notifications are generated for the threshold, but a dashboard report with the out of threshold items appears on the Alerts Home page.
To create a notification policy:
- Click the Alert Center tab.
- Click Notification Policies. The Alert Center Notification Policies dialog appears.
- Click New. The New Alert Center Notification Policy dialog appears.

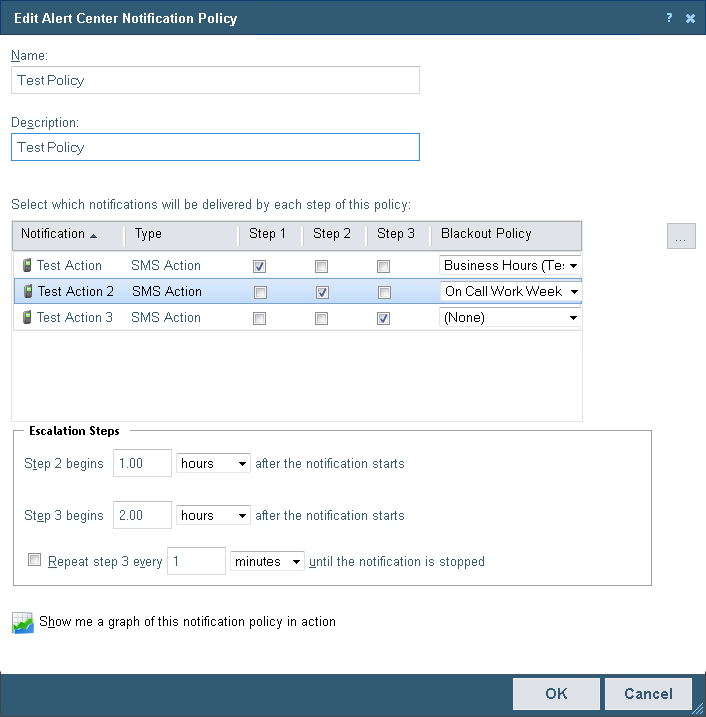
- Complete the identifying information for the policy.
- Name. Type a name for the notification policy. The name identifies the policy in the Alert Center Notification Policies dialog.
- Description. Enter a description of the policy. The description appears next to the policy name in the Alert Center Notification Policies dialog.
- Select the notifications you would like delivered for each of the three steps in the policy. You can select multiple notifications for each policy step. To select a notification, click the boxes for the step of the policy that you would like the notification to be sent. For example, if you would like an email sent to Bob for the policy's first step, select the Step 1 boxes for the Email Bob notification. Continue the same for Step 2 and Step 3. Step 1 of the notification policy begins as soon as an item falls out of threshold. You can specify when steps 2 and 3 begin in the Escalation Steps section of the dialog. If you do not see an appropriate notification, or if the list is empty, click browse (...) to open the Notification Library and configure a new notification.
- If desired, use the drop-down list to select and apply a configured blackout policy for any individual notification. If an applied blackout policy is in effect:
- Notifications for the threshold will resume after that blackout policy ends.
- The subsequent action in the notification policy will continue to fire.
- Select the how the policy notifications proceed after Step 1 in the Escalation Steps section.
- Specify a start time for steps 2 and 3 of the policy. By default, step 2 is set to begin 1 hour after the first notification occurs, and step 3 is set to begin 2 hours after the first notification.
- You can choose to repeat step 3 of the policy at a regular interval until the notification is stopped. By default, the policy is set to repeat step 3 every hour until the notification is stopped.
Note: In order for this repeat function to work properly, step 3 must be enabled for at least one notification in the policy.
Tip: You can view a graph of the notification policy in action by clicking
 Show me a graph of this notification policy in action.
 - Click OK to save changes.