![]()
![]()
![]()
![]()
|
|
|
|
|
For MOVEit Automation Legacy Failover Environments: See Install Analytics Agents in Legacy Failover Environments.
Install an Agent for each MOVEit database or MS Exchange database that you want to include in the Ipswitch Analytics environment. Install only one Agent per machine.
Prerequisites |
|
Recommended configuration |
MOVEit Automation or MOVEit Transfer: install the agent on the machine that hosts the MOVEit database. Ipswitch Analytics for MS Exchange: The agent can be installed on any machine that has an SSL connection with the Exchange server and the Ipswitch Analytics server. |
Alternative configurations |
The agent can be installed on any machine that has network connectivity with the MOVEit database. For more information, see Configuration Options. |
Number of Licenses |
Each Ipswitch Analytics agent uses one license. The standard Ipswitch Analytics package comes with two agent licenses. To add another MOVEit server to the Ipswitch Analytics system at a later time, install another Agent and purchase an add-on Agent license. For more information, see How to Buy. |
Other information |
It is not necessary to stop the MOVEit server to install an Agent, because the installation process does not significantly affect MOVEit Transfer or MOVEit Automation system performance. |
To install an Analytics Agent:
Recommended:
Caution: Do not specify a destination on the desktop. Click Next.
Click Next.
Note: This dialog box appears only if you selected MOVEit Automation or MOVEit Transfer in the Analytics Agent Type dialog box.
Windows: SQL Server logon will use Windows authentication. If you select this option, username must be entered in the DOMAIN\User format.
SQL: SQL Server logon uses a separate user/password created specifically for logon to the SQL Server database.
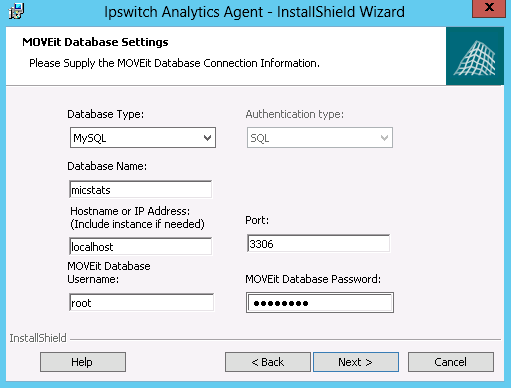
Note: If you are installing the Agent on a machine that contains an SQL Server database with multiple instances on the same server, the Hostname or IP Address field prepopulates with the default value used by MOVEit Automation or MOVEit Transfer (for example, localhost\instance1). You can enter a different instance. If the machine does not contain MOVEit Transfer or MOVEit Automation, you must enter the instance name manually.
Note: If the MOVEit database is using a non-standard port number, you must remove the default port number and replace it with the non-standard port number.
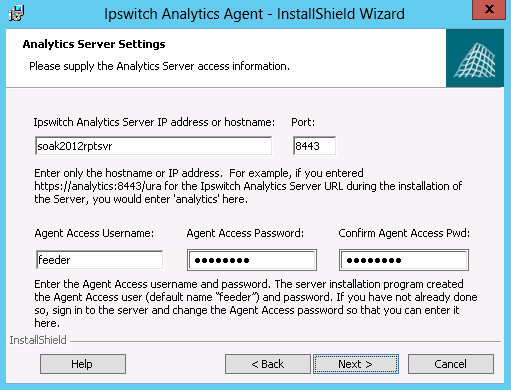
For an SQL Server database: The Authentication Type you selected in a previous step determines what user credentials you enter here. Windows authentication requires that the username be in the DOMAIN\User format.
Tip: If you cannot locate the username and password to the MOVEit database, look in C:\MOVEitDMZ_Install.INI file (MOVEit Transfer) or C:\MOVEitCentral_Install.INI file (MOVEit Automation).
Tip: If the connection to the database fails, make sure that your firewall is open.
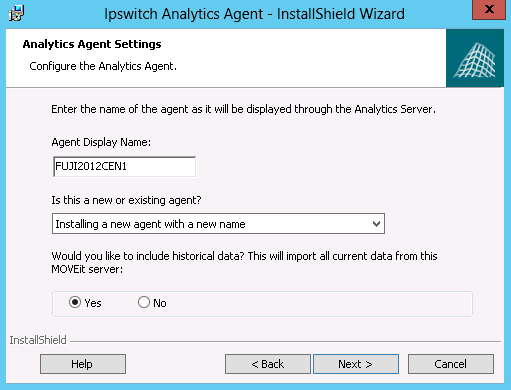
Tip: Use the MOVEit Automation name in the Agent Display Name so that in the Ipswitch Analytics interface, users can identify data that comes from this MOVEit server.
The next field appears only if you selected MOVEit Transfer or MOVEit Automation in the Analytics Agent Type dialog box.
See the subsection About historical data, below.
Tip: This selection pertains only to the agent you are currently installing and its corresponding server. You might want some servers to include historical data but not others. You can select a different option when you install other agents.
Click Next.
Tip: If the connection to the database fails, check that your firewall is open.
Note: If you click Cancel, the installation stops, but the Agent installation folder remains in the installation directory that you selected. You can safely delete the Analytics Agent directory to remove any files that remain after an interruption of the installation process.
To view the installer log after the installation finishes, select the checkbox.
To view the log at another time: the log is located in a temp directory in the user's AppData folder. For example, C:\Users\Administrator\AppData\Local\Temp\n\MSIstring.log (where n is a number, and string is an alphanumeric string).
The Ipswitch Analytics Agent service is now running on this machine and immediately starts to report data to the Ipswitch Analytics Server. To disconnect this Agent, see Licensing in the Ipswitch Analytics Administrator Guide.
To install another licensed Agent for a different MOVEit database, repeat this procedure (Step 4: Install an Analytics Agent).
About Historical Data
Note: Historical data can be included for MOVEit sources.
If during the Agent installation, you chose to include historical data, it might take some time (a few minutes to a few hours) to retrieve the historical data and send it to the Ipswitch Analytics server. While the data is being captured, the MOVE it server continues to operate, and you can use Ipswitch Analytics. However, because data capture is a "trickle" process, some historical data cannot be viewed until the data capture process is complete. You are not notified when the Agent finishes including all historical data. To verify that the historical data capture process is complete, run a report for a time range in the past.
If you have a large number (more than 10) Analytics Agents to be connected to the Analytics Server, the server might face heavy data volume from the agents if they all feed historical data at the same time. To make the initial data loading process run more smoothly, start the agents by smaller groups of 10 agents. Start the second group after the first group has finished loading historical data. After the historical data is loaded, the data volume returns to normal levels and all agents can stay up. Users can then start to use the Analytics Server.