Adding an End User Monitoring component
The End User Monitoring (EUM) component allows you to monitor the success of a specific automated user activity based on a script you enter when initially configuring the component using the End User Monitoring component boxes. To add an EUM component to an application profile, you must first install and register iDrone on a machine other than your WhatsUp Gold server. For information on installing and configuring iDrone, see Installing and Configuring iDrone. The script entered during EUM component configuration can be written manually or generated using the iMacros browser add-on. For information on iMacros, see Using the iMacros add-on with iDrone.
Please note, when using a non-standard port with WhatsUp Gold, in addition to configuring the EUM component in APM, you must also configure the plug-in to use the EUM component/iDrone in the Application Settings.
Note: Adding components to an application profile helps create the foundation of the application profile. After adding components to an application profile, you must create an application instance to monitor an application on a device. Learn more about APM terminology.
To add an EUM component to an application profile:
- From the WhatsUp Gold web interface, go to APM > Configuration. The All Application Profiles page appears.
- Select the application profile for which you want to add a component, then click Edit/View Application Profile. The Components list appears.
- Click Add Components.

The Component Library appears.
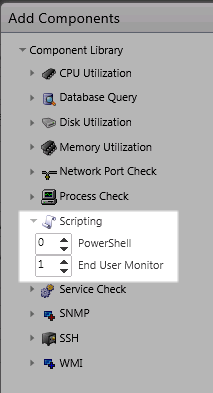
- Click the arrow next to Scripting to expand the dialog controls used to add the component(s).
- Specify the number of components you want to add by clicking the up and down arrows next to End User Monitor.

- Click Add Selected.
- Click browse (...) next to the TEST Device box to launch the Select a Device dialog.

- Select a device from the navigation tree on which to test the individual component and click OK.
- Click Test to test the component on the selected device (optional). To remove the device override and revert to the device associated with the application component, click
 .
.Note: If no test device is selected, the component is tested on the test device associated with the application profile.
Test devices are not saved as part of the application profile.
- Enter or select the appropriate information in the End User Monitoring component boxes.
- Click Save to save your changes or click Save and Close to complete your changes.
To add an End User Monitoring component to an application instance:
- From the WhatsUp Gold web interface, go to APM > Configuration. The All Application Profiles page appears.
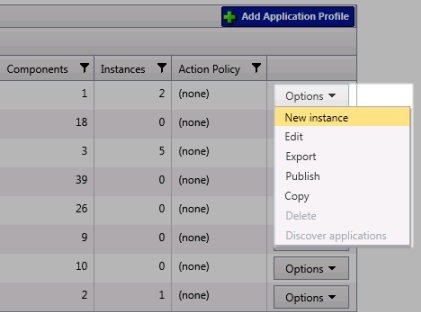
- Select New Instance from the Options list associated with the application profile you want to edit.

The Configure Application Instance page appears.
- Click Add Components. The Component Library appears.
- Click the arrow next to Scripting to view scripting component options.
- Specify the number of components you want to add by clicking the up and down arrows next to End User Monitor. You can also enter a number in the End User Monitor box manually.
- Click Add Selected.
- Enter or select the appropriate information:

- Enabled. Select this option to enable or disable the component.
- Action Policy. Select an action policy from the list for the component.
- Device Override. (Optional) Override the device associated with the instance and designate a specific device to assign to the component.
- Click browse (...) next to the Device Override box to launch the Select a Device dialog.
Important: If the device you want to use is configured with a WhatsUp Gold down dependency, make sure that you use a cloned device for this device selection in the APM plug-in. For more information, see the Dependencies overview.
- Select a device from the navigation tree on which to test the individual component and click OK.
- Click Test to test the component on the selected device.
- Click browse (...) next to the Device Override box to launch the Select a Device dialog.
Note: Click
 to remove the device override and revert to the device associated with the application instance.
- iDrone Name. Select a previously installed and registered iDrone from the list.
- Enter or select the appropriate information in the End User Monitoring component boxes.
- Click Save to save your changes or click Save and Close to complete your changes.