
Migrating from WhatsUp Gold 2016 to 2019
In this File
About upgrading
Thank you for upgrading to WhatsUp Gold 2019! This guide is intended to highlight several changes Ipswitch has made to the user interface between the releases of WhatsUp Gold 16 and WhatsUp Gold 2019 as well as guide you through the steps to follow after the upgrade installation. Please note, after WhatsUp Gold 2019 has been successfully installed, several features and functions previously found within the NM Admin Console application can now be found in the web interface.
Important: We recommend clearing your browser's cache and local storage to reduce potential problems loading icons or style definitions. This should be done each time you use the same browser to switch between versions of WhatsUp Gold.
After WhatsUp Gold 2019 has been installed, there are four main areas of the application which need to be addressed. They are as follows:
- Update your device information.
- Migrate your dashboard views.
- Configure your scheduled reports.
- Review your custom maps.
Step 1: Update your device information
WhatsUp Gold 2019 supports additional device types and brands, collects rich device information, offers several new monitors, and provides new tools for monitoring and analysis. In order to take full advantage of these new capabilities, you'll need to update, refresh, or rescan your devices depending on your network monitoring needs and specific environment.
Roles and sub-roles
In WhatsUp Gold 2019, each device discovered is assigned a single primary role and multiple sub-roles based on data gathered from that device during the discovery scan. To refresh device details, including assigned roles and sub-roles, select Refresh Device Details from the action menu (![]() ) found at the top of the device/group tree. This will refresh device details for every device in the selected device group. You can also select a specific device or device(s) on the map, then select Refresh Device Details from the action menu found on the device information card or the right-click menu.
) found at the top of the device/group tree. This will refresh device details for every device in the selected device group. You can also select a specific device or device(s) on the map, then select Refresh Device Details from the action menu found on the device information card or the right-click menu.
Please note, refreshing device details is not the same as rescanning a device. Refer to the following table for additional details on the differences between the two actions and which scenarios best apply to each.
Refresh Device Details |
Rescan Device |
Best option for refreshing Host, System and Inventory Information. Overrides made in Device Properties (such as display name, OS or Brand) will be preserved. |
Best option for adding recently added monitors configured with the Use In Rescan option. |
|
|
For syncing inventory information, you can apply the Keep Details Current for this device. |
Please note, only credentials already applied to the selected device are used to determine which monitors may be applied during the rescan. If the device does not pass preconditions for the monitor (such as the presence of specific MIB objects), no monitor is added. |
For additional information on roles and sub-roles, see Managing Detection Categories (Device Roles).
Virtual
In addition to the WhatsVirtual data from earlier versions, WhatsUp Gold 2019 maps and maintains 'parent-child' relationship details for virtual machines, hosts, and management servers. Please see below for additional details on how WhatsUp Gold 2019 handles refresh and rescan actions depending on the virtualization device type:
Hyper-V
A normal device refresh/rescan reveals the roles of virtual devices and relationships between hosts, virtual machines, and management servers (e.g, vCenter). If device roles are present, but relationships are not, rescan the parent device (or management server) at the same time as its hosts/VMs.
VMware/vCenter
A normal device refresh/rescan reveals the roles of virtual devices and relationships between Hyper-V hosts and virtual machines. Note that having VMware tools installed on your monitored virtual machines can provide WhatsUp Gold with more detailed and integrated performance monitoring and reporting data (e.g., Disk IO operations).
For more information, see Running Discovery, Discovering Virtual Devices, and Monitoring Virtual Machines and Infrastructure.
Step 2: Migrate and configure dashboards and reports
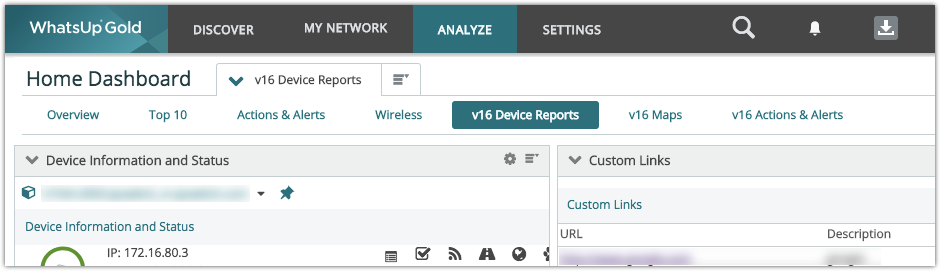
WhatsUp Gold 2019 installation asks if you want to migrate your existing v16 dashboard views to WhatsUp Gold 2019. If you choose to do so, your migrated dashboards will appear next to the default views in Home Dashboard or Device Status Dashboard in the new user interface. These can by found by selecting Analyze > Dashboards from the main menu.
Note, all dashboard views for all user accounts are migrated from one version to the other. Make sure you are logged in using the correct user account to view the dashboards. For each of your v16 custom dashboard views, an equivalent version is created in WhatsUp Gold 2019. In the event a specific report is no longer supported or has been merged with another report, a blank dashboard report with the same v16 title will be displayed. In some cases, we may refer you to a different report to use for similar information.
Tip: If you choose not to migrate your dashboard views during WhatsUp Gold 2019 installation, you can still migrate tour dashboards at any time using the command line interface. Expand the section below for instructions on how to do so as well as to see additional important information about the dashboard migration utility.
For additional detail about the dashboard migration process, see here.
While most report settings are migrated without issue, some may not be fully compatible with the latest version of WhatsUp Gold. If any of your reports do not retain its original configuration, please adjust affected settings as needed to fully restore your custom dashboard views and individual reports. Click the report settings icon (![]() ) to access configuration options for any given report.
) to access configuration options for any given report.
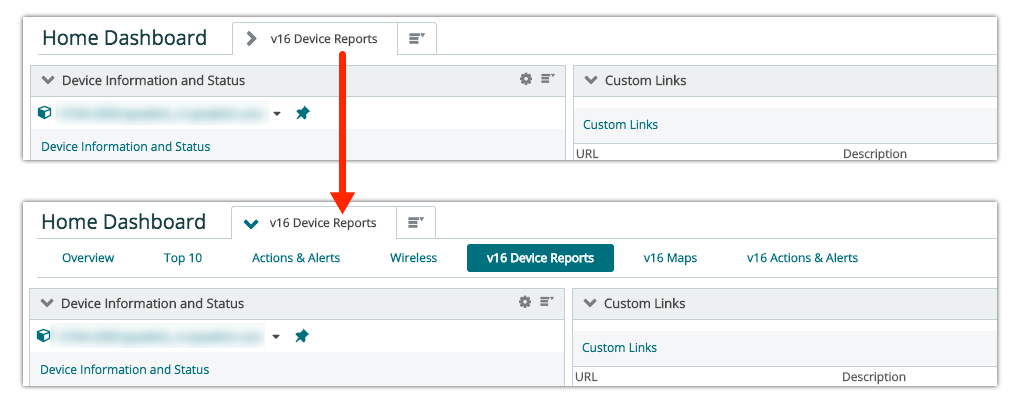
You can further customize your dashboard views by doing the following:
- Expand/Collapse the dashboard view tabs by selecting the (
 ) icon.
 - Drag borders to adjust the column width and row height of any report.
For additional information, please review the Dashboards Overview and Configuring Dashboards and Reports video content as well as Create NOC Views and Custom Dashboards in the WhatsUp Gold help.
Additional information about dashboard migration
Beginning with the WhatsUp Gold 2018 Service Pack 2 release, the WhatsUp Gold now has the ability to migrate all users’ existing dashboards and reports as well as most report settings and configurations.
Please note, some report settings may not be fully compatible with the latest version of WhatsUp Gold. In this case, affected settings must be adjusted following migration to fully restore dashboard views and individual reports to their previous configuration.
Also, note that scheduled report functionality is not currently supported by the migration tool. Any scheduled reports will need to be recreated for each migrated dashboard.
If you are upgrading to WhatsUp Gold 2019 from WhatsUp Gold 2016 or its service packs, select Advanced Installation options when running the installation program to initiate the upgrade. During the upgrade process, you'll be presented with the option to migrate your dashboards and reports.
If you choose not to migrate during upgrade, you can still run the migration tool using the command line interface post-installation.
To run the migration tool using the command line interface:
- From your Ipswitch “WhatsUp” install folder, launch a command window and run the following command:
MigrationUtility.exe –m –t 2 –p runAnalysisOnly=false - After the migration tool runs, you can review the resulting log file to check for any errors that may have occurred during migration. From the
Ipswitch/WhatsUp/Data/Logsfolder, open theMigrationUtility.logfile and review the “Migration Results Summary” section at the bottom of the file.
This migration tool is also available to any users who upgraded to WhatsUp Gold 2017 or later. Use the instructions above to run the migration tool and restore any v16.x dashboards and reports.
Step 3: Configure scheduled reports
While actions and policies originally configured in your v16 setup are retained following upgrade to WhatsUp Gold 2019, scheduled reports are not. Once installation is complete, please reconfigure scheduled exports by navigating to the applicable report. Select Export > Schedule Export from the action menu (![]() ) found at the top of a dashboard view and configure report export settings as needed. All scheduled exports can be found by selecting Scheduling Activities > Scheduled Reports from the Settings menu. The Scheduled Reports Library allows you to enable/disable, edit, or delete existing export schedules.
) found at the top of a dashboard view and configure report export settings as needed. All scheduled exports can be found by selecting Scheduling Activities > Scheduled Reports from the Settings menu. The Scheduled Reports Library allows you to enable/disable, edit, or delete existing export schedules.
For more information, see Scheduled Reports Library.
Step 4: Review custom maps
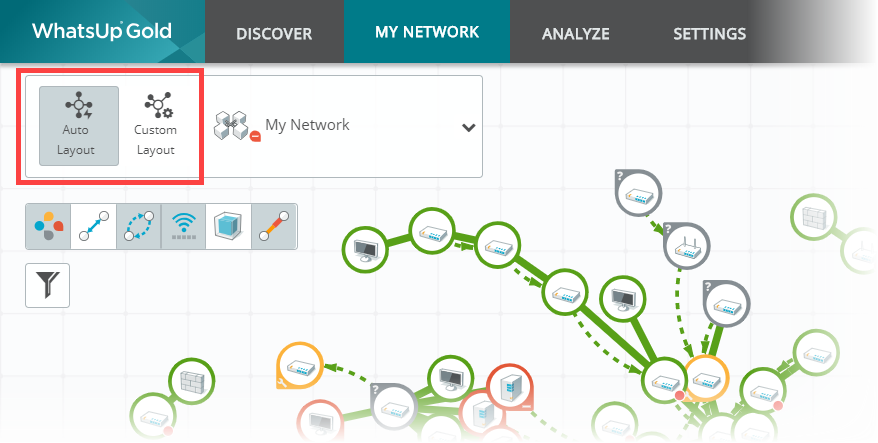
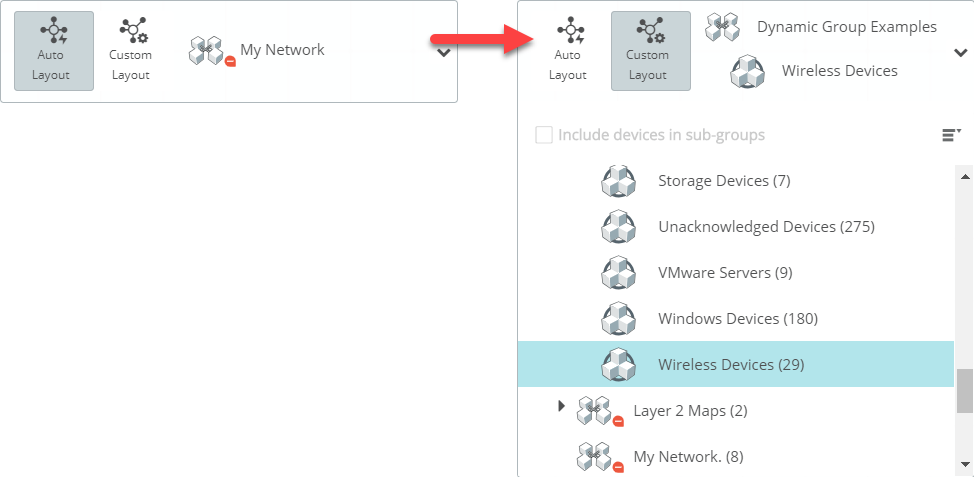
In WhatsUp Gold 2019, there is an additional map view for visualizing your devices. The Auto Layout map automatically arranges the devices and provides a new way to see devices in sub-groups. By default, the "My Network" group displays all the devices in your network at once, rather than displaying the sub-groups as folders on the map. You can deselect the Include devices in sub-groups option to view sub-groups on the map, similar to folders in version 16.
To access your custom map for a selected group, click Custom Layout. We recommend reviewing the accuracy and completeness of your device group custom map views. Some custom map elements originally configured in the v16 admin console, such as certain links and annotations, may not be retained following the upgrade to WhatsUp Gold 2019. For more about editing custom maps, see Customizing your map view.
Enter edit mode by clicking the Edit icon (![]() ) at the lower right corner of the screen. Recreate any custom links between devices and annotations by selecting any two nodes on the map, then clicking Add a custom link from the device information card.
) at the lower right corner of the screen. Recreate any custom links between devices and annotations by selecting any two nodes on the map, then clicking Add a custom link from the device information card.
What's different about WhatsUp Gold 2019?
Navigation
One of the most noticeable difference between the current version of WhatsUp Gold and previous releases is the organization of features and functions within the application. Most individual 'plug-in' type functions like FlowMonitor, Wireless, Virtual, Configured and APM that were previously separated out across the main menu have been integrated into one simplified menu.
- Discover contains anything discovery-related, including settings, scan history, and a map of discovered devices.
- My Network goes directly to the map (or list) view.
- Analyze contains all dashboards and reporting functions, as well as logs and tools.
- Settings contains WhatsUp Gold configuration options, actions/alerts, libraries, users/user groups, scheduling, and 'plug-in'-specific settings.
Please see (User Interface) in the product help for more detailed information.
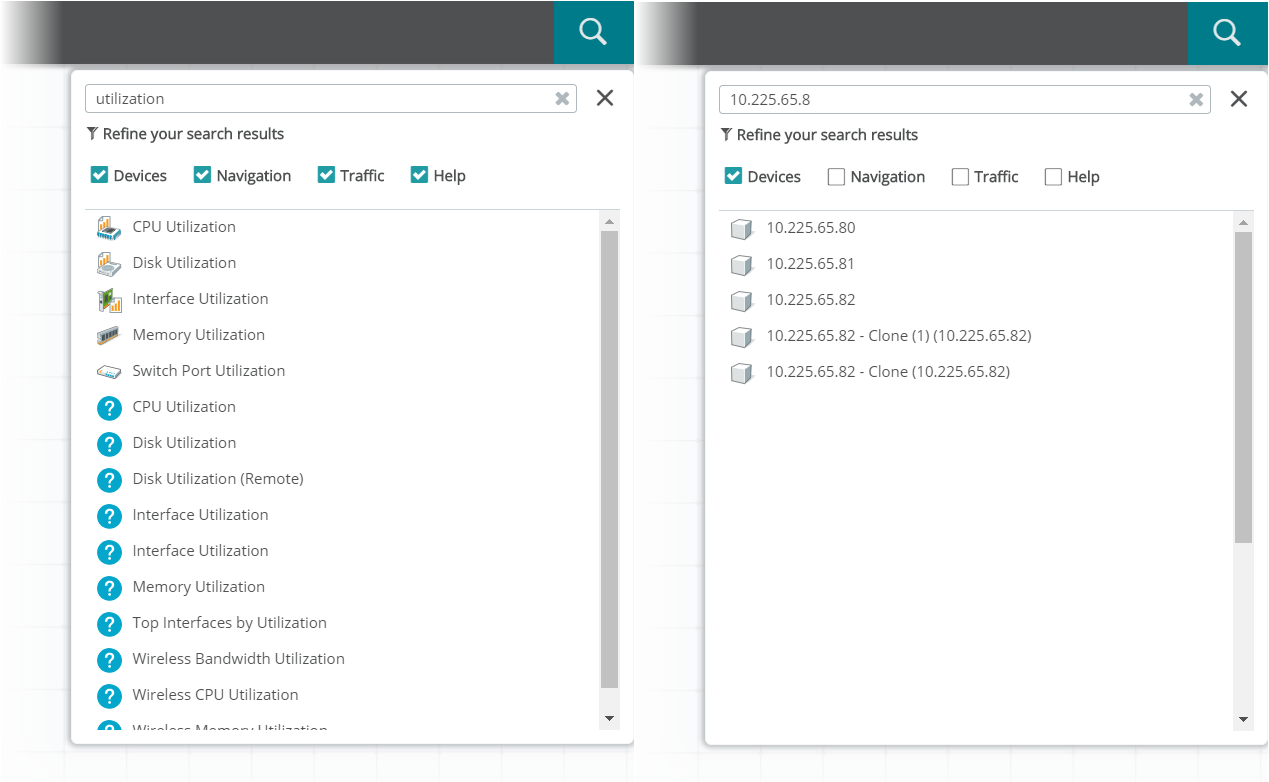
Global Search
Use the global search (![]() ) in the main menu to find devices, help topics, or application features such as reports.
) in the main menu to find devices, help topics, or application features such as reports.
Discovery
Discovery is now faster, more accurate, and offers you more control when attempting to scan for devices within your network. We've also simplified the discovery workflow for ease of use. The New Scan interface now consists of the following main categories:
- Choose your starting device set.
- Select credentials for the scan.
- Configure additional/advanced options.
- Review scan settings and run discovery.
For additional information on the WhatsUp Gold New Scan interface, see Initiating a Discovery Scan.
Select Discover > Discovered Network to view discovered devices on the map and see the progress of active discovery scan(s) in the lower left corner of the map view (or in the left panel of the list view). When the scan has completed, you'll need to select the discovered devices you want to monitor. Select the applicable device(s) on the map or list, then select Start/Update Monitoring.
Please note, the Discovered Network Map and corresponding Device List display cumulative results of all completed discovery scans. To view devices associated with a single scan, use the filter to select the recent scan.
Roles and Sub-roles
Roles assigned during discovery determine which attributes, monitors, and actions are automatically assigned to each device. Role assignments determine how WhatsUp Gold classifies devices detected during discovery and what device icons are displayed on the map. You have the ability to customize as well as create new roles and sub-roles within the Roles and Sub-roles Library.
Enhanced Device Map
By default, My Network presents your device inventory as a single integrated network map showing all monitored devices. Map icons are arranged automatically based on the information WhatsUp Gold receives during discovery (Auto Layout). However, you can enable Custom Layout to further customize the map view by rearranging icons, creating custom links, adding graphics and annotations, etc. Use the three main controls in the top left to adjust what you see in the map or list.
- First, expand the device/group tree and select a specific static or dynamic device group to display.
- Second, enable/disable the desired map overlays; available overlay options include devices, connectivity and link status, device dependencies, wireless, virtualization, and interface utilization links.
![]()
- Third, apply additional filters to further refine your map view. There are several filtering options that may be applied individually or collectively. For additional information on the extensive filtering capabilities of WhatsUp Gold 2019, please see Device Filtering.

Finally, if you prefer a list view more reminiscent of the v16 interface, you have the option to launch a device list in either partial or full-screen view using the Device List control at the lower right corner of the screen.