![]()
![]()
![]()
![]()
|
|
|
|
|
To create a template, you can:
The template editor contains a Palette and a Canvas.
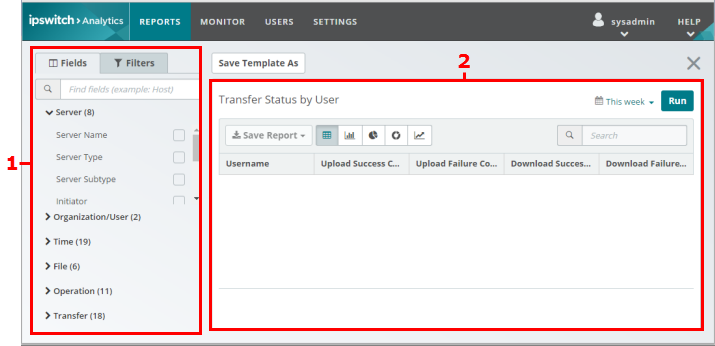
1. Palette
Fields tab: Area where you select the data fields to include in the template. Initially, the Fields palette is empty. Each field that you click in the palette appears as a column header in the canvas.
Filter tab (unselected in the figure): Area where you optionally filter data by MOVEit sources.
2. Canvas
The main workspace that contains all of the template's data fields, placed as column headers. New templates do not contain any fields.
Template Editor Actions
To |
Do this |
Show summary or detailed fields in the palette |
This option is available when you are creating a new template. In the Report Output dropdown box, in the upper right corner of the screen, select Summary or Detailed.
Only fields that are specifically Summary or Detailed fields are affected by your selection. Warning: You will lose all fields that you have already added to the template if you change the Report Output |
Add fields to a template |
In the palette, click the Fields tab, and then click the plus sign (+) next to the field name. The field that you click appears as a column in the template canvas. To see a description of the type of data that the field displays in a report, hover over the field name in the palette. For more information, see Field Definitions. |
Remove fields from a template |
In the palette, clear the checkbox for the field. |
Change the layout of field columns |
Click and drag a column heading. |
Sort data in a column |
Click a column heading. Column sorting is available only in the template editor. Sort order cannot be saved in the report. To save a report with a specific column sort order, save to CSV file (see row, below), and use the column sorting feature in Excel® or similar tool. |
Filter a template |
A filter lets you choose to include or exclude data from only specific MOVEit sources and MS Exchange sources.
For details about filter fields, see Add a Filter. |
Add data visualizations to a template |
Click an icon for the chart type. You can add one of each type of chart: line, bar, donut, pie. For more information, see Add Data Visualizations. |
Run a template to produce a report |
|
Save a report |
|
Save a template |
Note: Time Ranges are not saved with the template. The time range selector affects only templates run inside the template editor. |