- Retrieve the public certificate file for the Ipswitch Analytics Server. You can do this on the Agent machine, or on the Ipswitch Analytics Server machine:
On the Agent machine:
- Open a browser to the Ipswitch Analytics Server IP address or hostname and accept the certificate.
- Go into your browser's settings to manage certificates and export the public certificate that is associated with the Ipswitch Analytics Server. The exported certificate must be in one of the following file formats: .pem, .cer, .crt, or .der.
- Place the exported certificate on the Agent machine's desktop or easily accessible file location.
– or –
On the Ipswitch Analytics Server machine:
- Copy c:\Program Files\Ipswitch\Analytics Server\apache-tomcat-7\certs\servercert.pem and place it on the Agent machine's desktop or other easily accessible location.
- On the machine where you want to install the agent, sign in with an account that has administrator privileges.
Recommended:
- For MOVEit Automation and MOVEit Transfer, install the agent on the machine that hosts the MOVEit database.
For MS Exchange, install the agent on any machine that has network connectivity with the Exchange server and the Ipswitch Analytics server.
- Download the appropriate Ipswitch Analytics Agent installation file, where n is the release number:
- 64-bit: Ipswitch_Analytics_Agent64_vn.exe
- 32-bit: Ipswitch_Analytics_Agent32_vn.exe
- Open the Ipswitch Analytics Agent installation file. Click Next.
- Accept the License Agreement. Click Next.
- Select a Destination Folder. Recommended: Use the default location.
Caution: Do not specify a destination on the desktop.
Click Next.
- Enter the Analytics Server Settings. The Agent forwards data from the MOVEit server to the Ipswitch Analytics Server that you specify here.
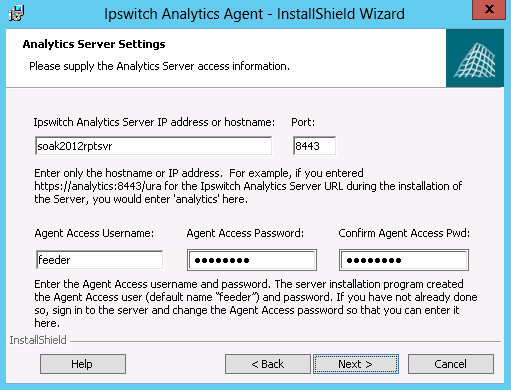
- Ipswitch Analytics Server IP address or hostname: (From the Tomcat Settings that you entered during the Server installation).
- Port: The port on which the Ipswitch Analytics Server accepts HTTPS connections. Default is 8443. Adhere to your IT security or other IT network policies when configuring ports.
- Agent Access Username: The username that the Agent uses to authenticate with the Ipswitch Analytics server. You specified this username during the Ipswitch Analytics server installation. See the Installation Worksheet.
- Agent Access Password: See the Installation Worksheet.
Click Next.
- Enter the Analytics Agent Truststore Settings:
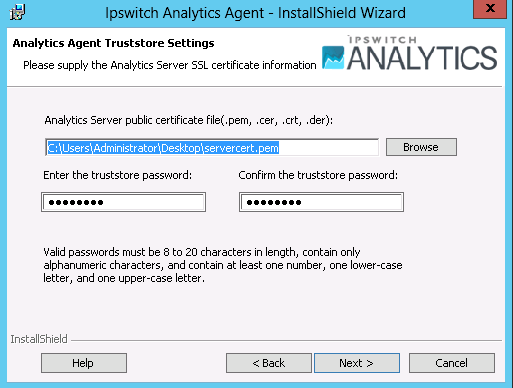
The installer creates the ‘ipswitchcerts’ truststore in /jre/lib/security.
Click Next.
- If the machine on which you are installing the Agent does not contain an installation of MOVEit Automation or MOVEit Transfer, select the MOVEit server type for which you are installing this Agent.
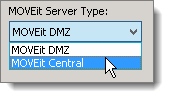
Click Next.
- Enter the MOVEit Database Settings.
- Note: This dialog box appears only if you selected MOVEit Automation or MOVEit Transfer in the Analytics Agent Type dialog box.
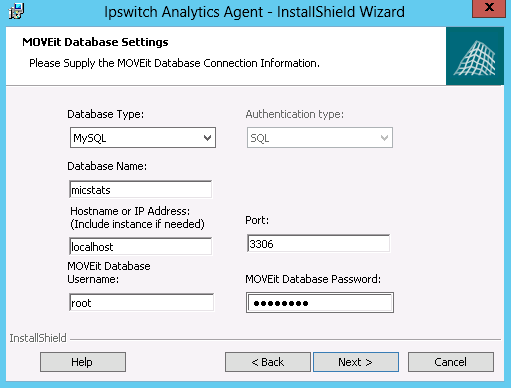
- Database Type: Select either MySQL or Microsoft SQL Server, depending on the type of database used by the MOVEit server you selected in the prior step.
- Authentication Type (SQL Server only): Select the authentication type that is used for logon to the SQL Server.
Windows: SQL Server logon will use Windows authentication. If you select this option, username must be entered in the DOMAIN\User format.
- SQL: SQL Server logon uses a separate user/password created specifically for logon to the SQL Server database.
- Database Name: The name of the MOVEit primary database.
- Hostname or IP Address: The location of the MOVEit primary database. The value you specify depends on your configuration:
- If the primary MOVEit database is on the same machine as the MOVEit server, value is localhost.
- If the primary MOVEit database and MOVEit server are on separate machines, the value is the Hostname or IP address of the machine where the database is located.
Note: If you are installing the Agent on a machine that contains an SQL Server database with multiple instances on the same server, the Hostname or IP Address field prepopulates with the default value used by MOVEit Automation or MOVEit Transfer (for example, localhost\instance1). You can enter a different instance. If the machine does not contain MOVEit Transfer or MOVEit Automation, you must enter the instance name manually.
- If you are installing the Agent on a machine that does not have MOVEit Transfer or MOVEit Automation, the default database name appears here (for example, moveitdmz).
- Port: The port that is used to connect with the MOVEit primary database. Default is the default port value for MSSQL/MySQL.
Note: If the MOVEit primary database is using a non-standard port number, you must remove the default port number and replace it with the non-standard port number.
- Username and Password: The username and password that allow access to the MOVEit primary database.
Tip: If you cannot locate the username and password to the MOVEit database, look in c:\MOVEitCentral_Install.INI file.
Click Next.
Tip: If the connection to the database fails, make sure that your firewall is open.
- Enter the Analytics Agent Settings.
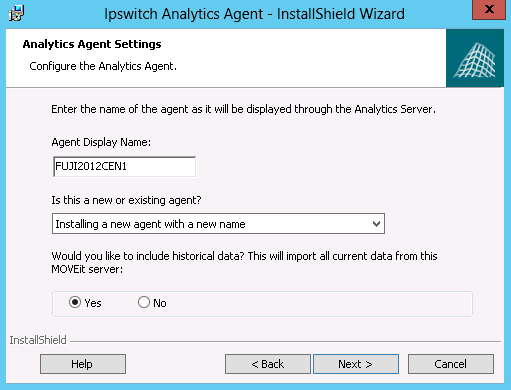
The next field appears only if you selected MOVEit Transfer or MOVEit Automation in the Analytics Agent Type dialog box.
- Would you like to include historical data? This will import all current data from this MOVEit server:
- Yes: Ipswitch Analytics includes all historical data from this MOVEit server.
- No: Ipswitch Analytics reports include data from this time forward only, and does include any past data from this MOVEit server.
- See the subsection About historical data, below.
Click Next.
- Review the installation setup, and then click Install.
Note: If you click Cancel, the installation stops, but the Agent installation folder remains in the installation directory that you selected. You can safely delete the Analytics Agent directory to remove any files that remain after an interruption of the installation process.
To view the installer log after the installation finishes, select the checkbox.
To view the log at another time: the log is located in a temp directory in the user's AppData folder. For example, C:\Users\Administrator\AppData\Local\Temp\n\MSIstring.log (where n is a number, and string is an alphanumeric string).
- Click Finish.